Toggling on Sprint or Version Swimlanes
The TeamRhythm story map is sliced horizontally by swimlanes. Depending on whether you’re using a Scrum or Kanban Board, these horizontal slices can be changed to show the Sprints from your Jira backlog, or Versions from your Releases page in Jira.
This gives you the flexibility to use the story map view for:
-
Sprint Planning
-
Release Planning
-
Retrospectives
The following swimlane types will be available to you based on your board type:
|
|
Single-project board |
Multi-project board |
|---|---|---|
|
Scrum board |
Sprint swimlanes Version swimlanes |
Sprint swimlanes only |
|
Kanban board |
Version swimlanes only |
No swimlanes |
|
Team-managed project |
Sprints/versions only available on the User story map if the features are enabled for the Jira project . |
N/A: team-managed projects cannot include cross-project boards |
Scrum Board - Sprint swimlanes
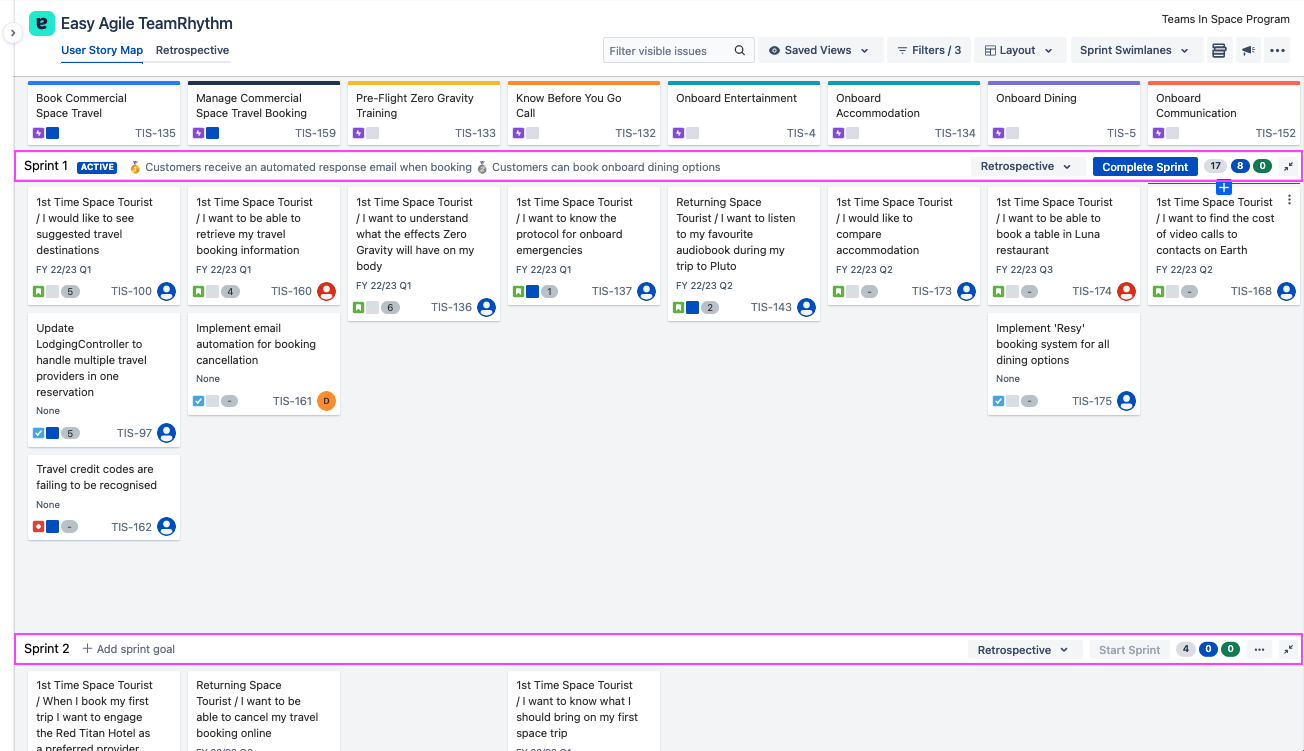
When a Team using a Scrum board first opens their User Story Map, they will see it sliced horizontally by Sprint swimlanes. These Sprints are pulled directly from your Jira backlog. The order of the Sprints on the Story Map reflects the order of the Sprints on your backlog.
Scrum Board - Version swimlanes
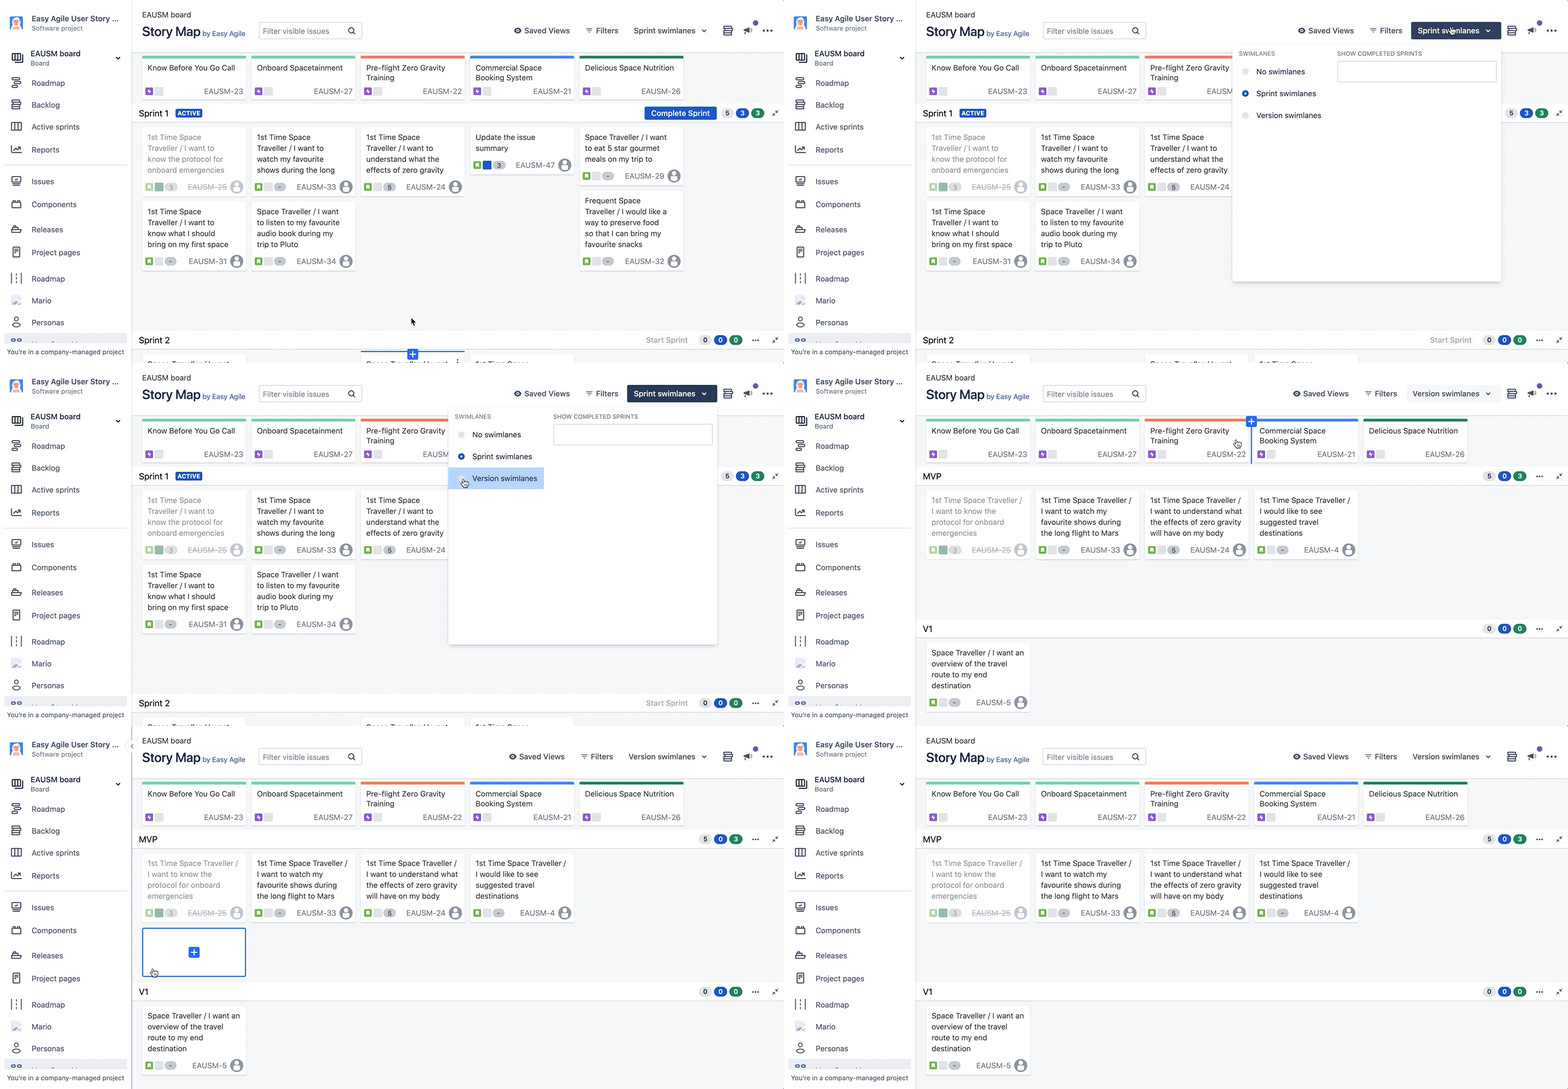
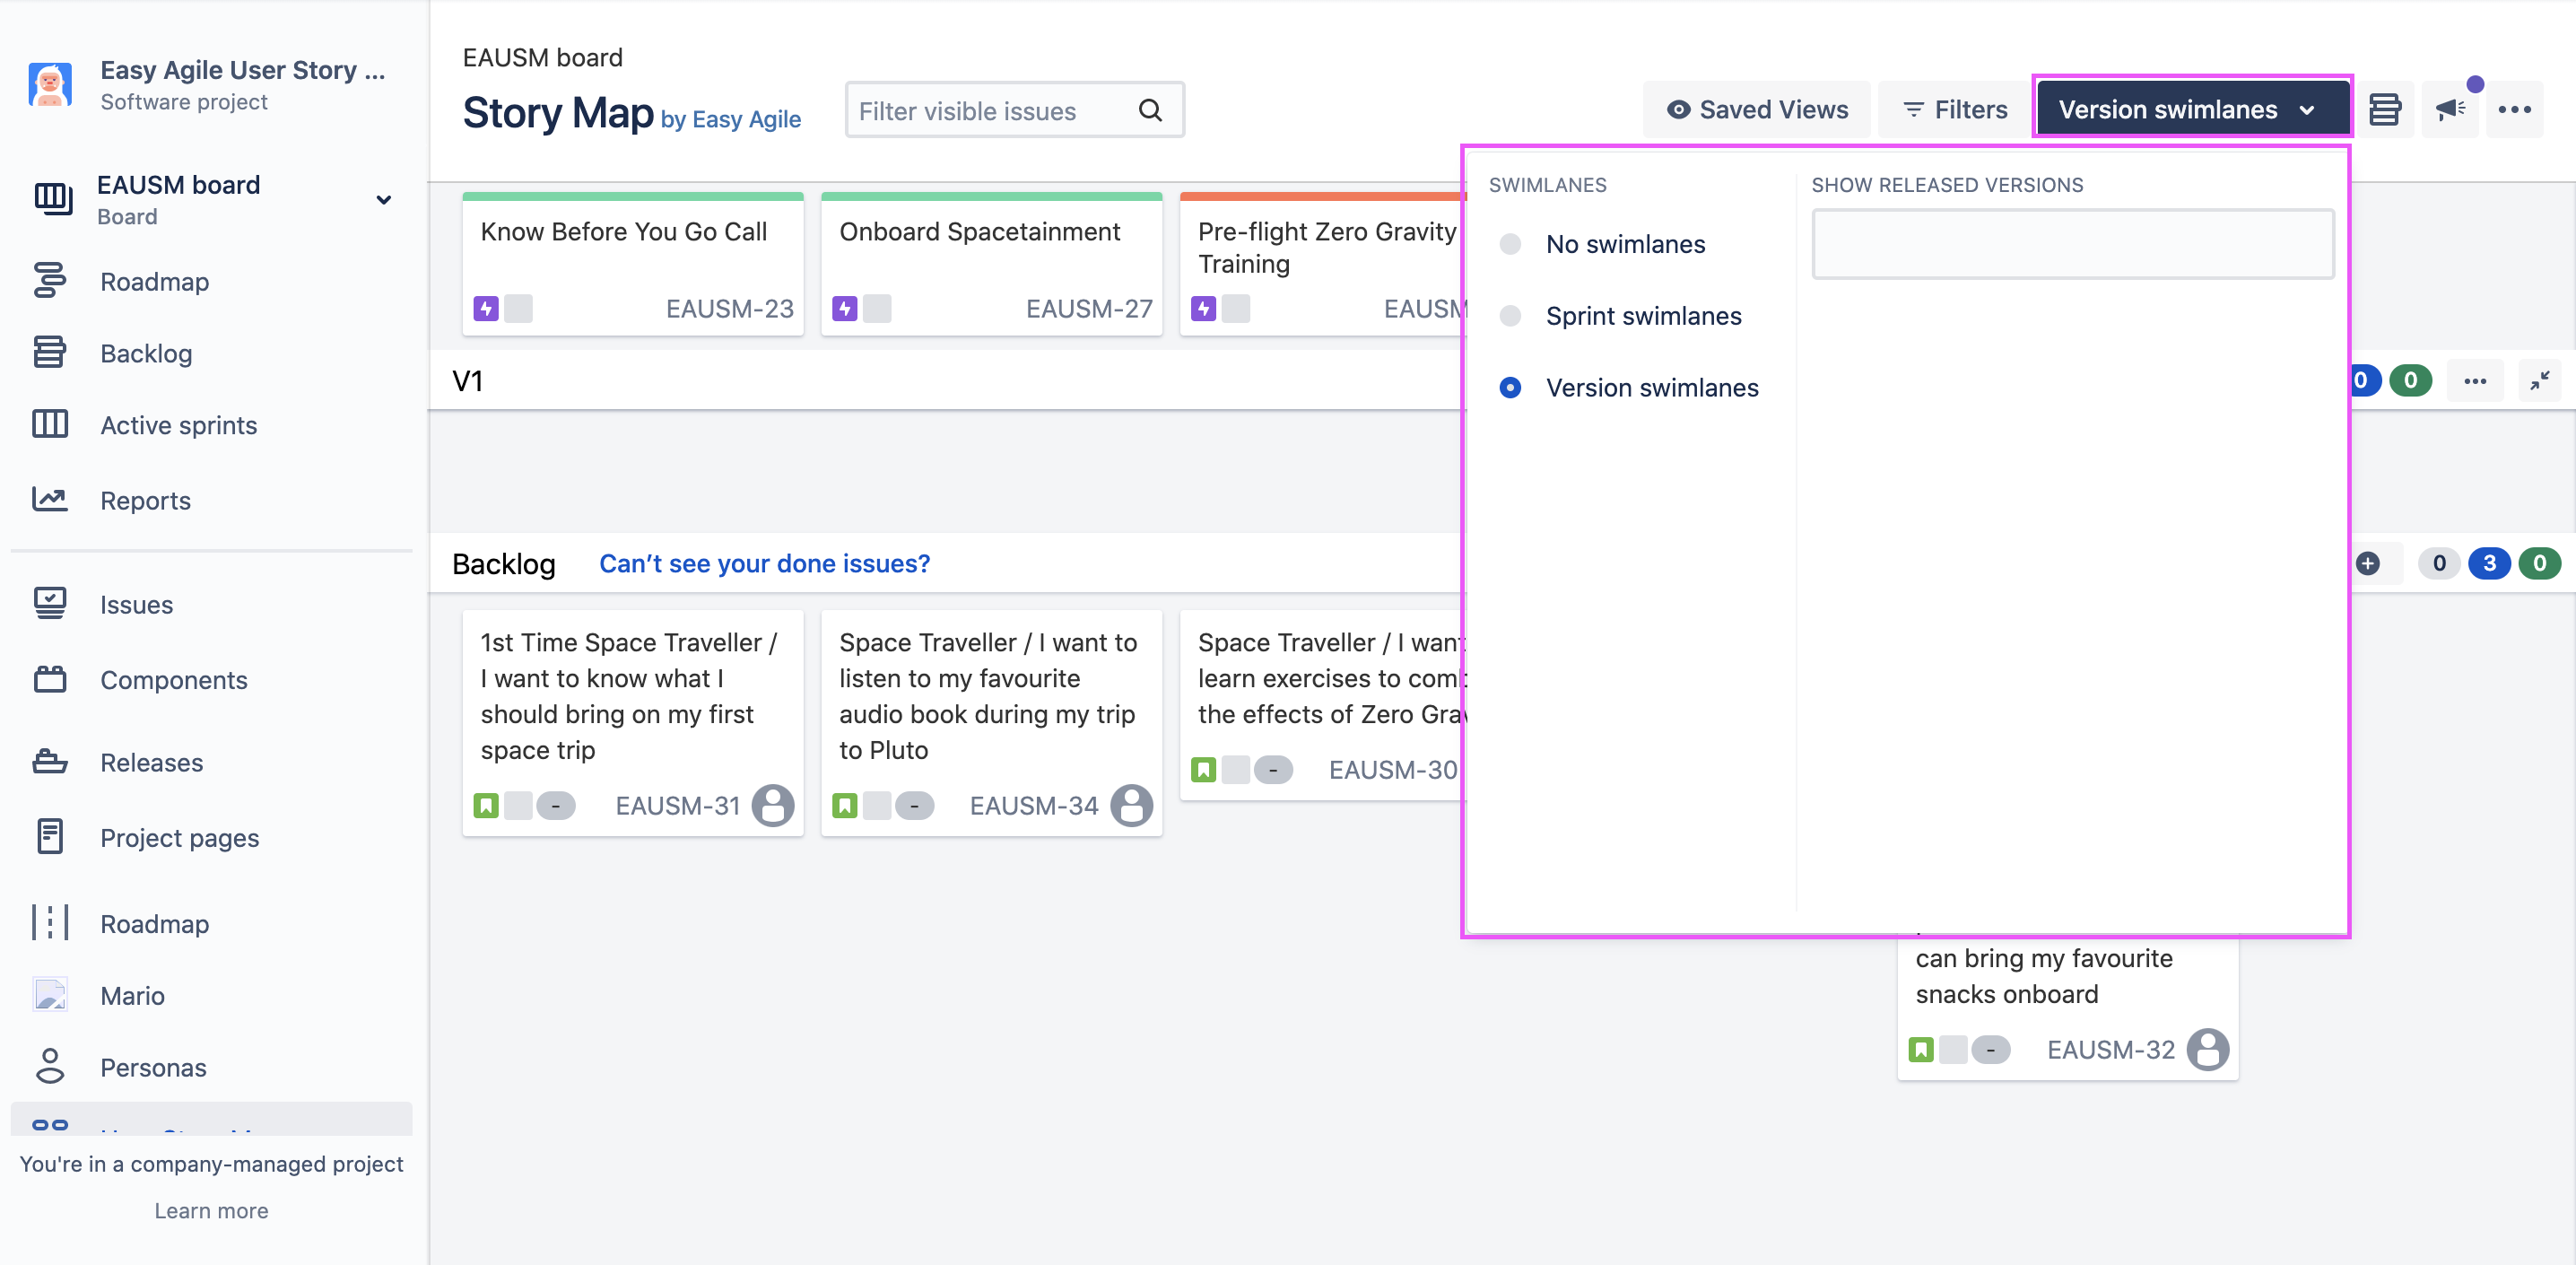
Teams using Scrum boards can also view their Versions as swimlanes on the Story Map. To change from Sprint to Version swimlanes, click on the Swimlanes dropdown in the top-right hand corner of the Story Map and select the Version swimlanes radio button:
Kanban Board - Version swimlanes
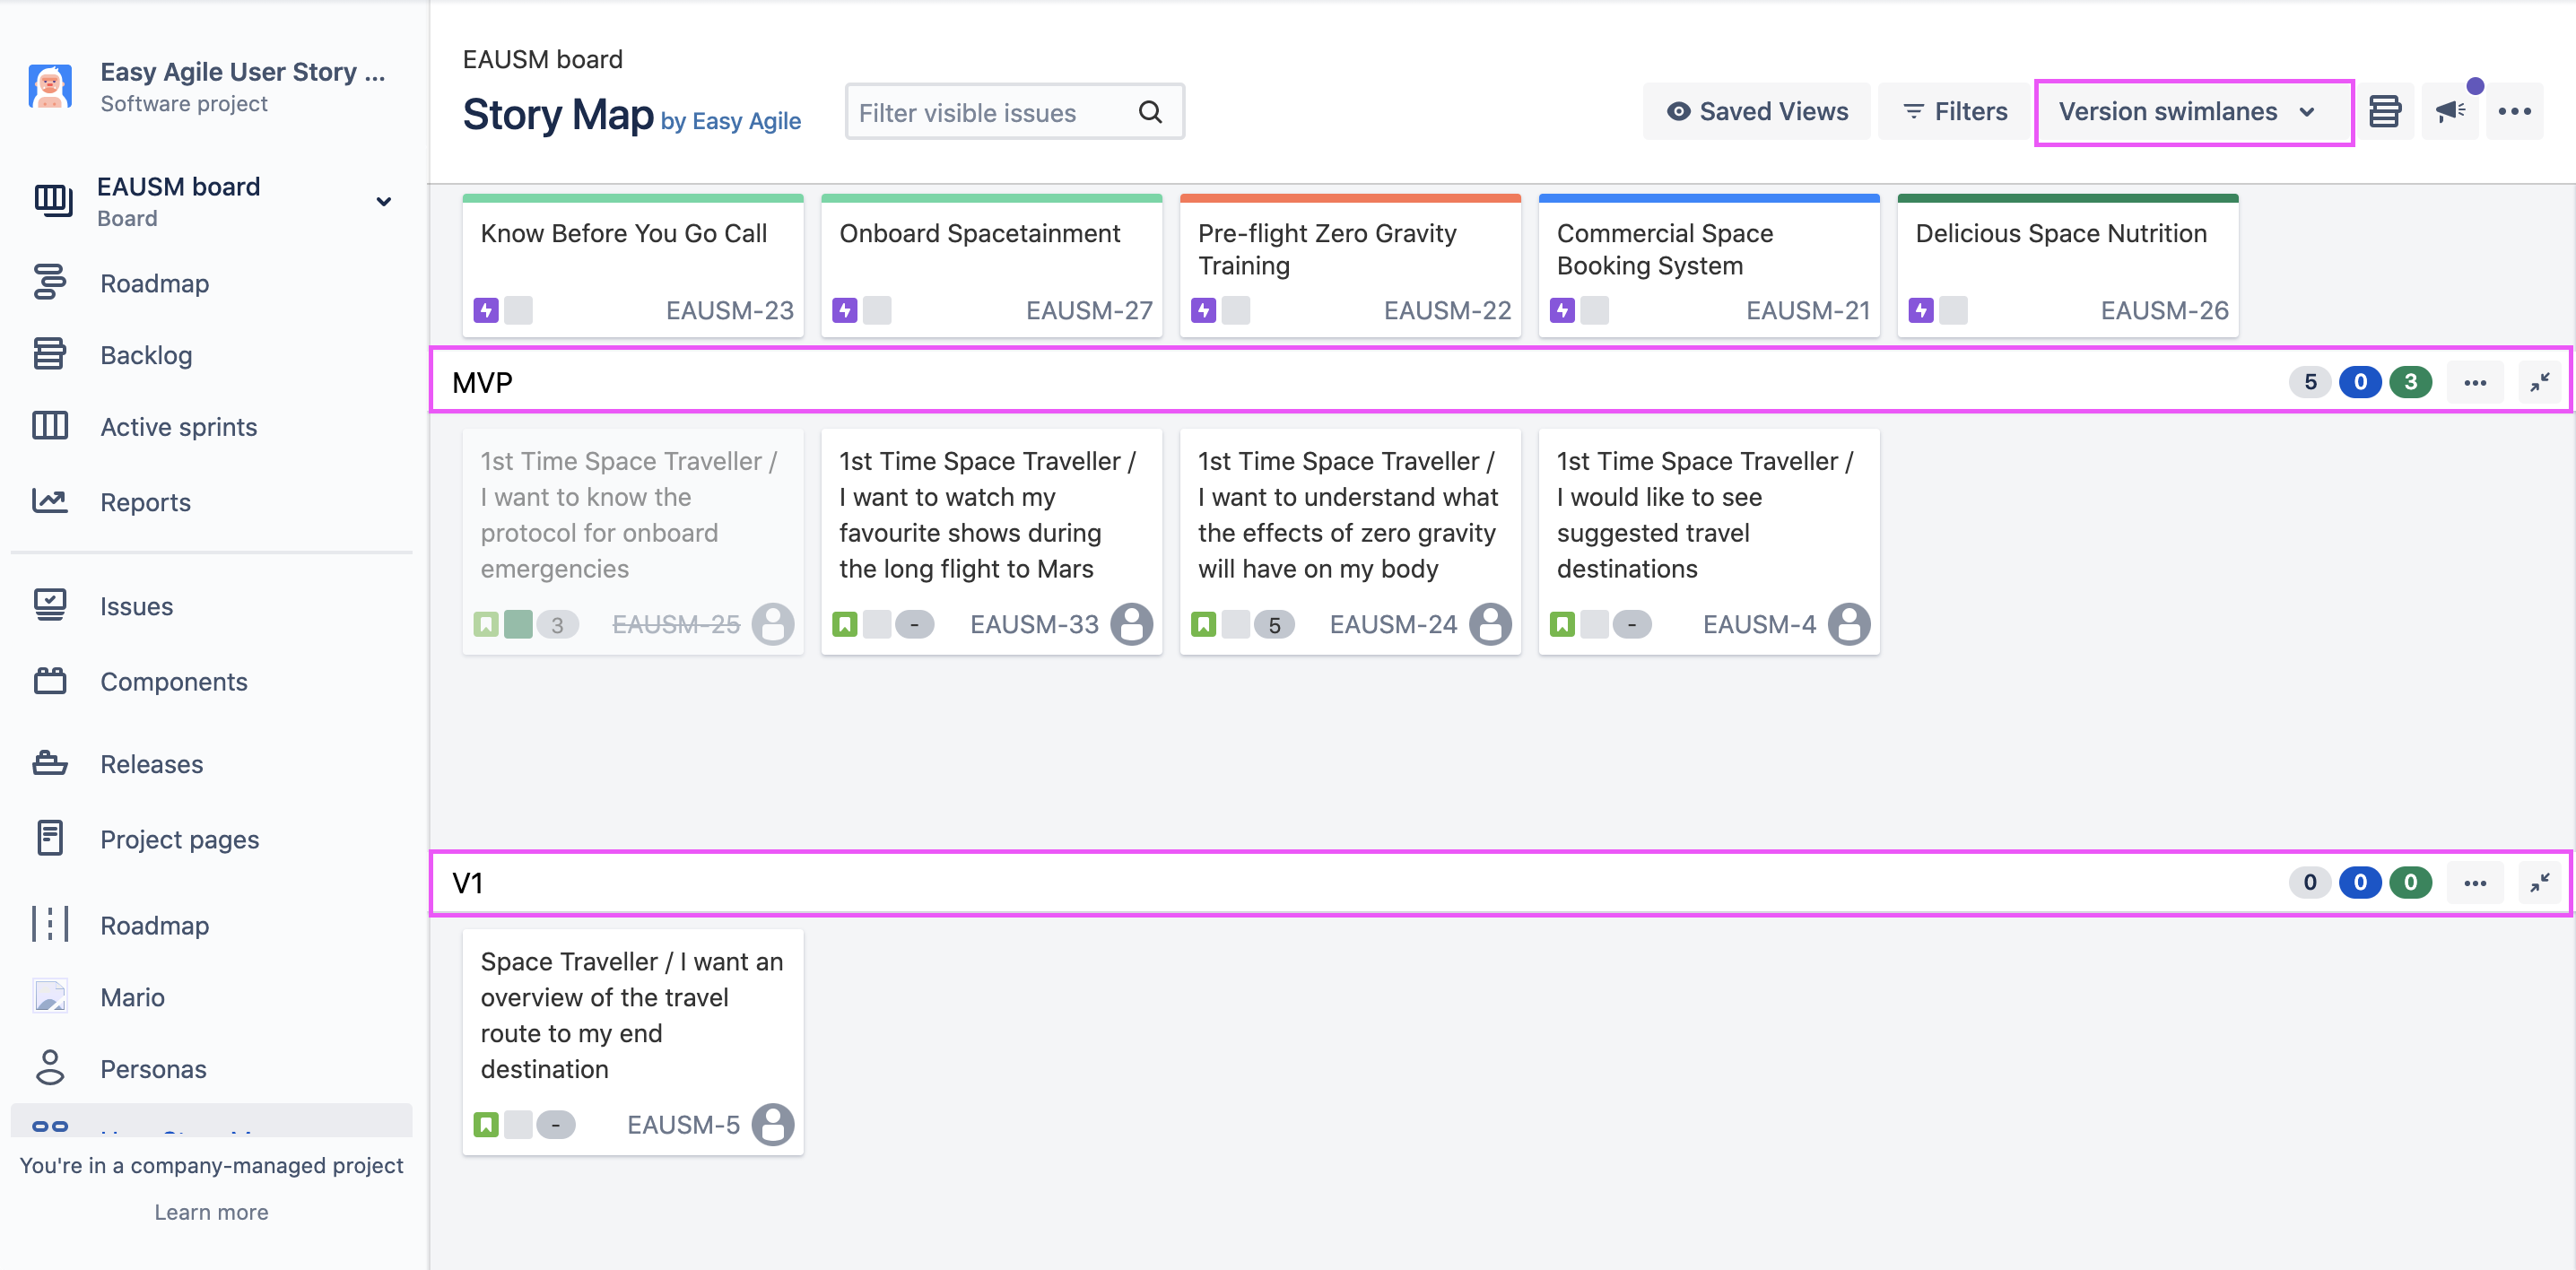
When a Kanban Team first opens their User Story Map, they will see it sliced horizontally by Version Swimlanes. These Versions are pulled directly from the Releases Page in Jira and are ordered by their Release date on the Story Map.
Scrum and Kanban Boards - No swimlanes
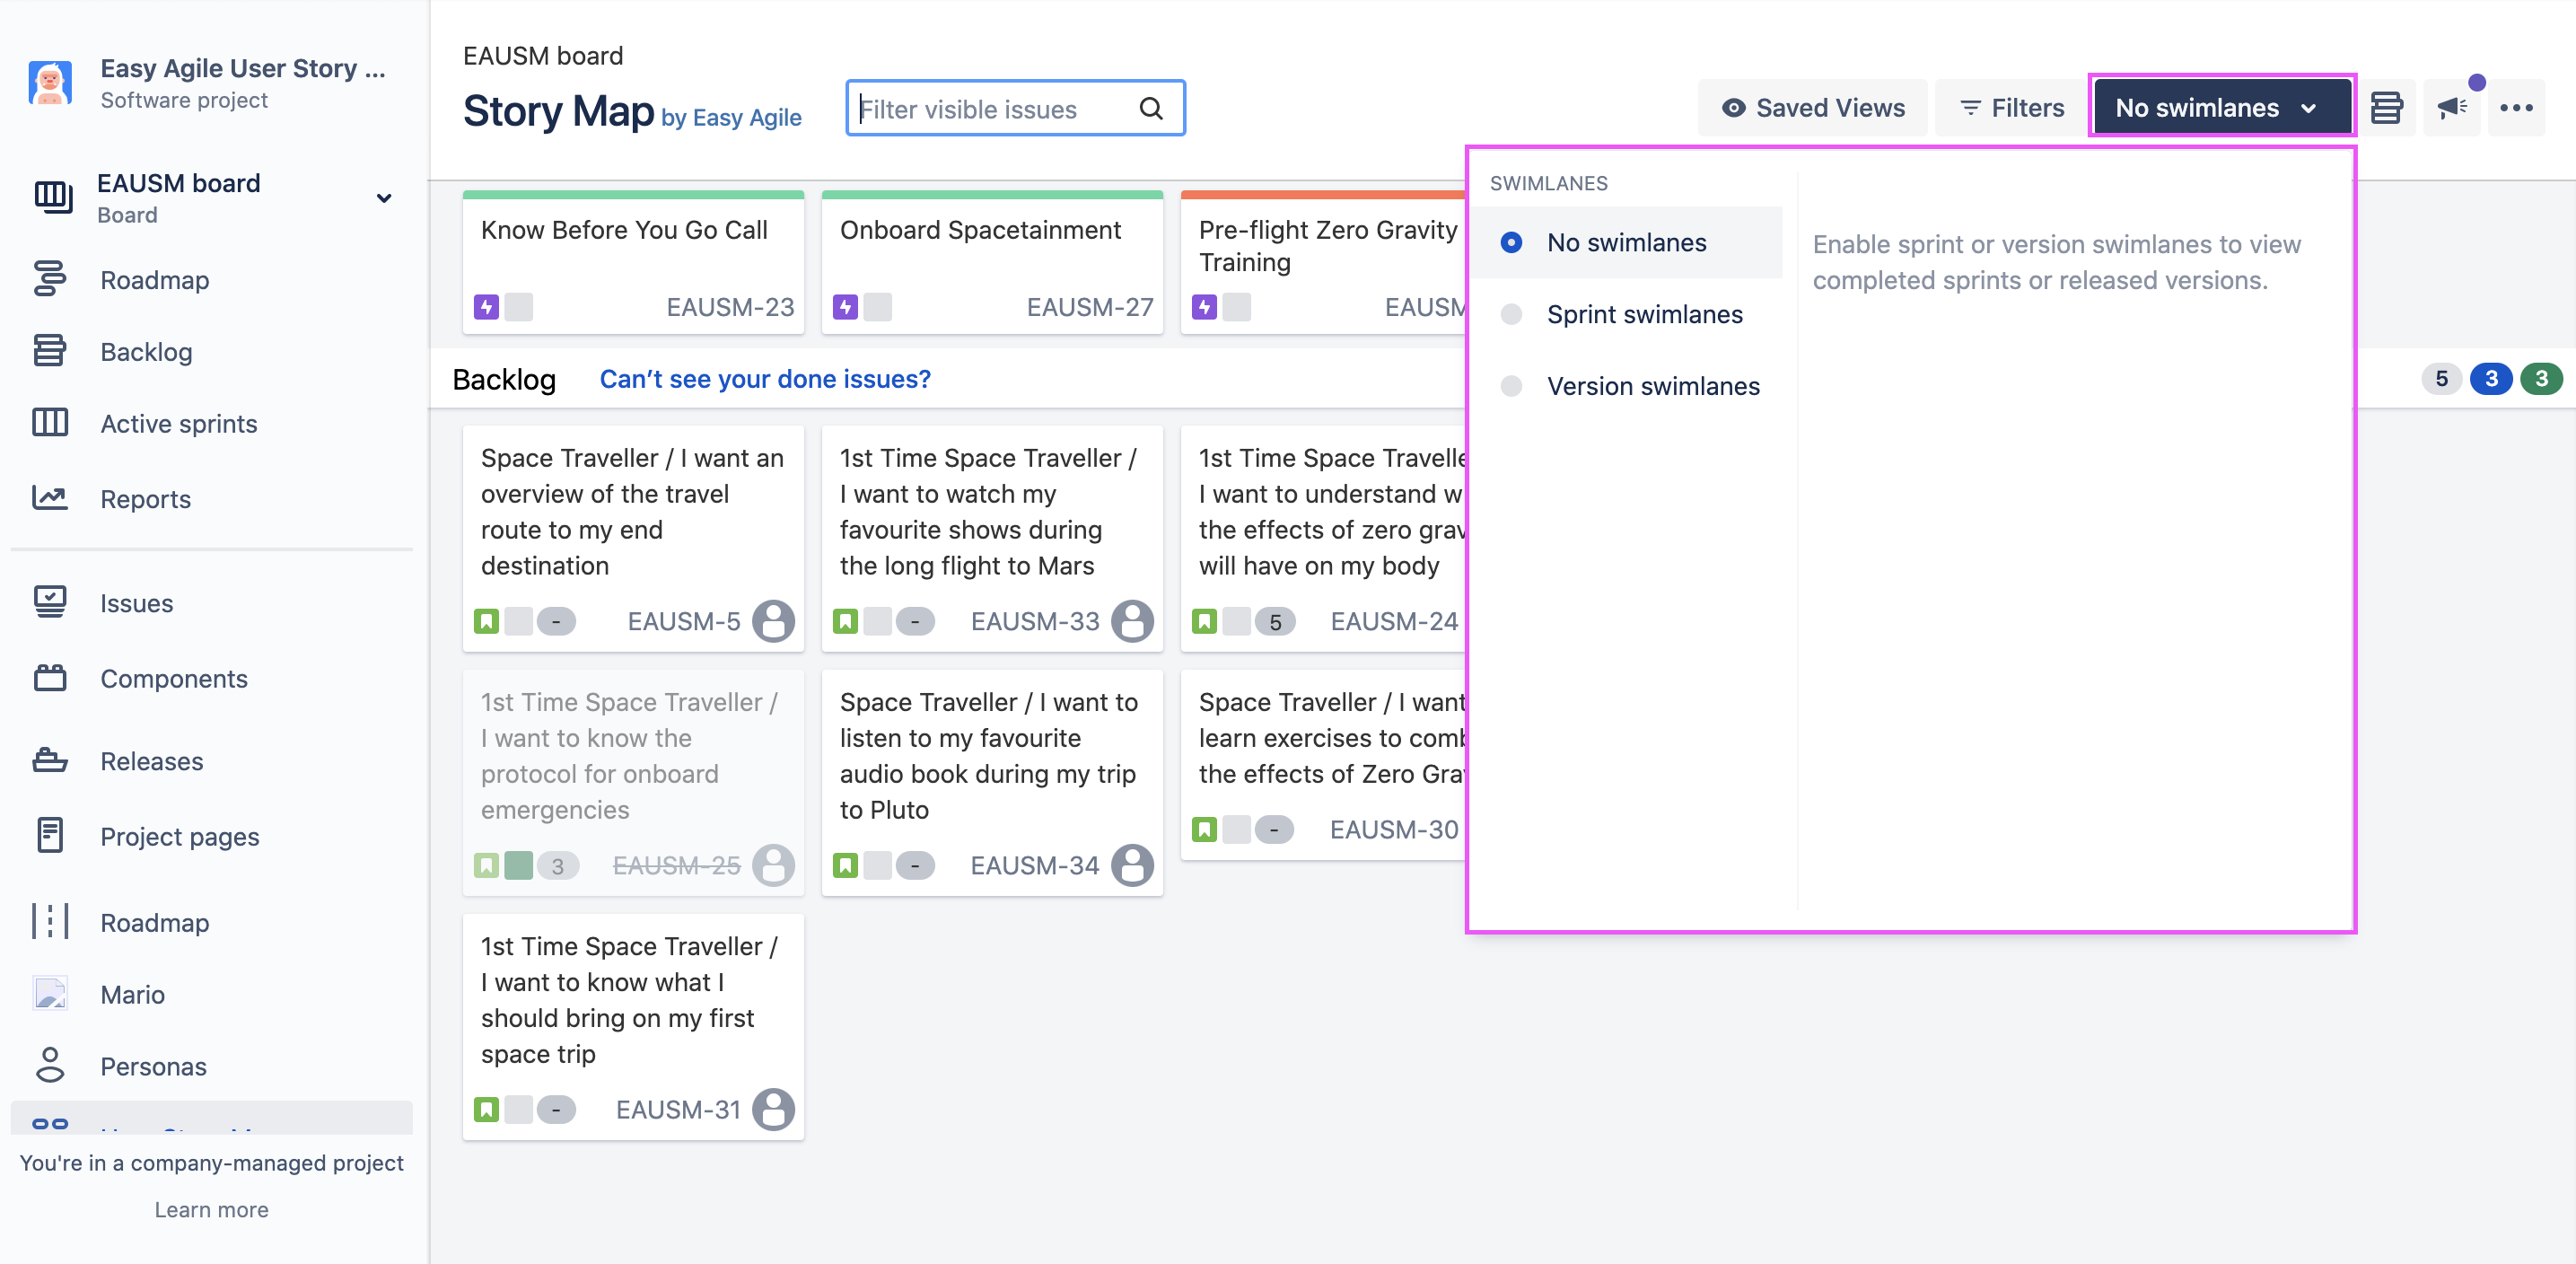
Scrum and Kanban Boards will also have the ability to turn off swimlanes in a No Swimlane mode. This gives you the ability to break down epics without having to schedule them into a Sprint or Version upfront. To turn on No Swimlanes, click on the Swimlanes dropdown in the top-right hand corner of the Story Map and select the No Swimlanes radio button:
Creating a new Sprint on the Story Map
To create a Sprint on the Story Map, first make sure Sprint swimlanes have been toggled on using the Swimlanes dropdown in the top right corner of the Story Map:
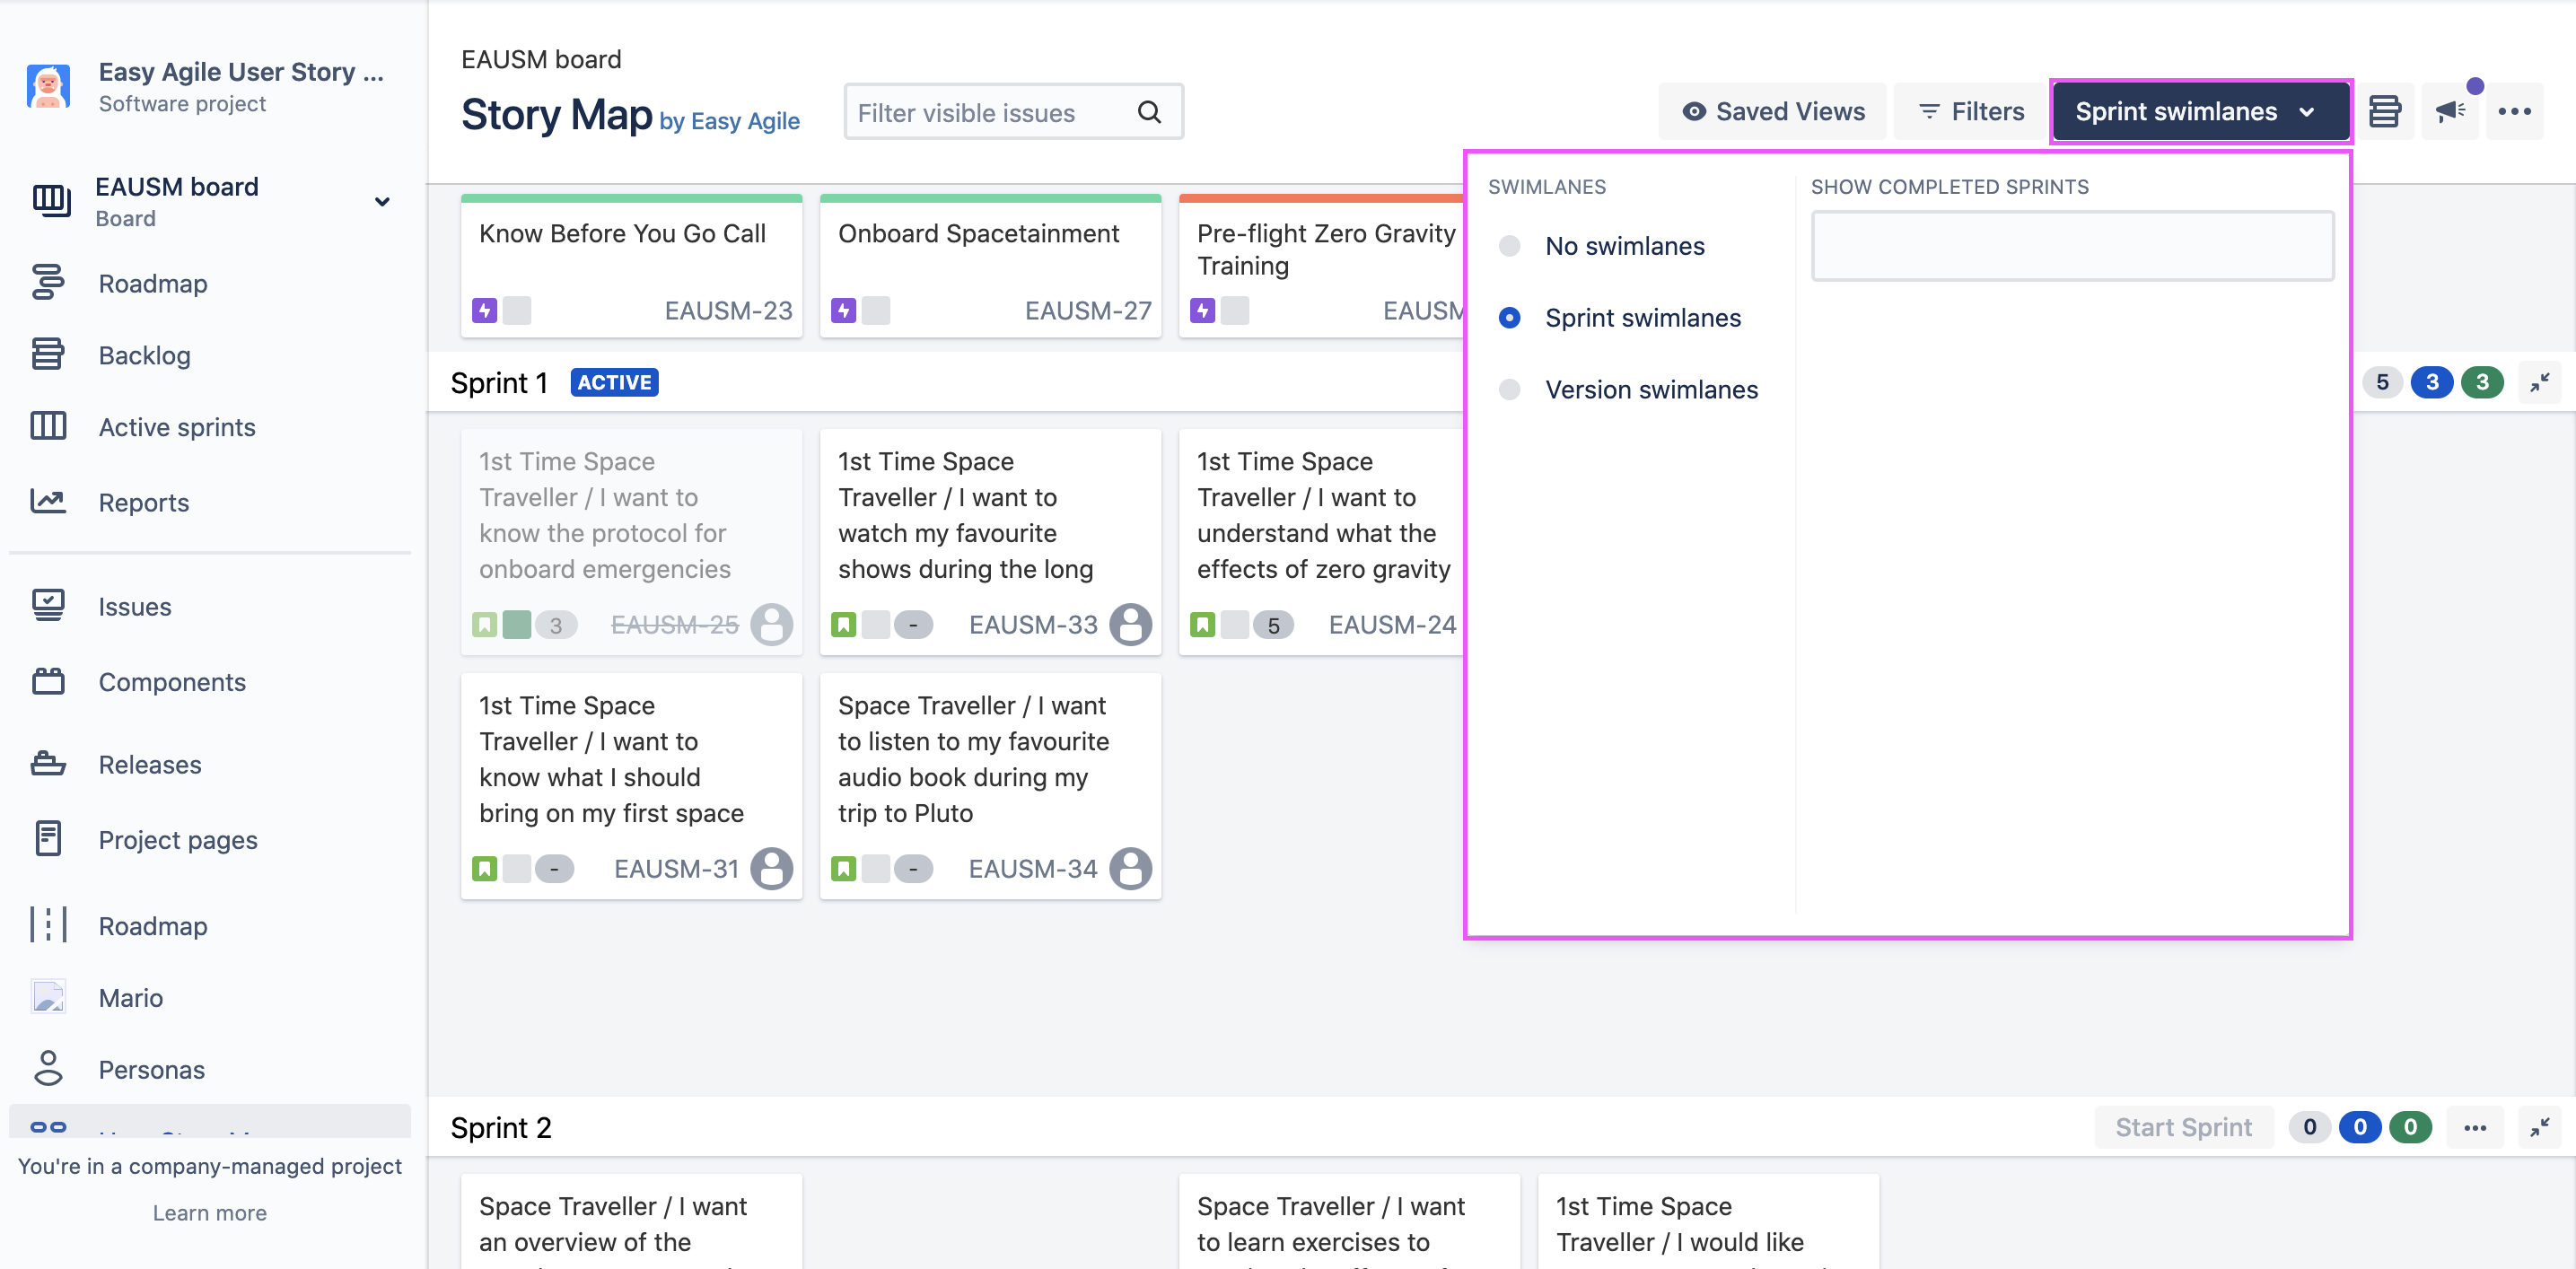
Scroll to the Backlog swimlane at the bottom of your Story Map, and click Add Sprint ![]()
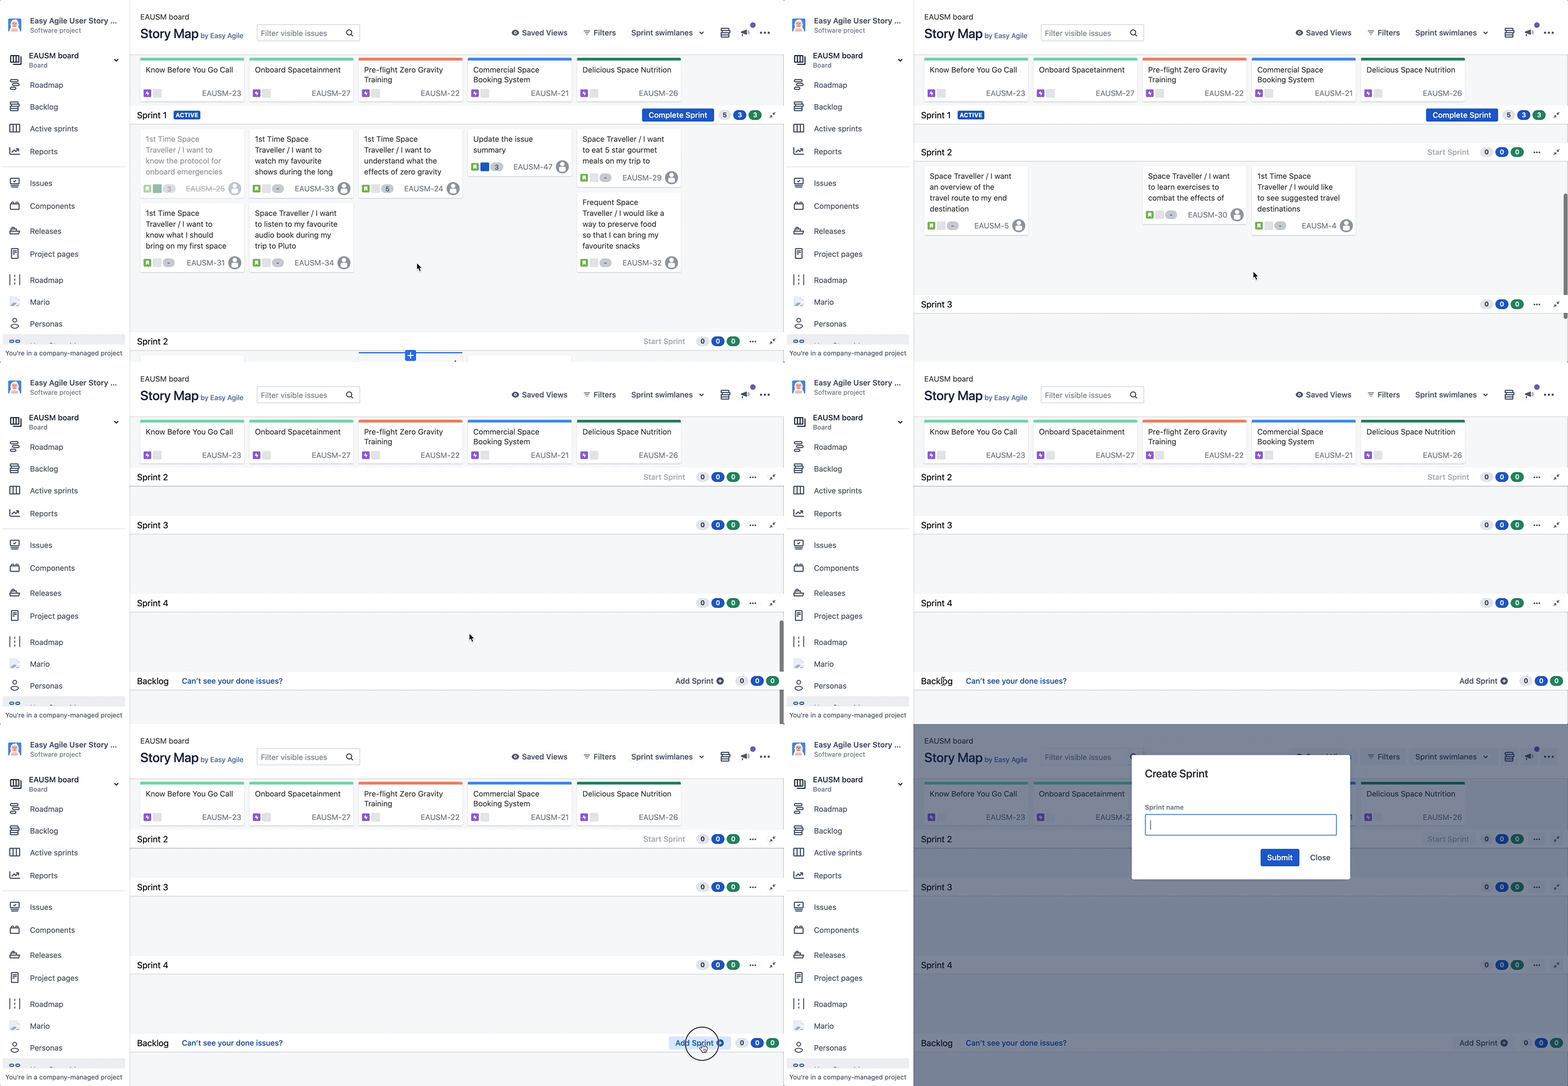
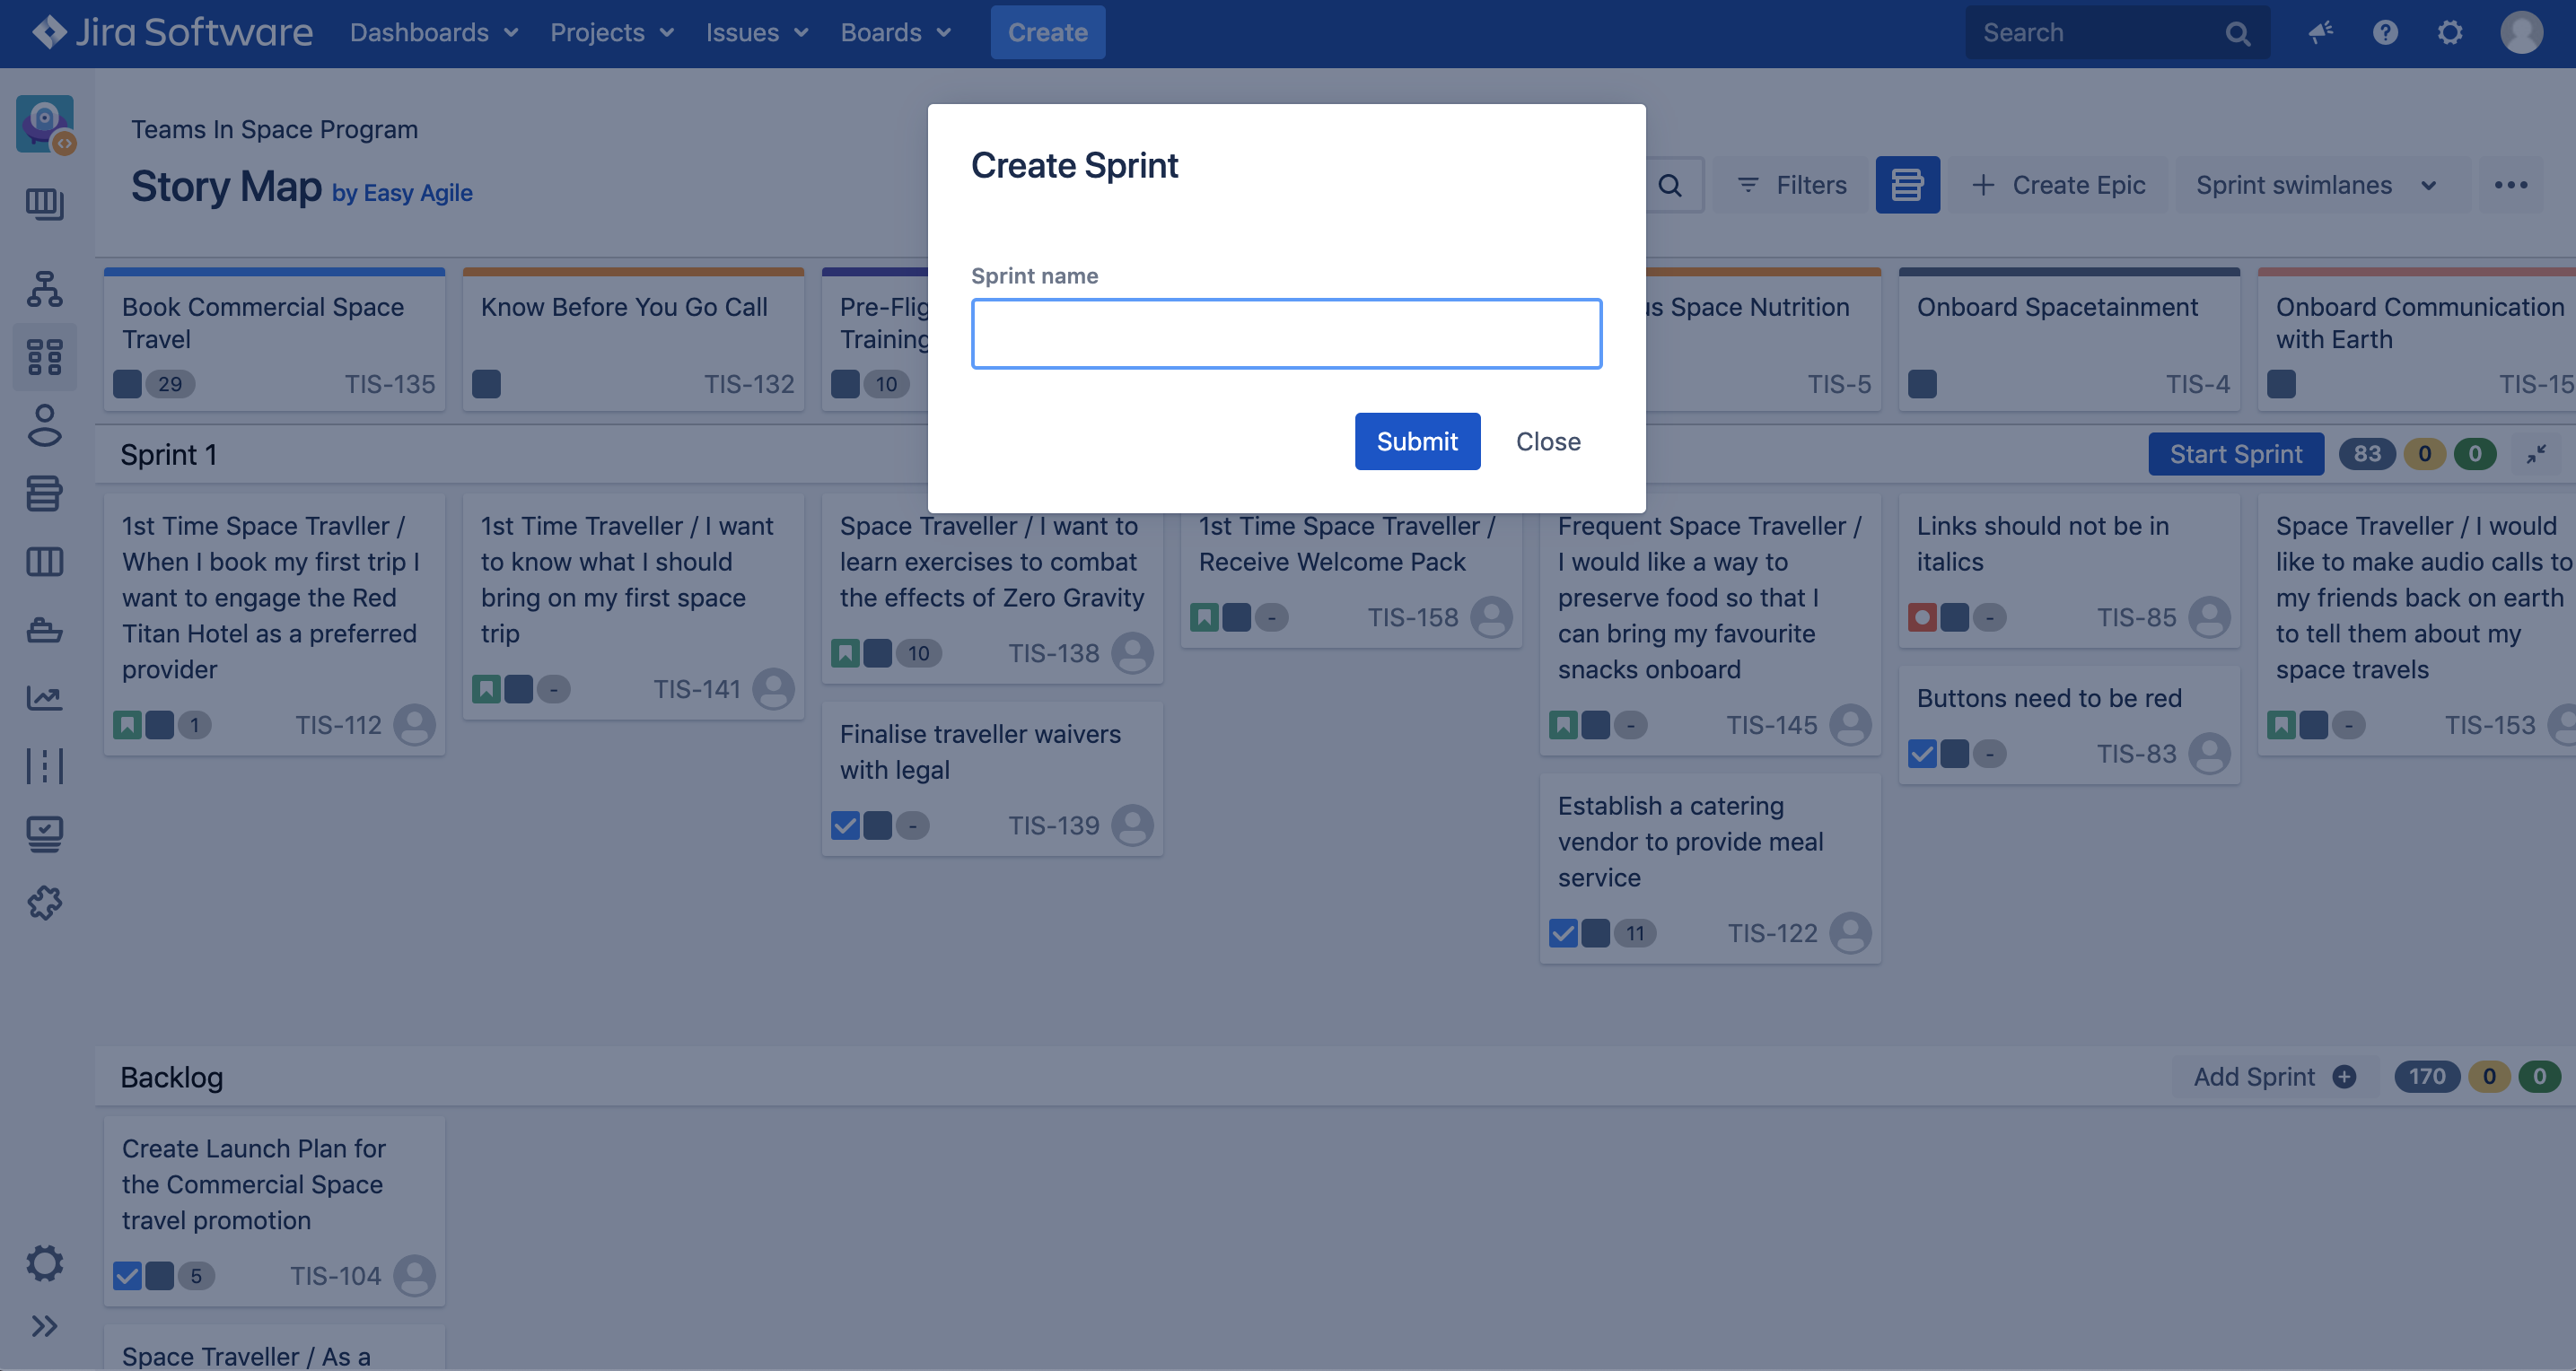
Name your Sprint and click Submit. Your new Sprint will appear above the Backlog on the User Story Map and on your Jira backlog:
Sprints will not be available on Kanban boards.
You must have either Board Administrator or Manage Sprints permission in order to create Sprints on the Story Map.
Adding Sprint Goals on the Story Map
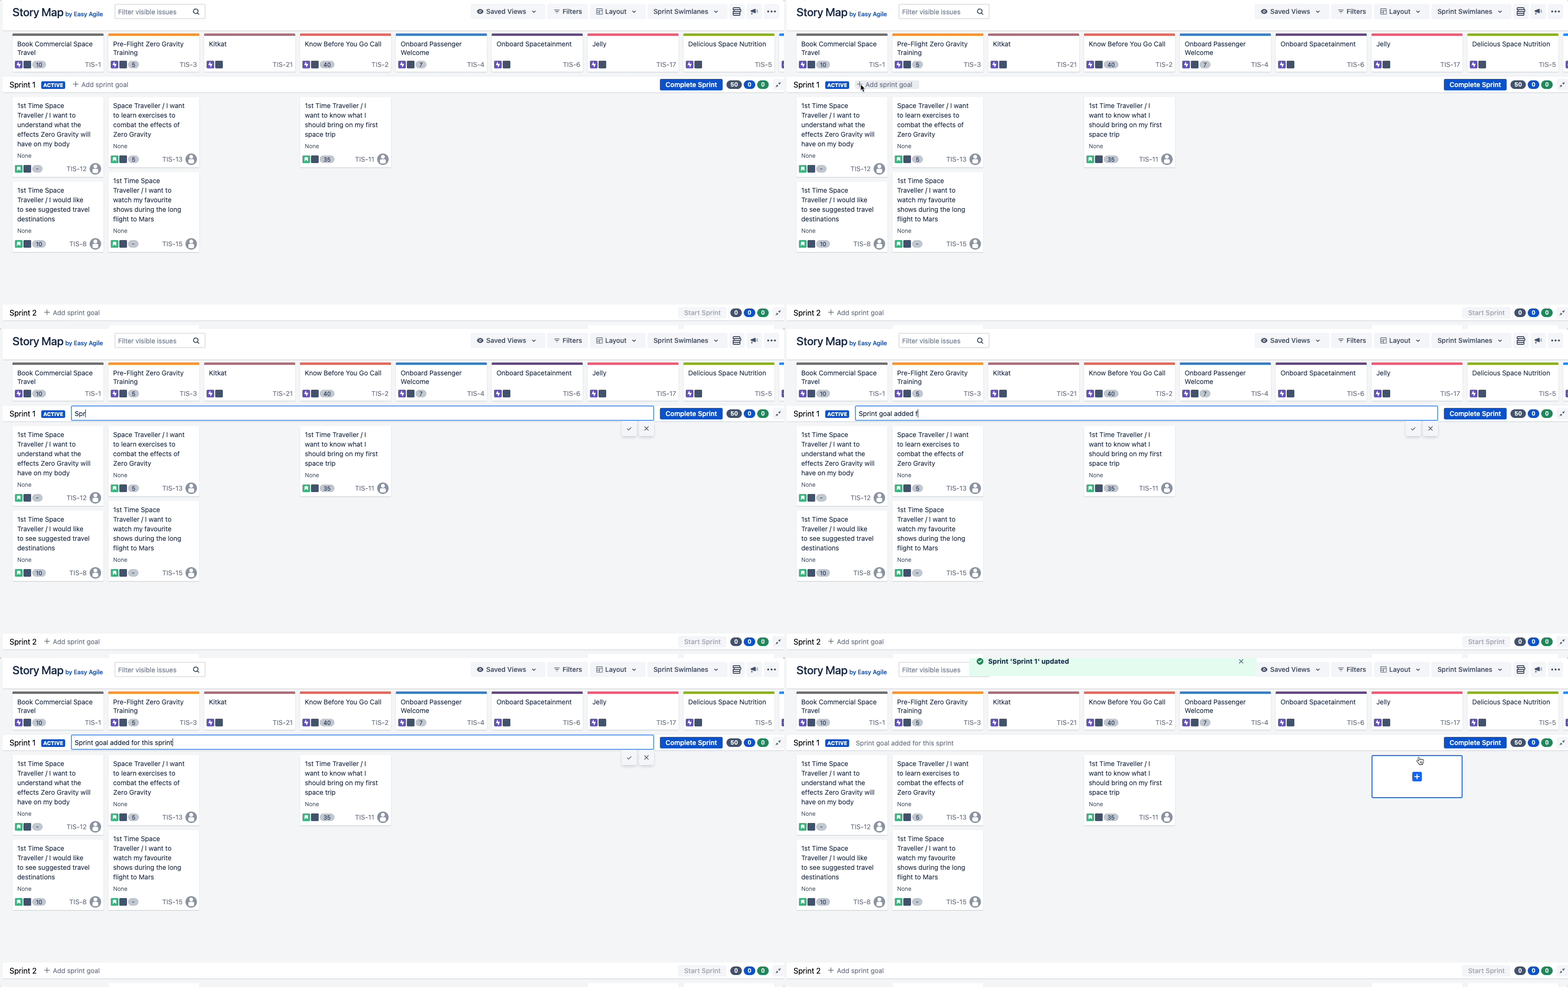
To add sprint goals on the Story Map, the user must have Sprint Swimlanes enabled on the Story Map. This can be done by navigating to the Swimlanes dropdown in the top-right hand corner of the Story Map and selecting Sprint Swimlanes radio button.
To add sprint goal, click on ‘+ Add Sprint Goal’ text next to the sprint name on the swimlane and enter your sprint goal.
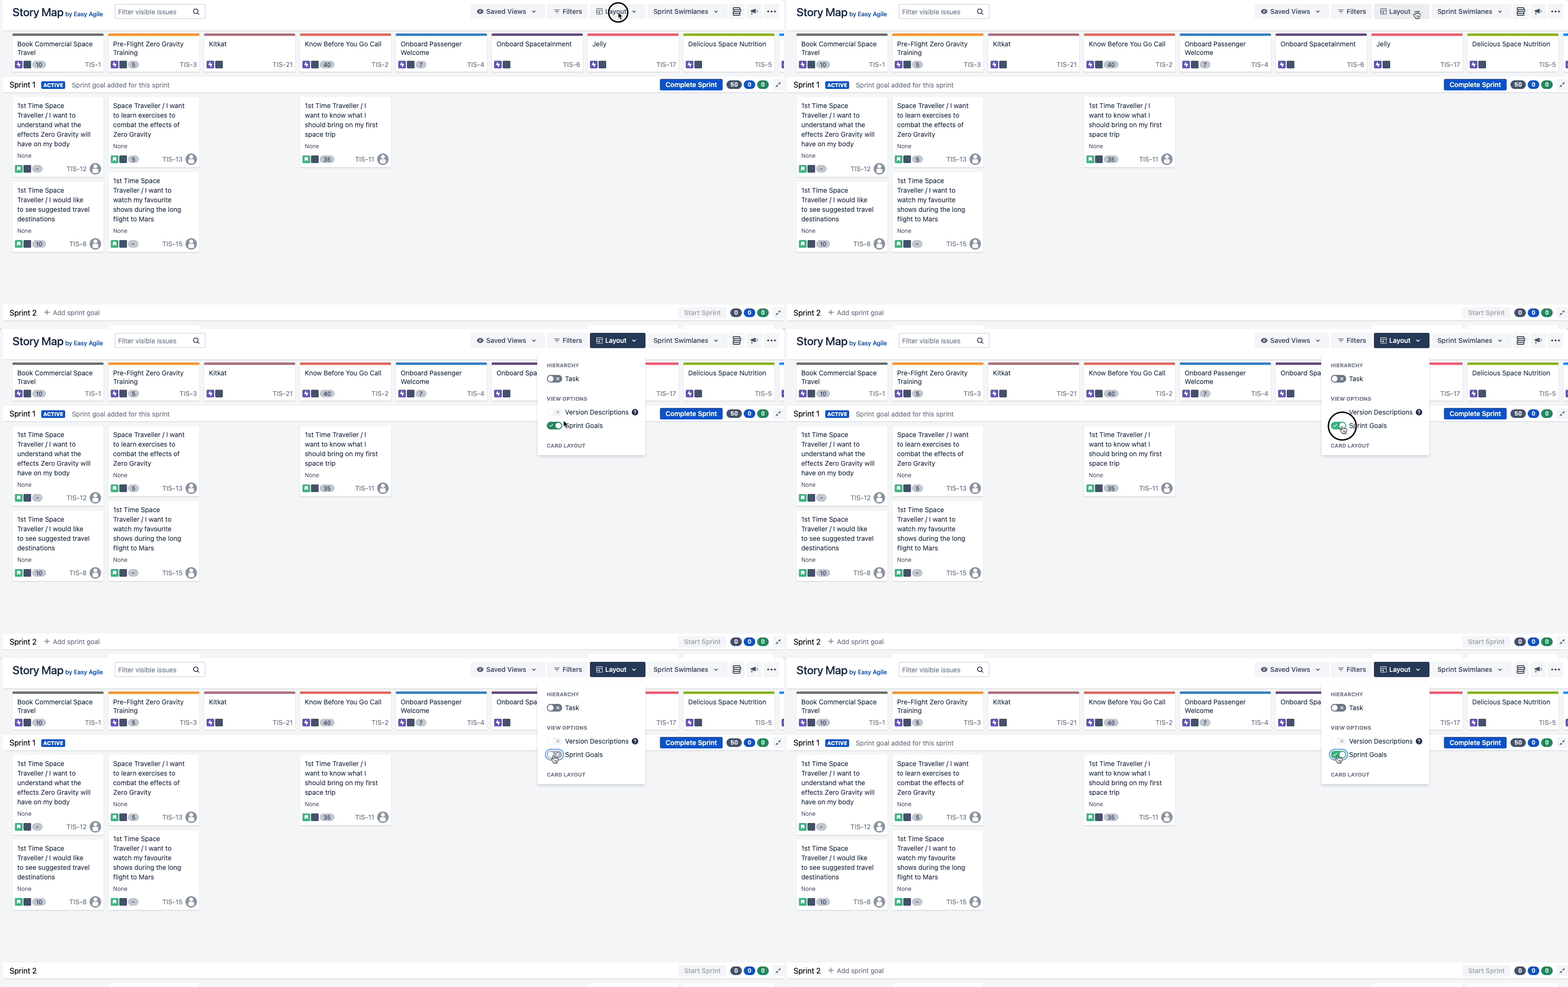
Showing/Hiding Sprint Goals on the Story Map
Sprint goal option can be toggled on/off depending on user preference.
To show or hide the sprint goal, click on the Layout button in the Story Map header and use the toggle to turn it on or off.
Creating a new Version on the Story Map
To create a Version on the Story Map, first make sure Version swimlanes have been toggled on using the Swimlanes dropdown in the top right corner of the Story Map:
Scroll to the Backlog swimlane at the bottom of your Story Map, and click Add Version ![]()
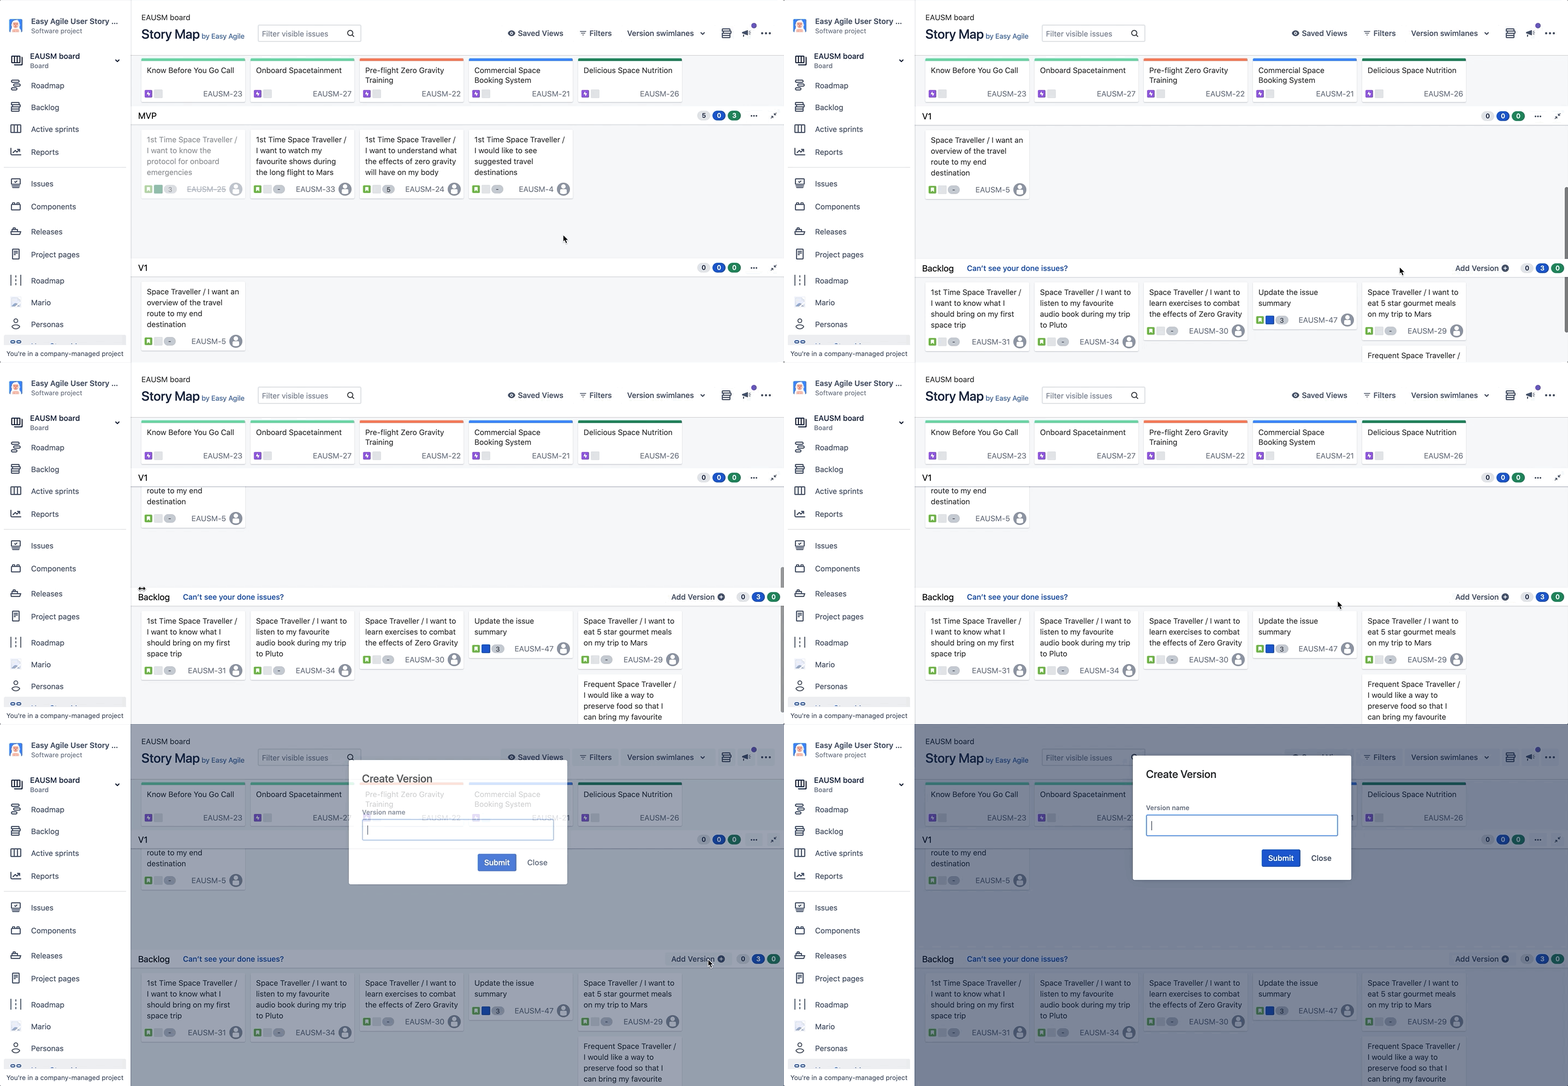
Name your Version and click Submit. Your new Version will appear above the Backlog swimlane on the User Story Map and at the bottom of your Releases page in Jira.
You must have Project Administrator permissions in order to create Versions on the Story Map.
Adding Version Descriptions on the Story Map
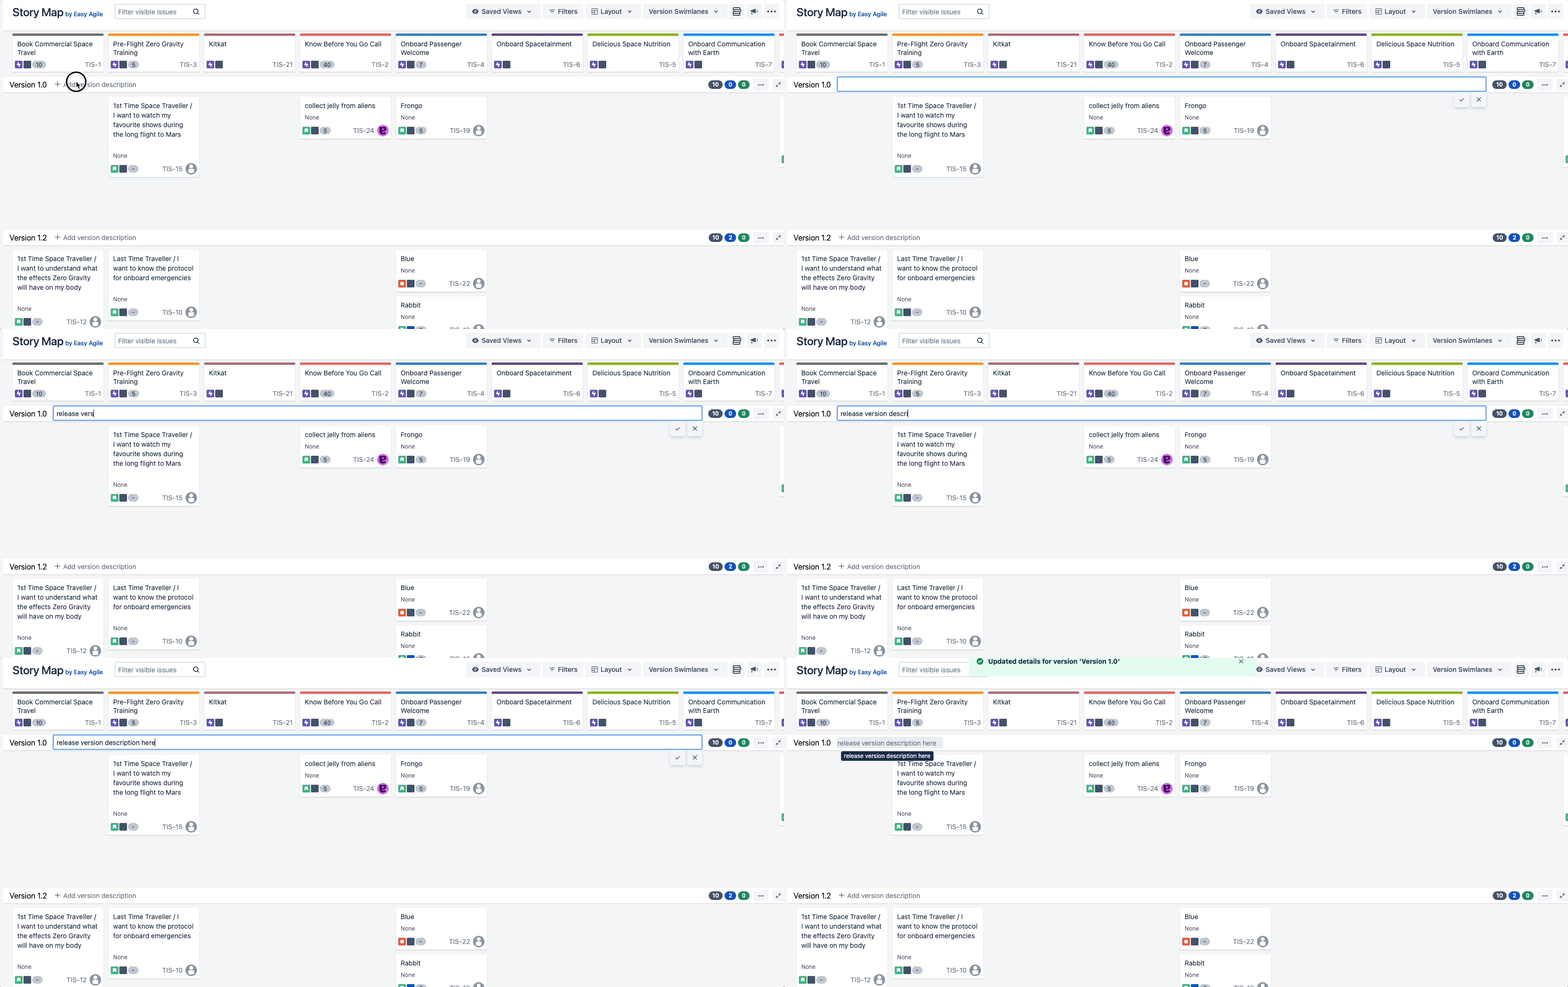
To add version description on the Story Map, the user must have Version Swimlanes enabled on the Story Map. This can be done by navigating to the Swimlanes dropdown in the top-right hand corner of the Story Map and selecting Version Swimlanes radio button.
To add version description, click on ‘+ Add version description’ text next to the version name on the swimlane and enter the required description.
Showing/Hiding Version Descriptions on the Story Map
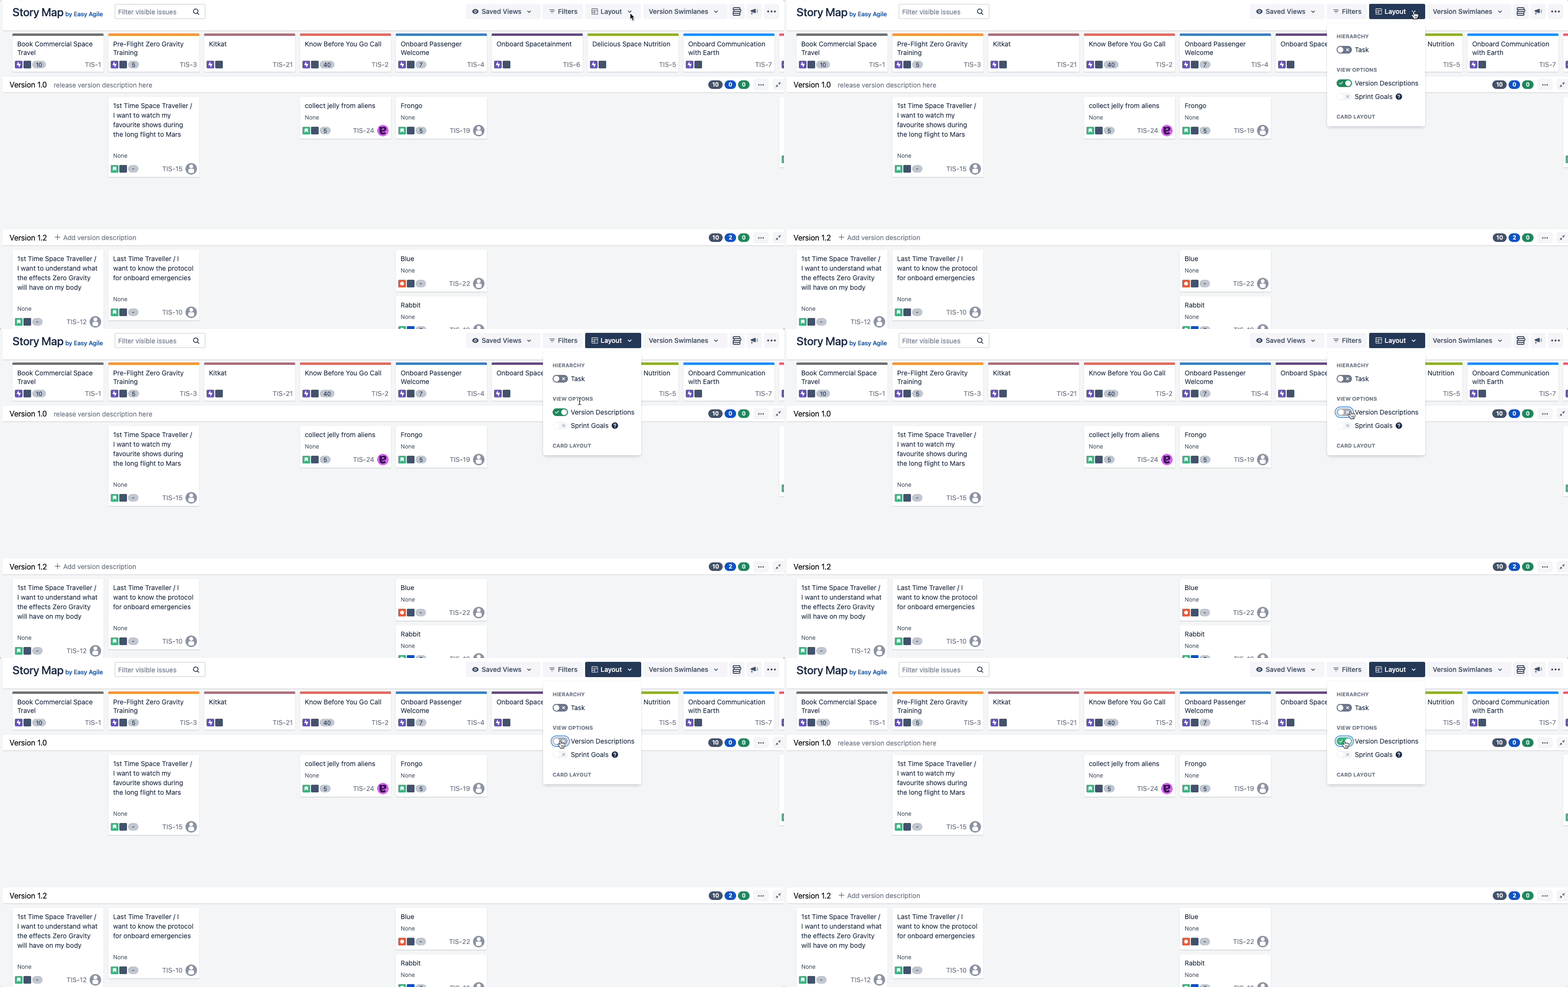
Version Descriptions option can be toggled on/off depending on user preference.
To show or hide the version description, click on the Layout button in the Story Map header and use the toggle to turn it on or off.
Re-ordering Sprints on the Story Map
To reorder a Sprint, click on the … menu on the far right of the Sprint swimlane and select Move up or Move down:
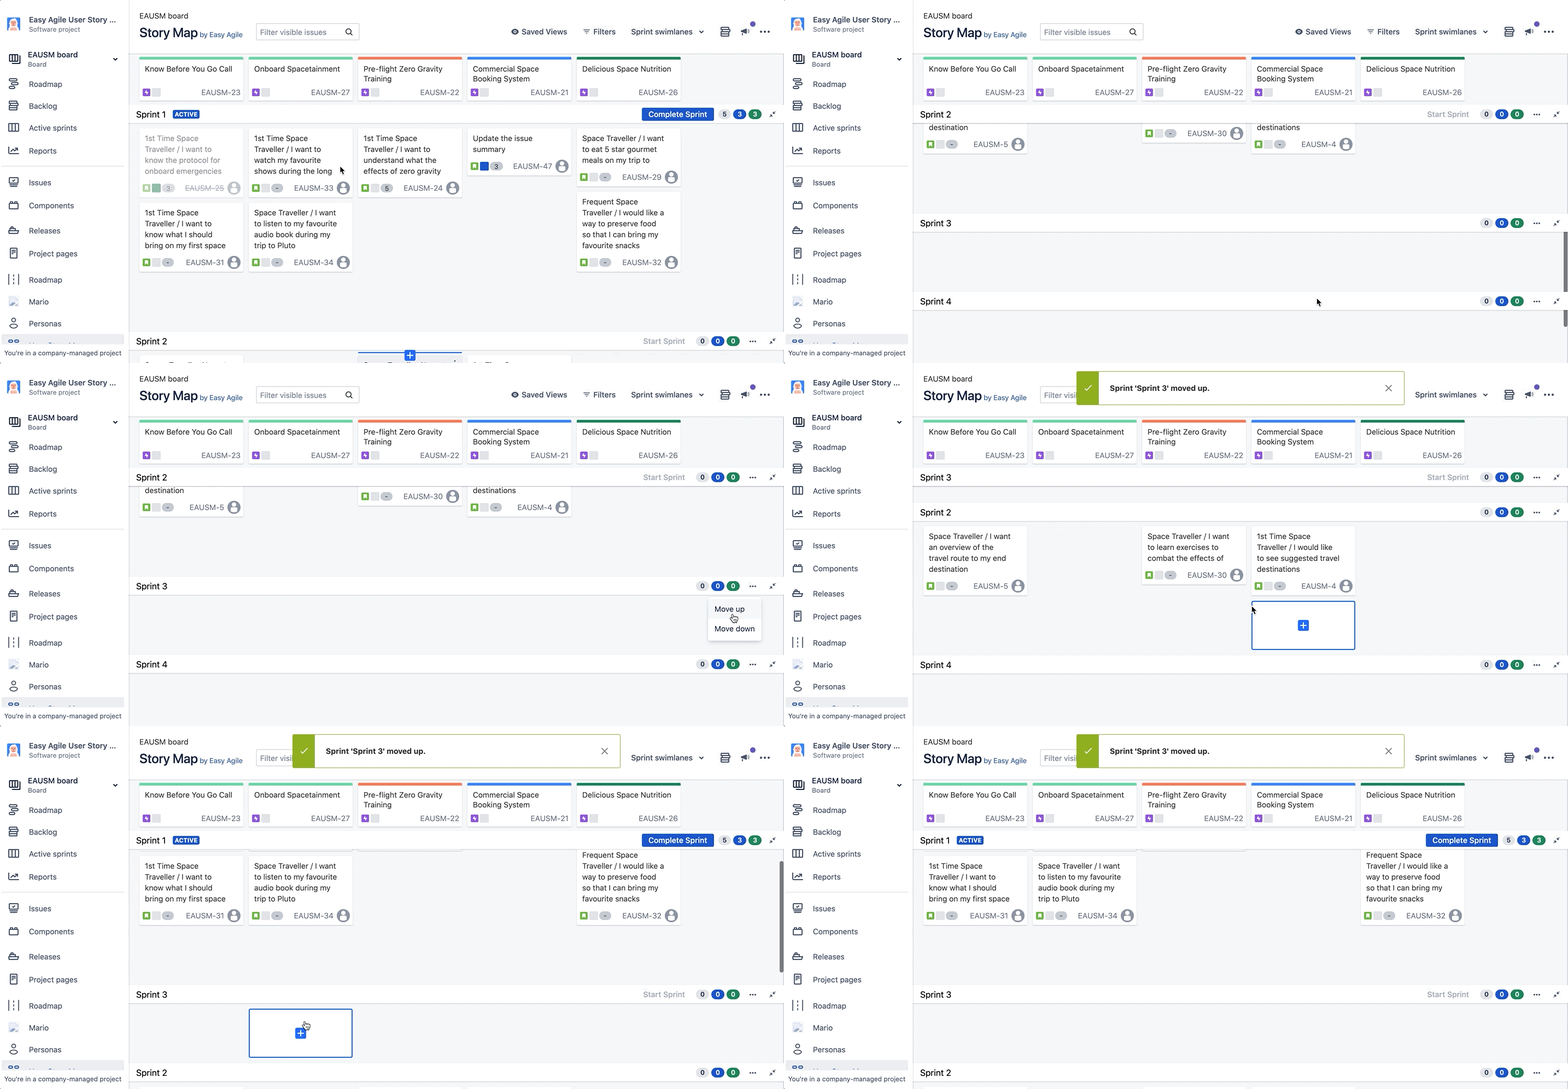
Reordering Sprints on the Story Map will also reorder Sprints on the Jira backlog. The Sprint order on the Jira backlog and the Sprint order on the User Story Map will be kept in sync irregardless of where Sprints are reordered.
You will not be able to reorder Active Sprints on your Story Map or Jira backlog. Only future Sprints can be reordered and cannot replace the top Sprint if it is Active
Re-ordering Versions on the Story Map
To reorder a Version, click on the … menu on the far right of the Version swimlane and select Move up or Move down:
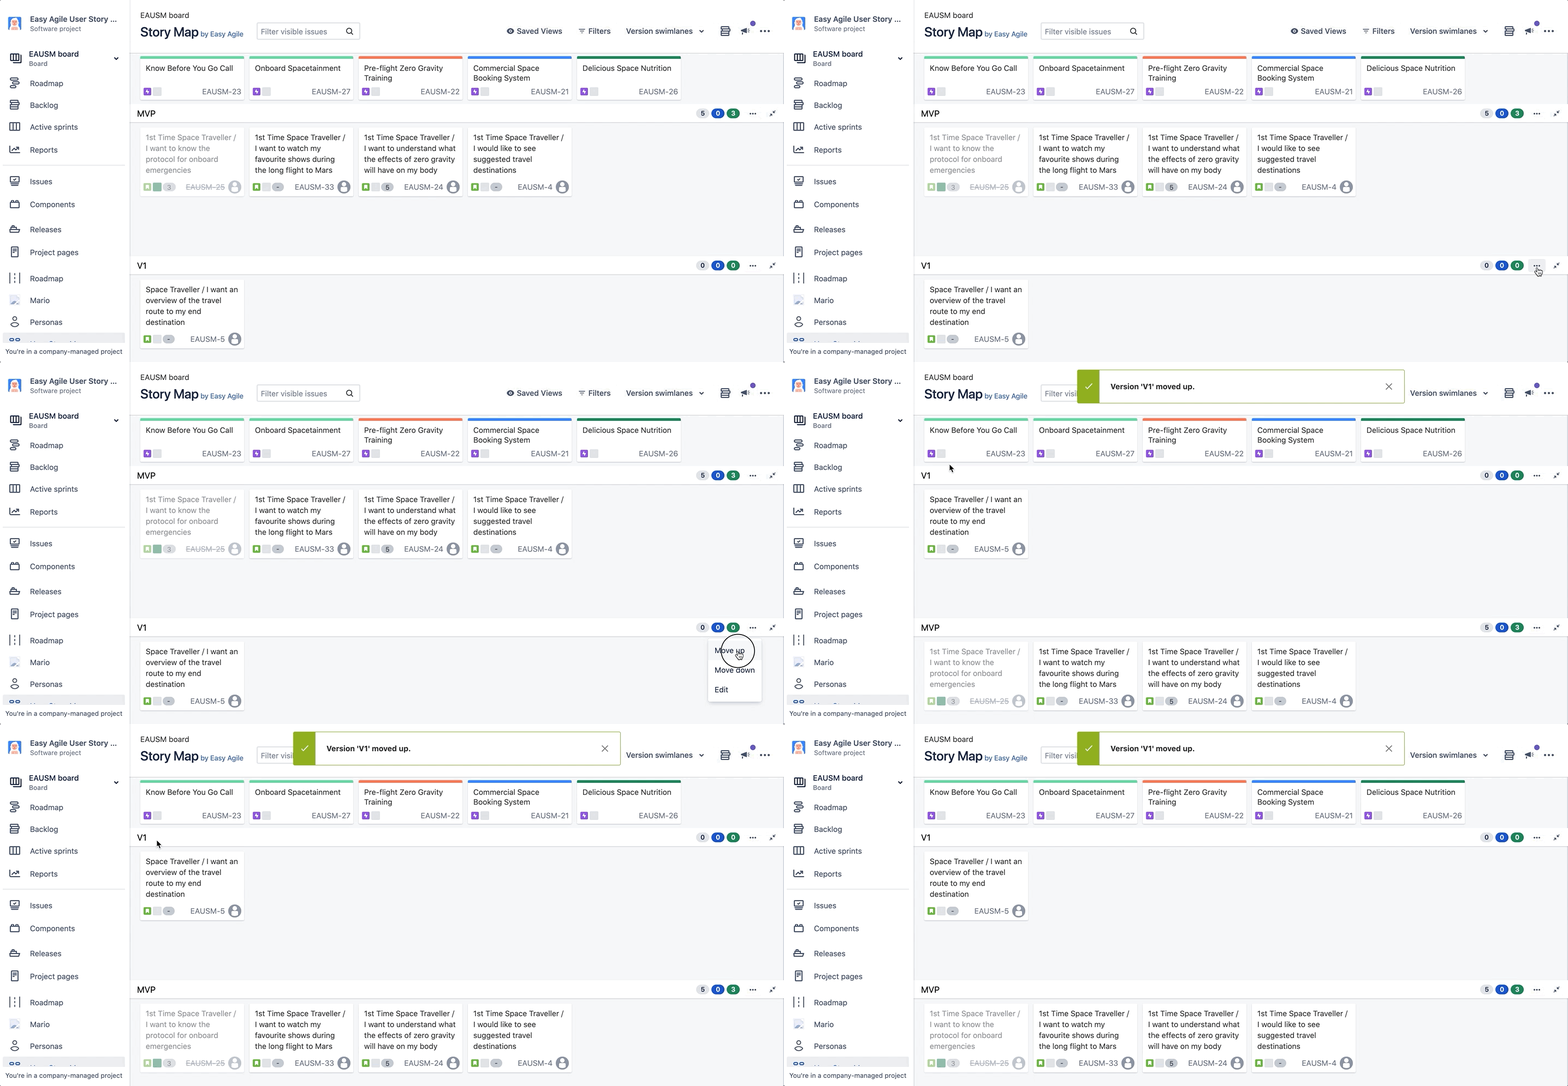
Reordering Versions on the Story Map will also reorder Versions on the Releases page in Jira. The Version order on the Releases page in Jira and the Version order on the User Story Map will be kept in sync irregardless of where Versions are reordered.
Starting & Completing Sprints on the Story Map
Teams can Start and Complete their Sprints in Jira without having to leave the Story Map.
Starting a Sprint
If there are no Active Sprints, Easy Agile User Story Maps will give you the option to Start the Sprint at the top of your Story Map:
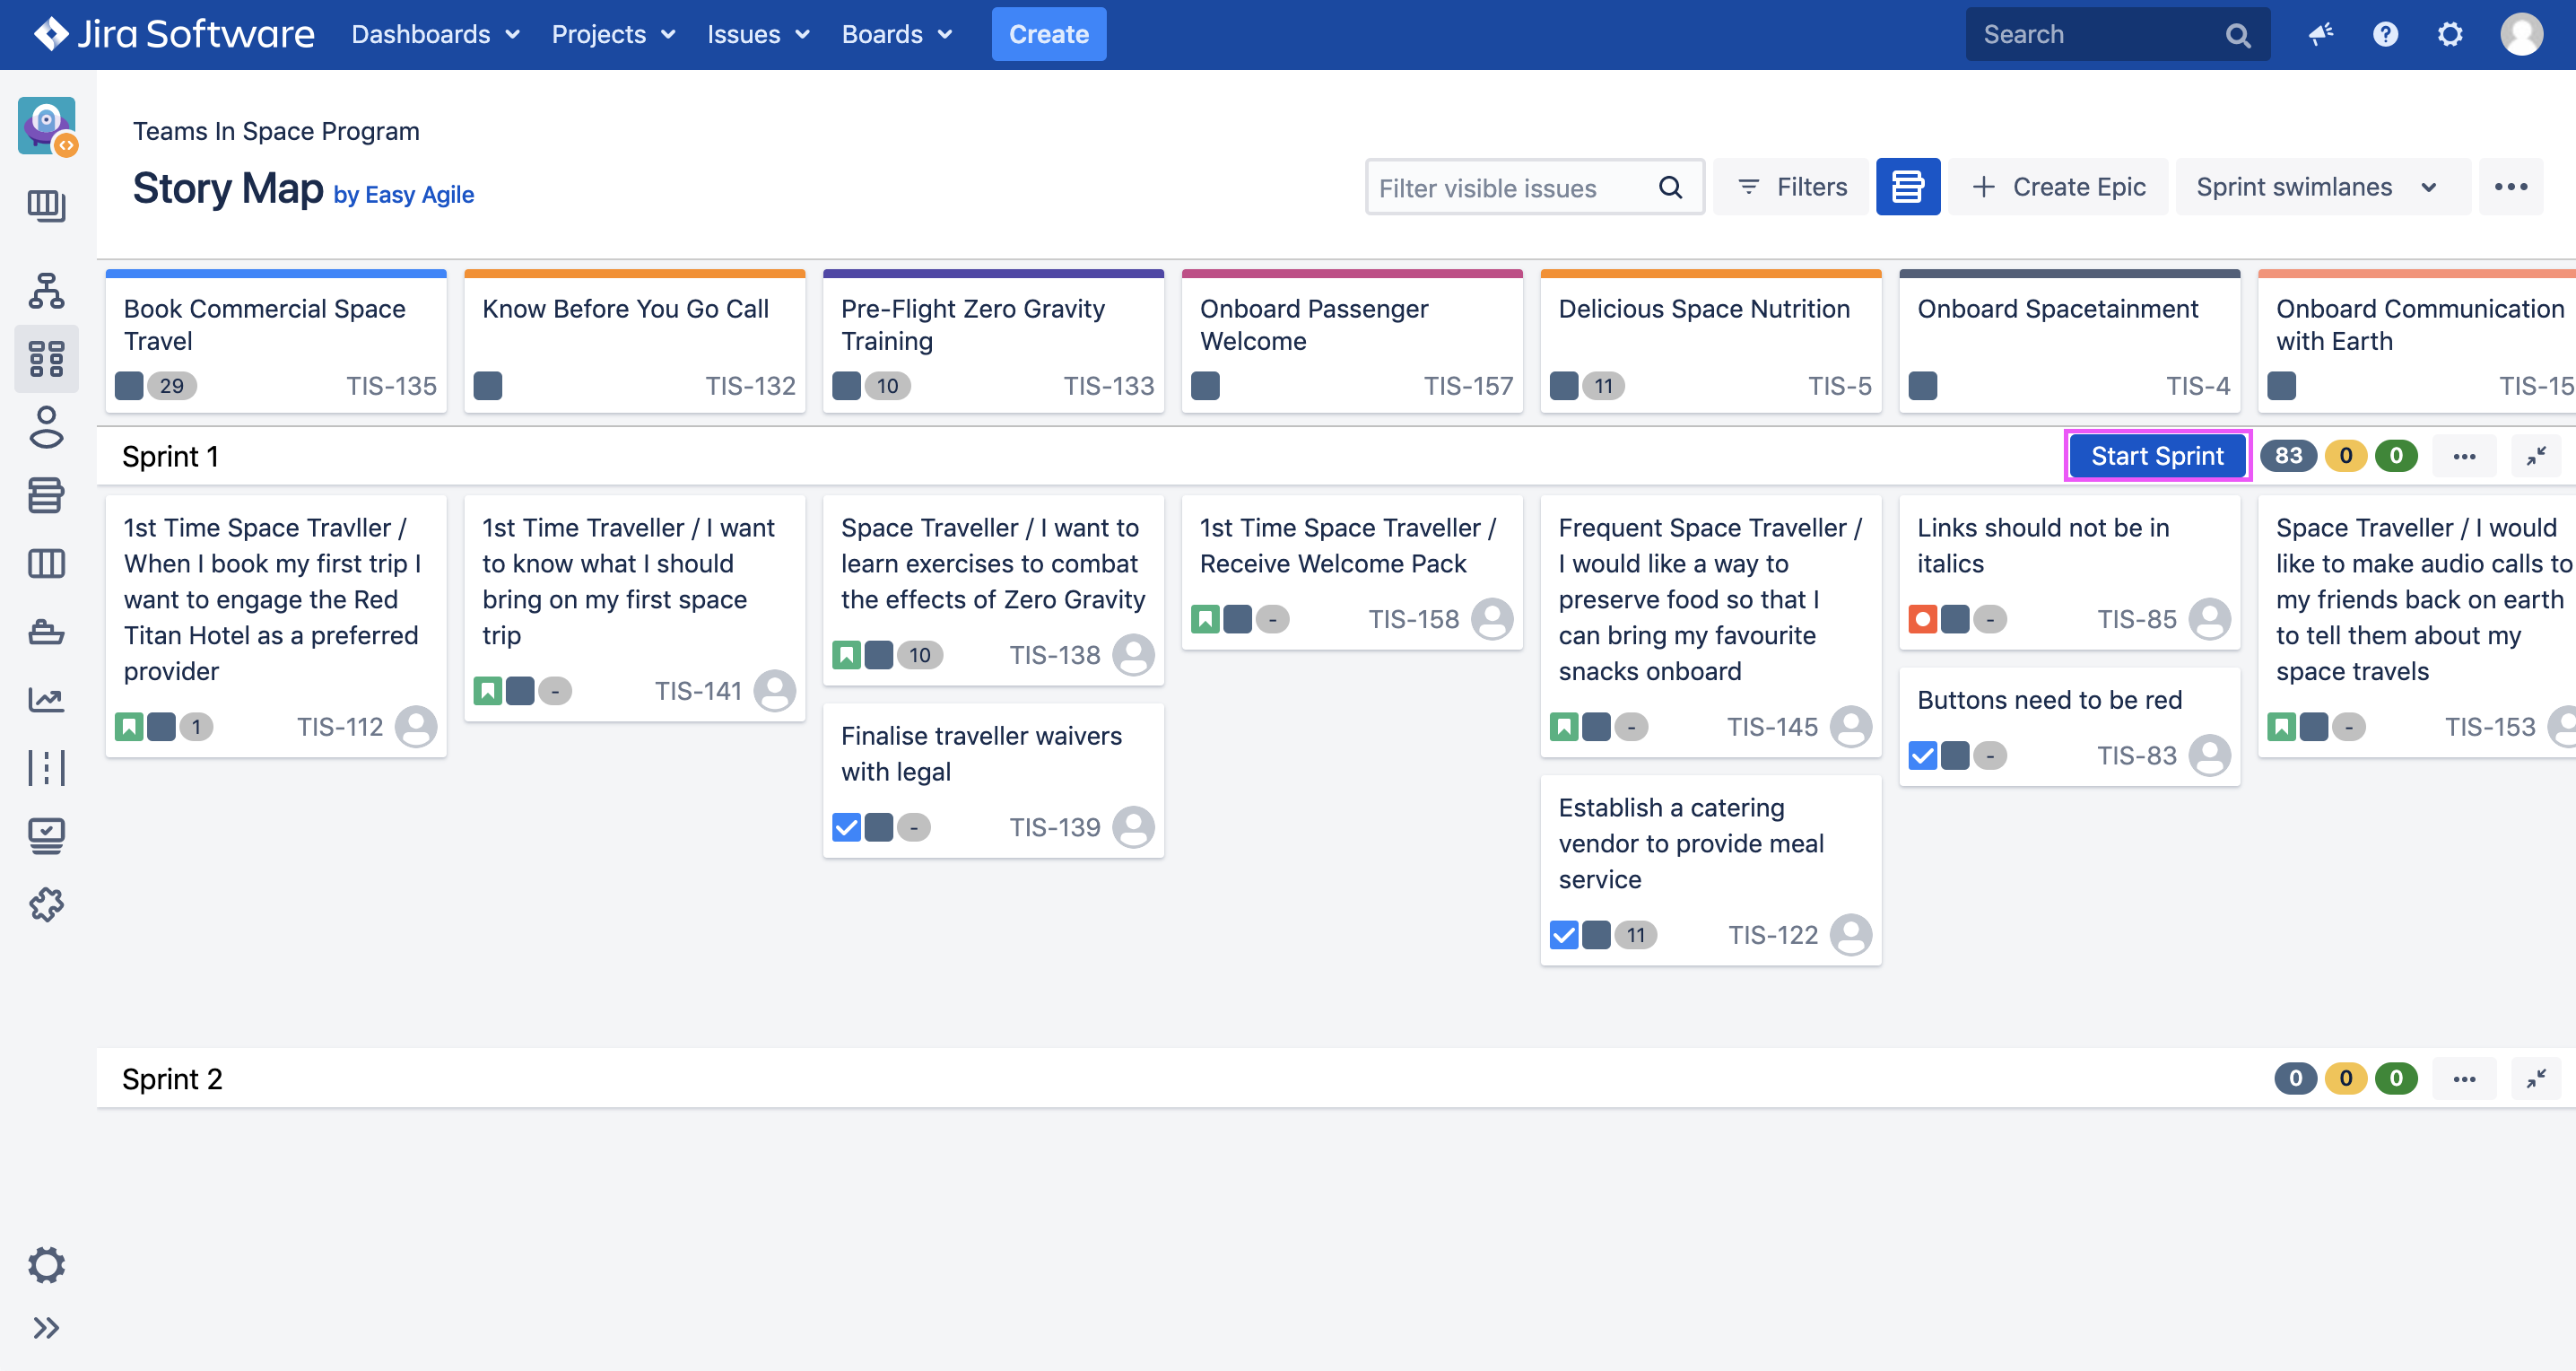
To Start a Sprint, click on the blue Start Sprint ![]()
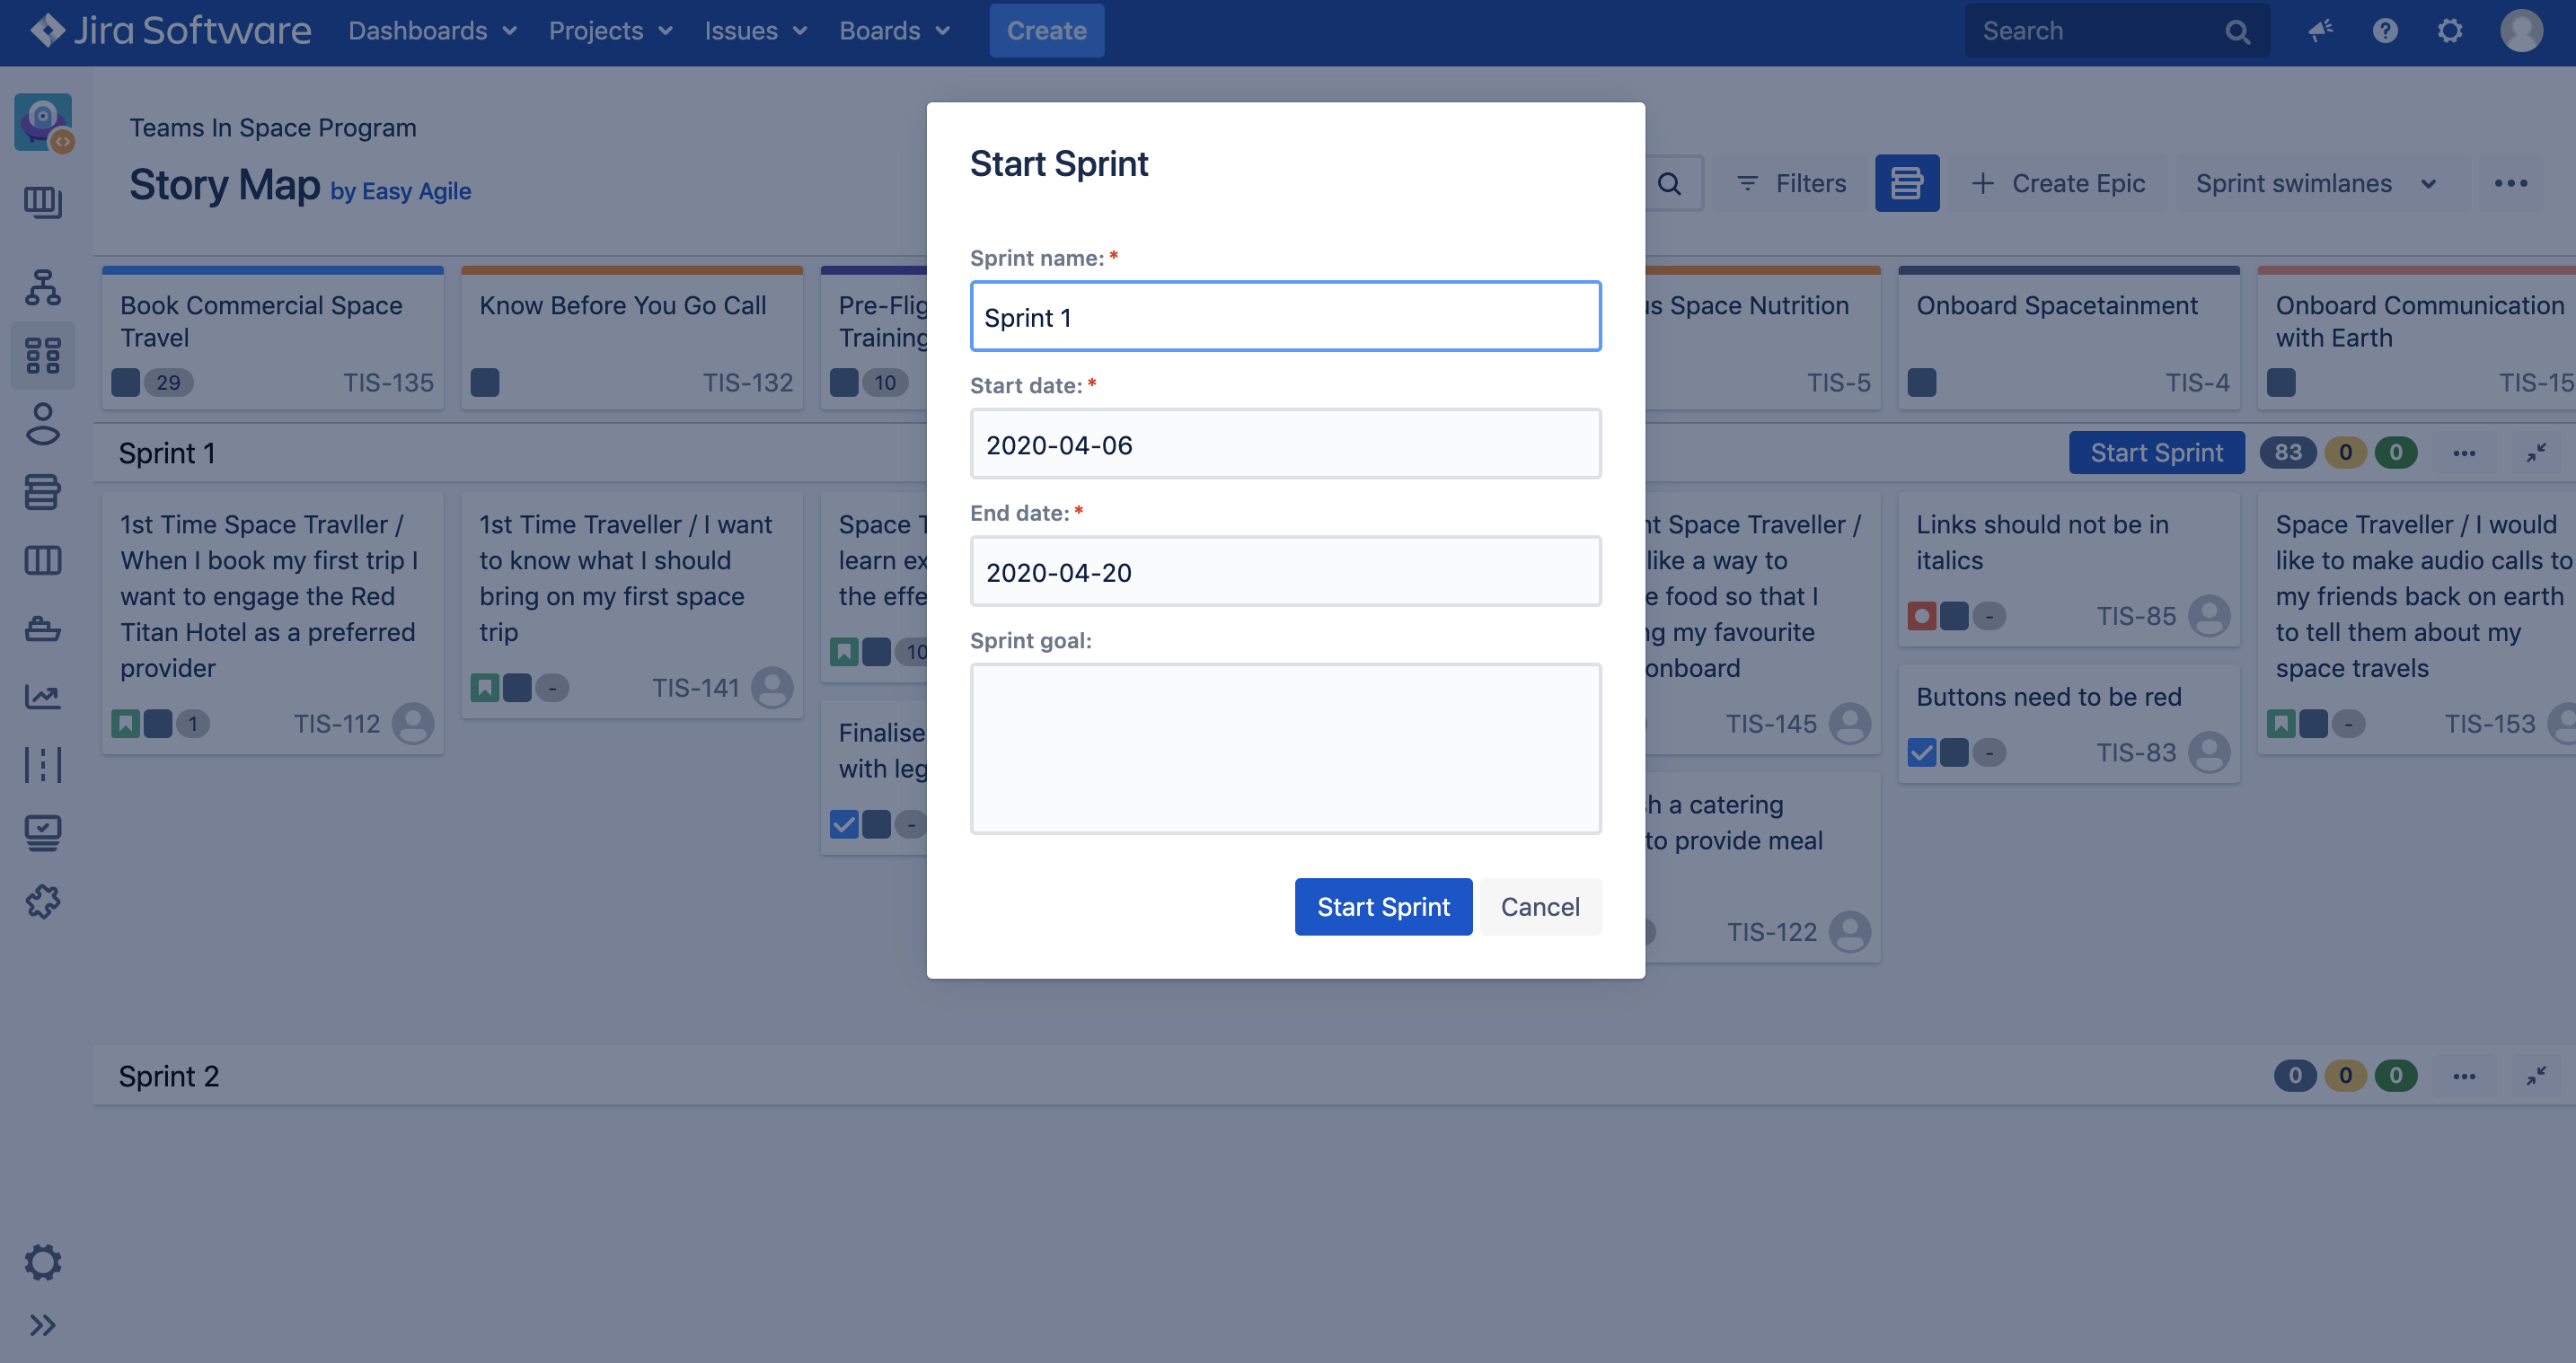
Here, you can edit your Sprint name, add a Start/End date for your Sprint and enter the Sprint goals. Click Start Sprint.
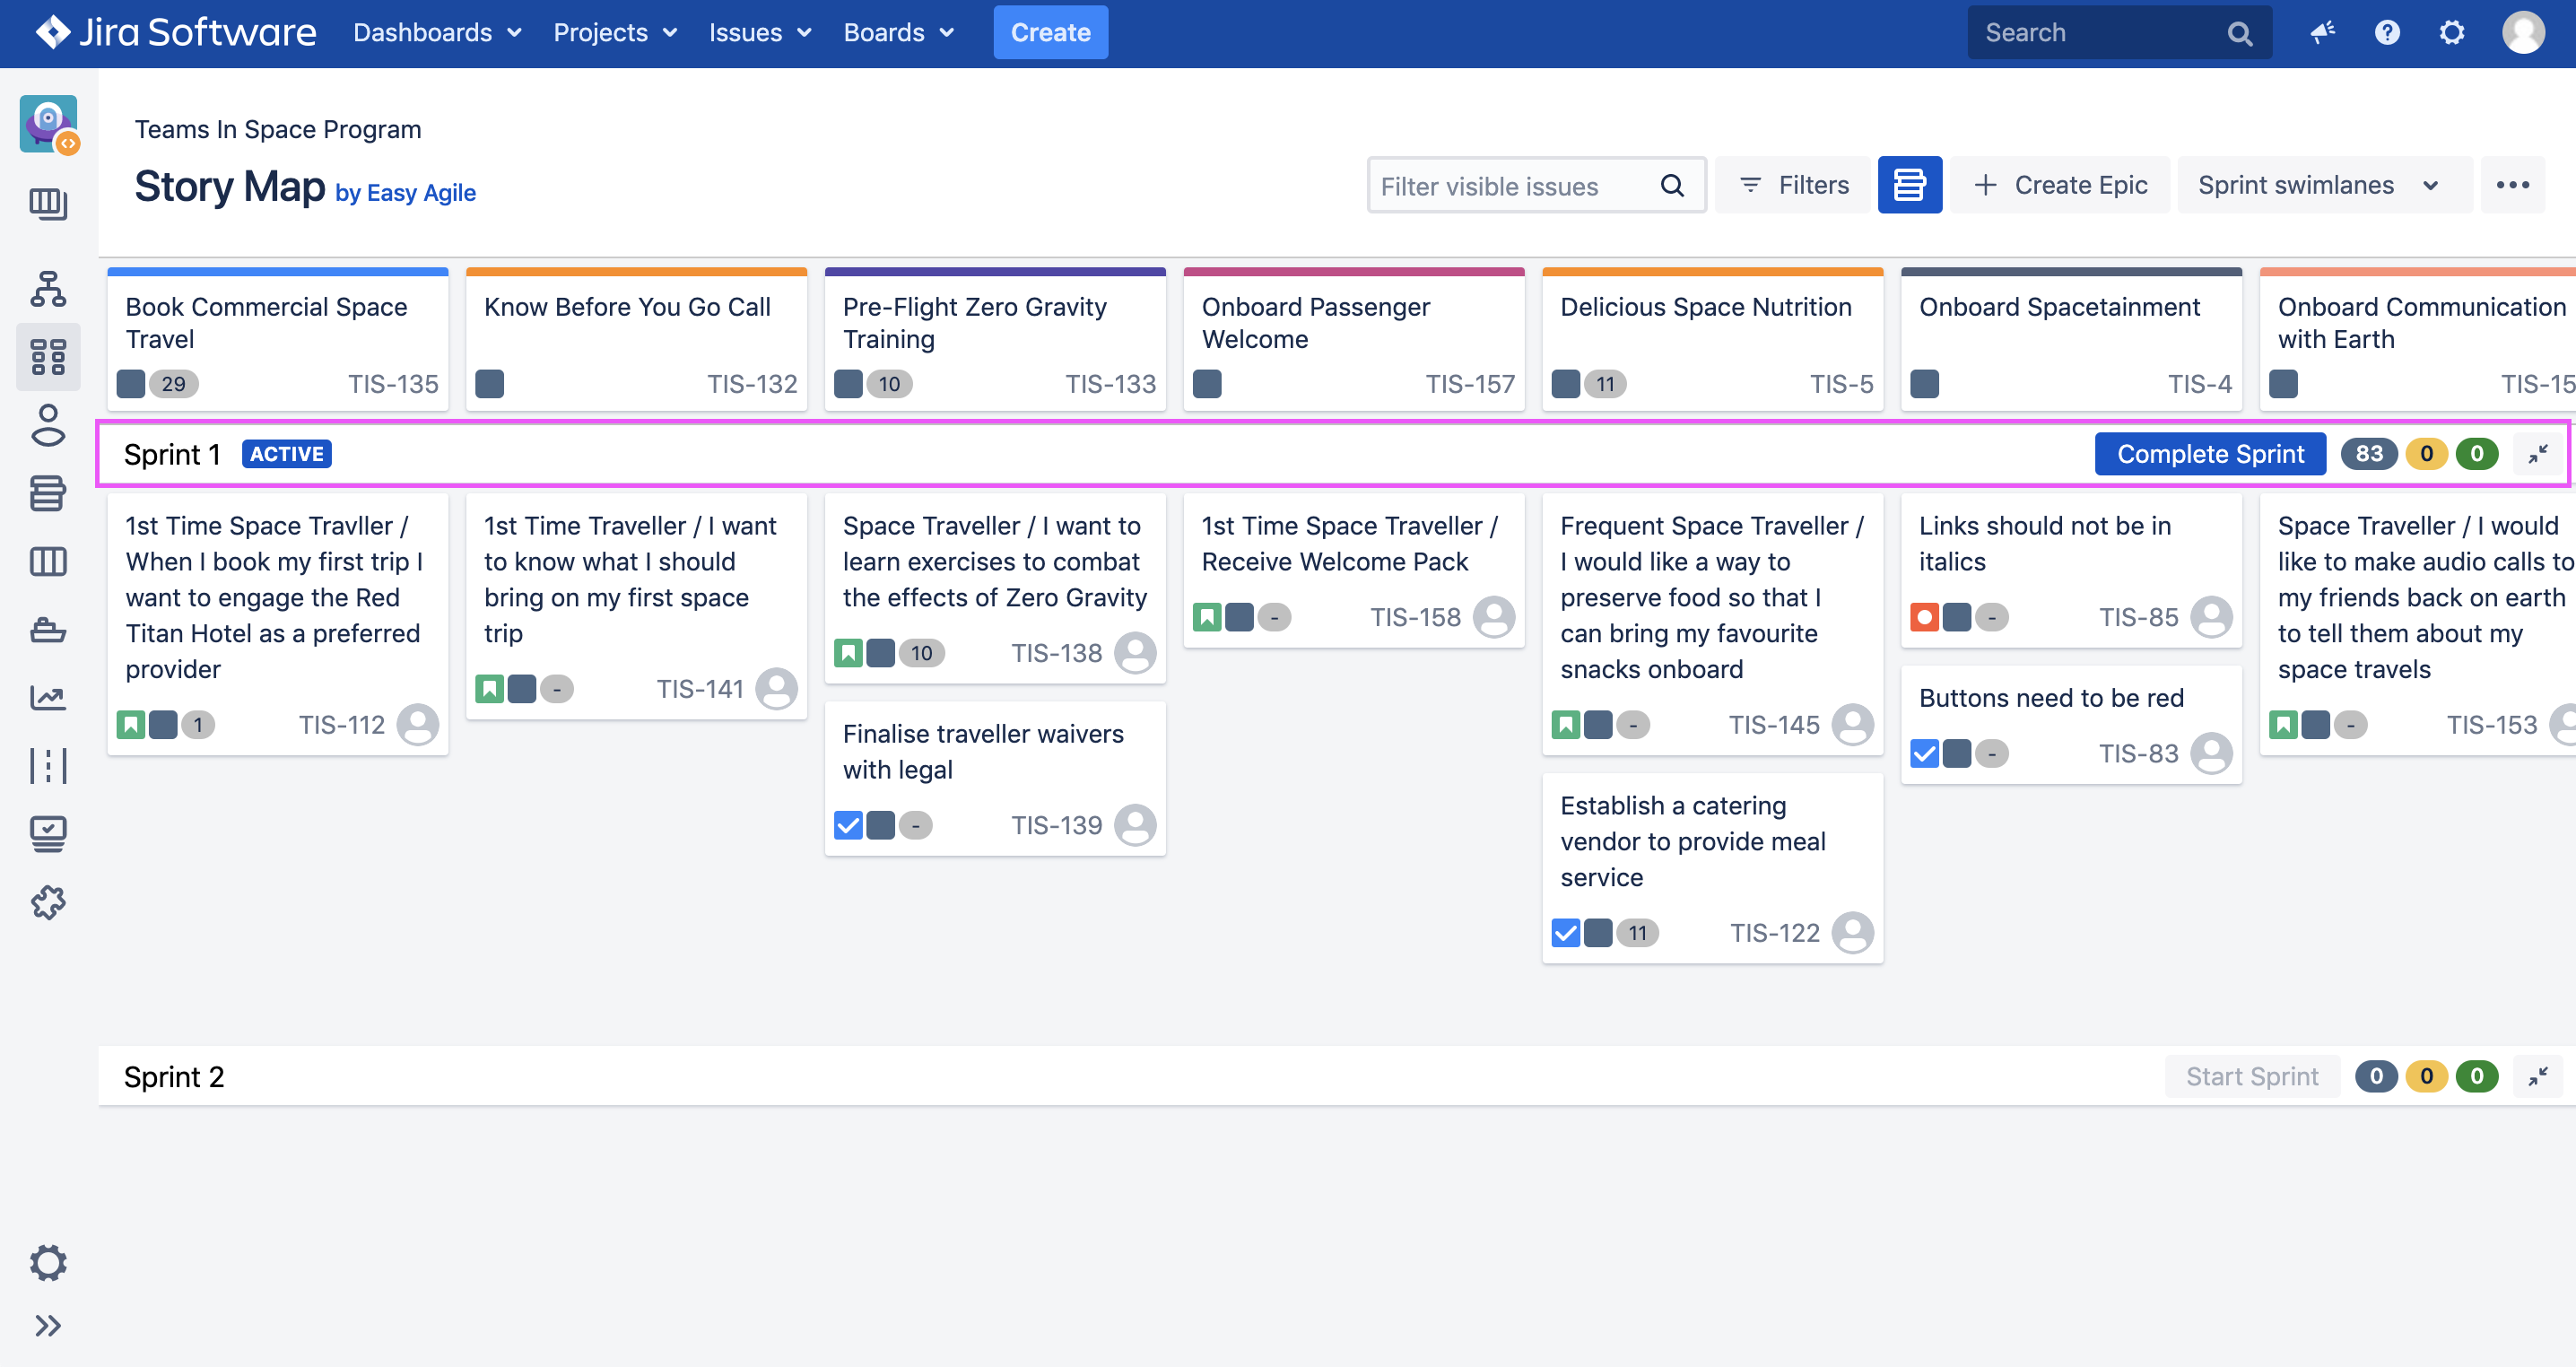
Your Sprint is now Active in Jira.
Completing a Sprint
Active Sprints will appear at the top of your Story Map with active written after their name.
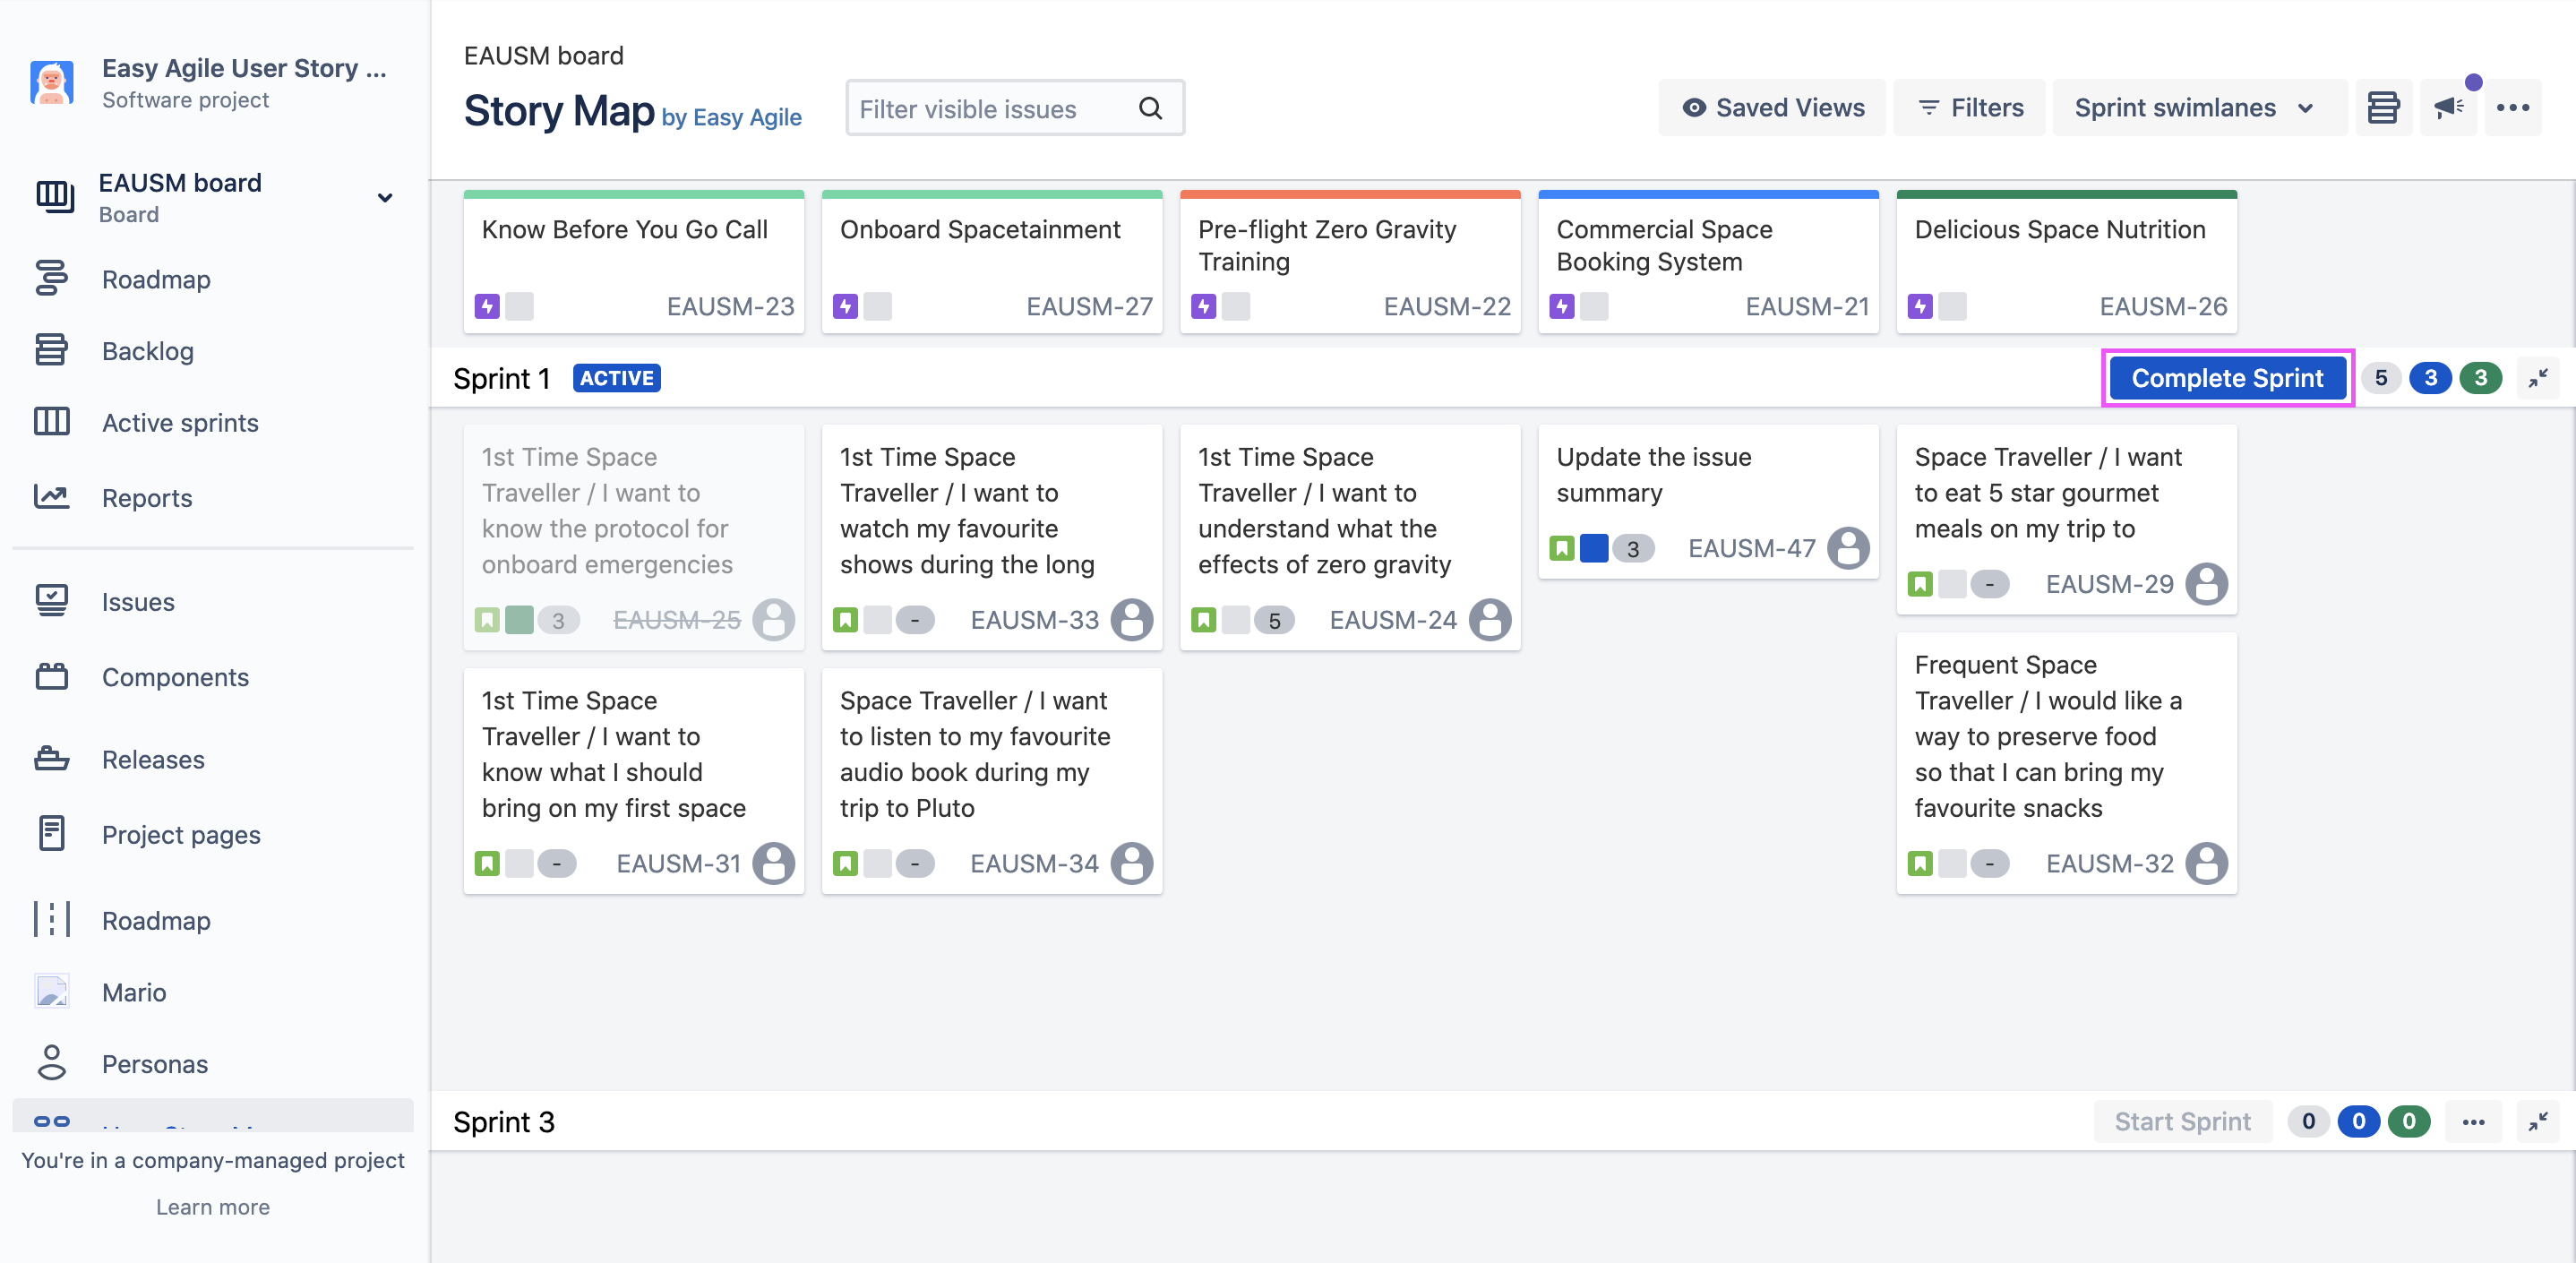
To complete an Active Sprint, click on the blue complete sprint button on the far right of your swimlane:
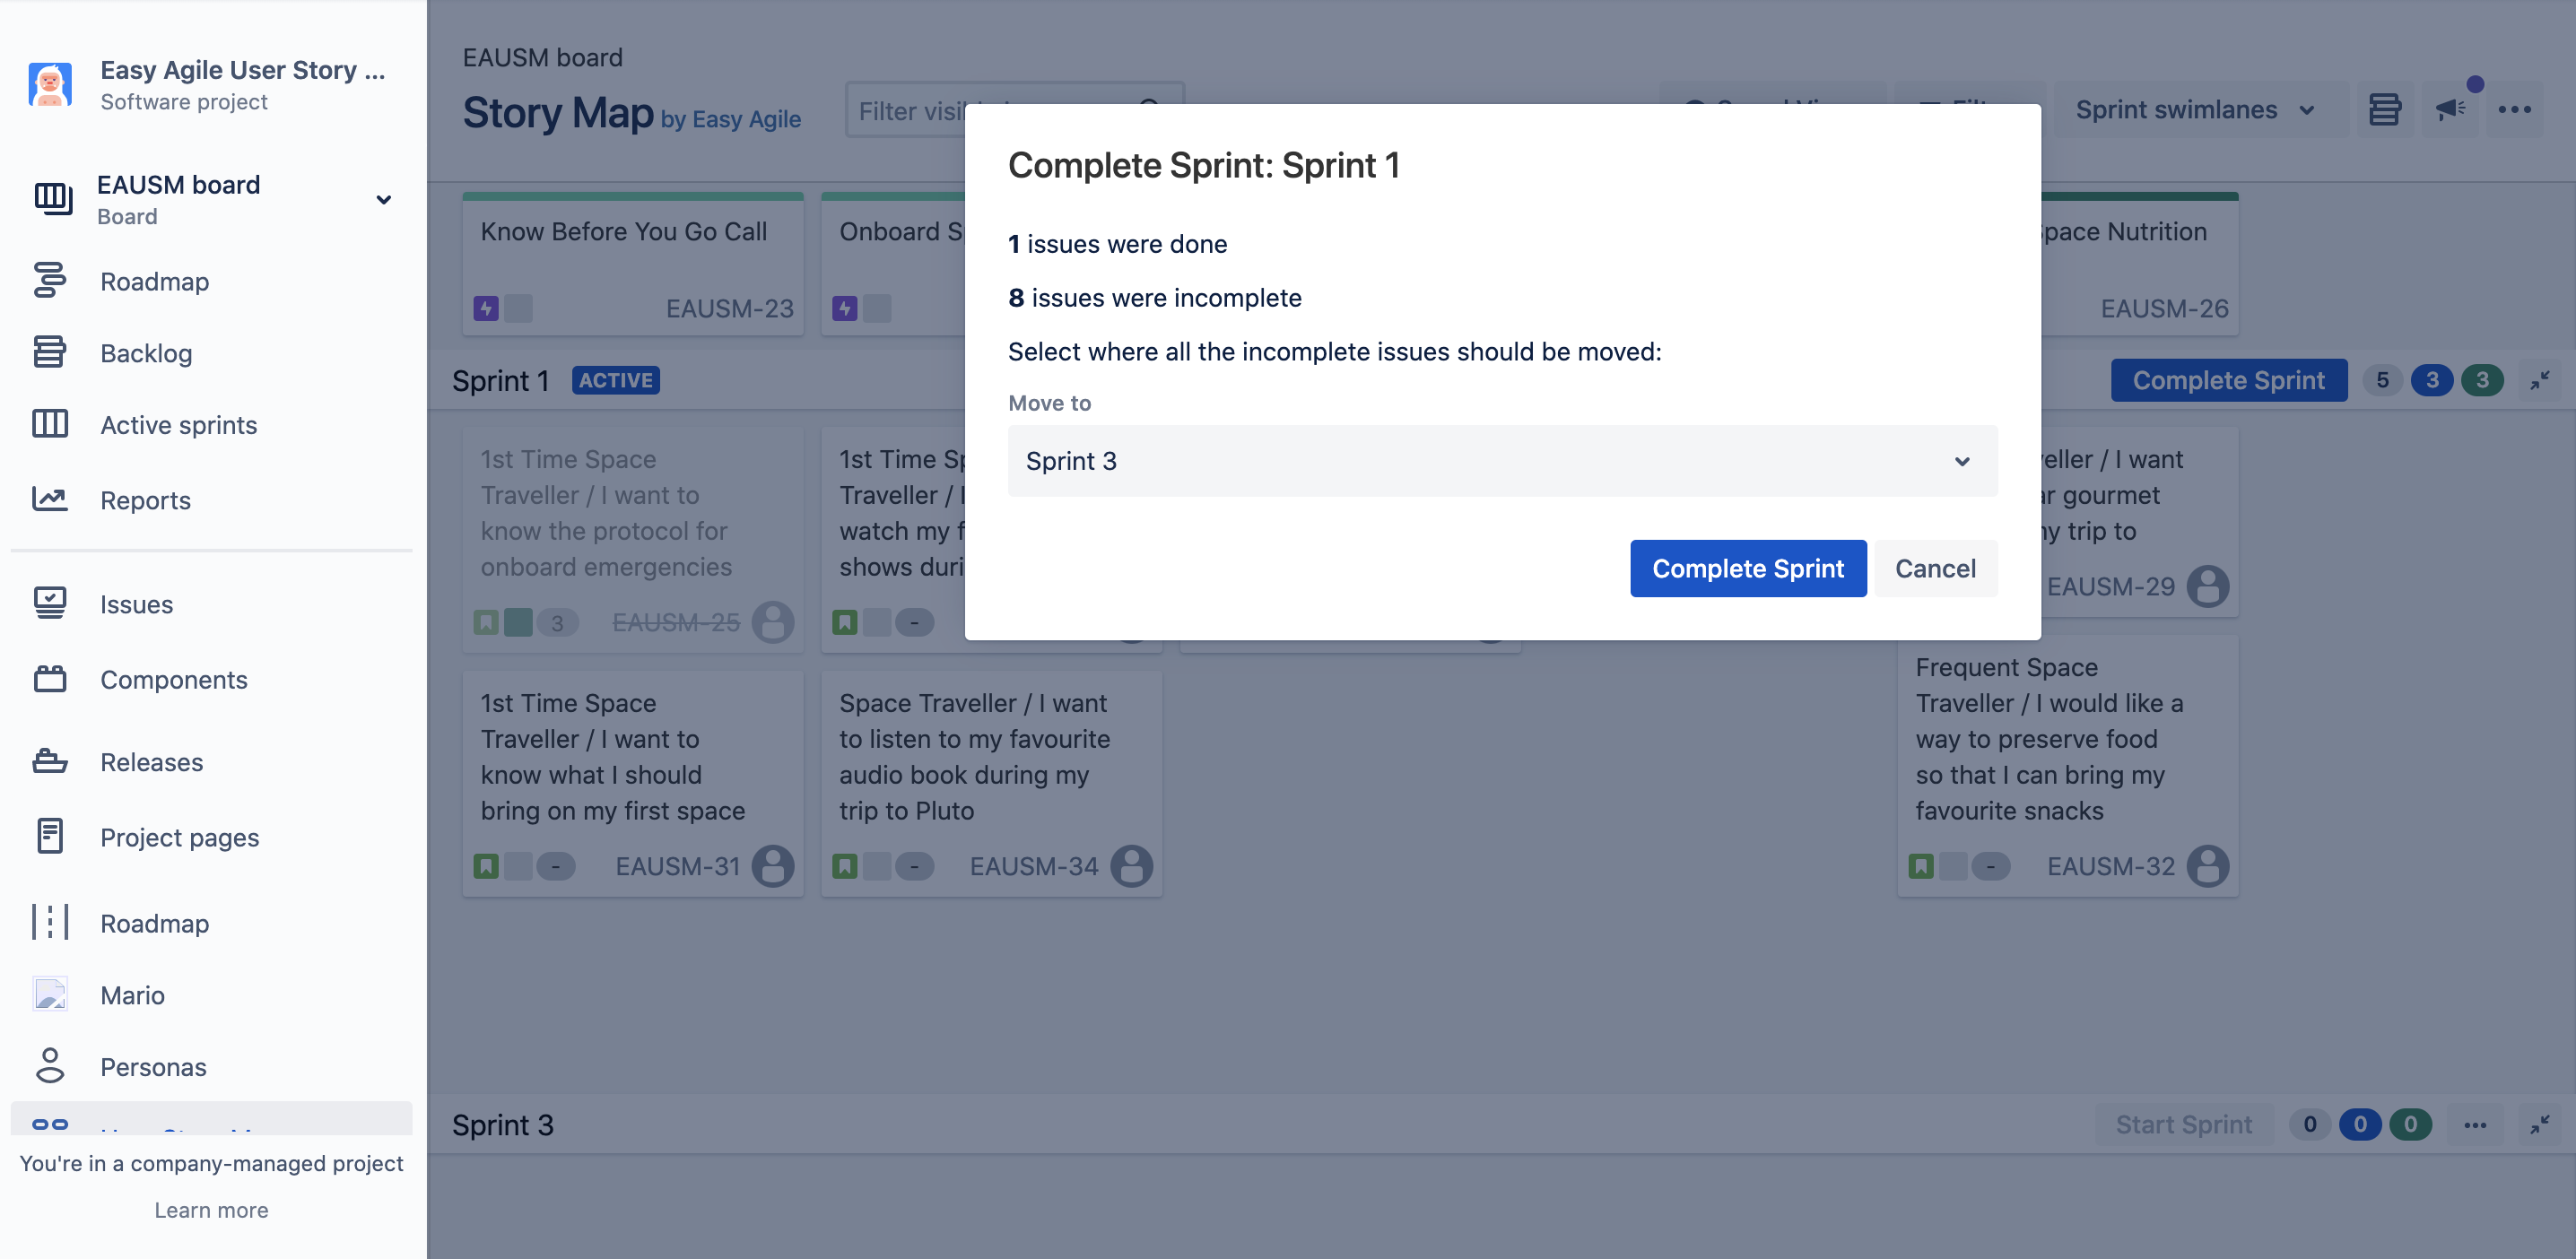
You will now see an overview of the status of issues in your Sprint. Under the move to heading, select where incomplete issues should be moved to, then click Complete Sprint.
Viewing Completed Sprints on the Story Map
The Story Maps is one of the easiest ways to view your completed Sprints in Jira. The ability to visualise the work completed in historic Sprints helps teams:
-
run Retrospectives
-
provide visibility into the progress of an entire project/product
-
use the Story Map for reporting
-
create strategic long-term plans which require a firm grasp on previous efforts
-
write release notes
-
adhere to regulatory compliance
-
identify “carry over” from Sprint to Sprint
To view Completed Sprints, select the Sprint swimlanes radio button from the Swimlanes dropdown. To the right of the panel, you’ll notice a section called SHOW COMPLETED SPRINTS:
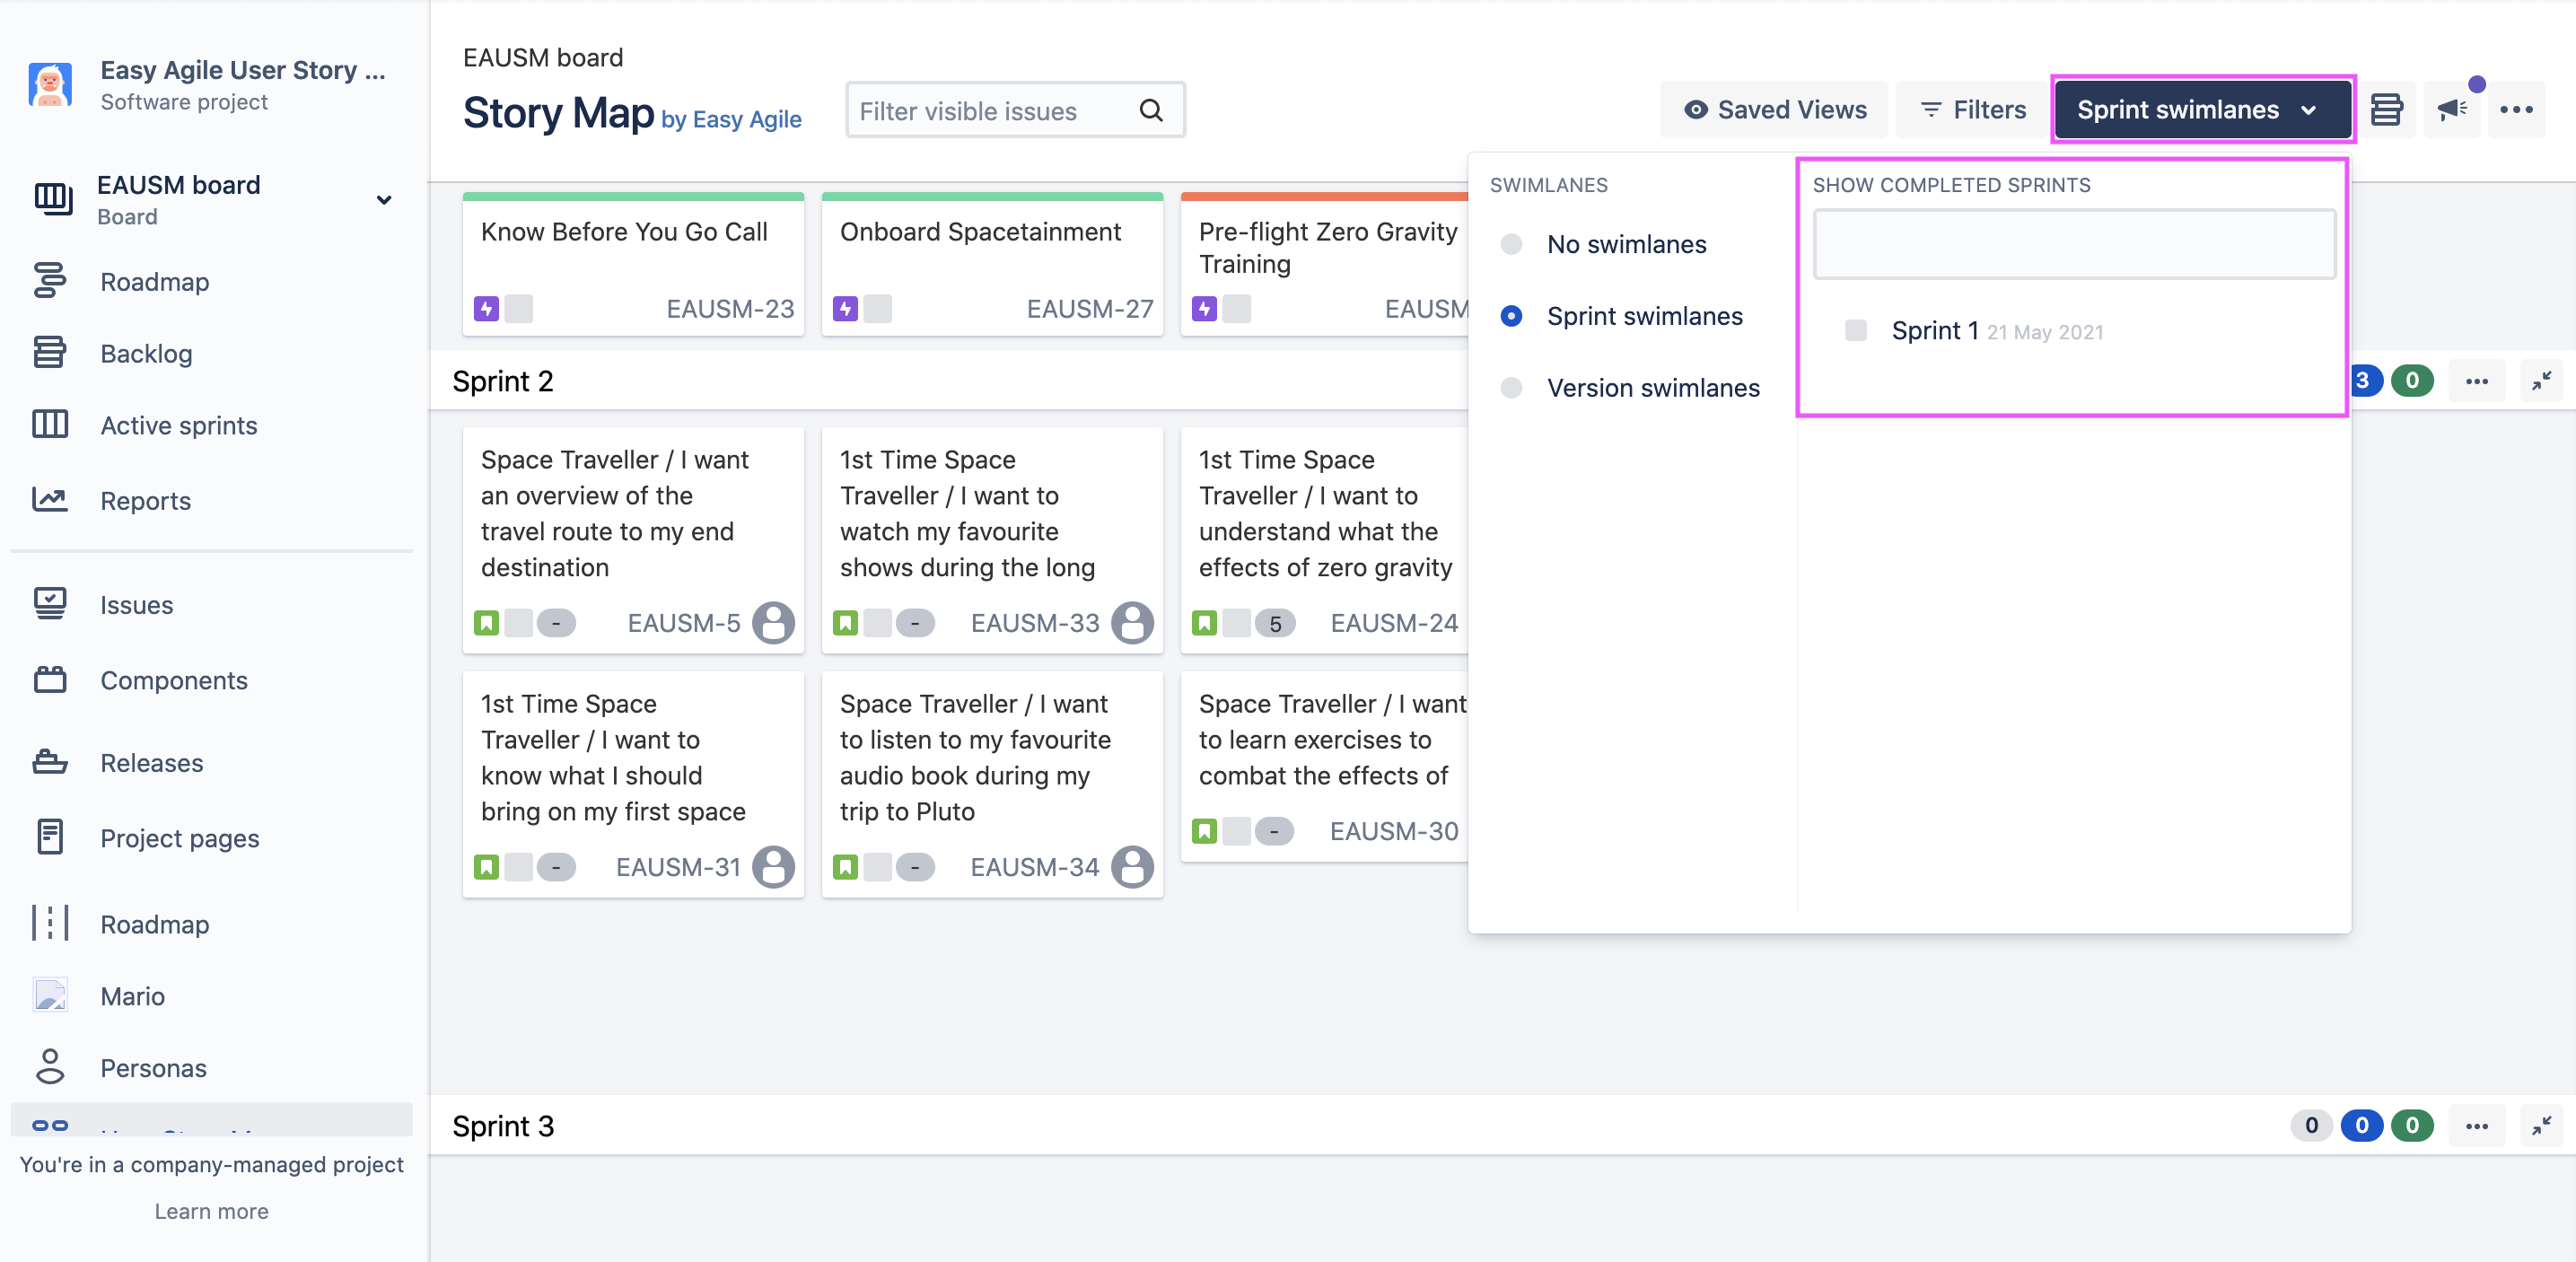
Here you will see a list of all your historic completed Sprints ordered by completed date (i.e. most recently completed Sprints will appear at the top of the list).
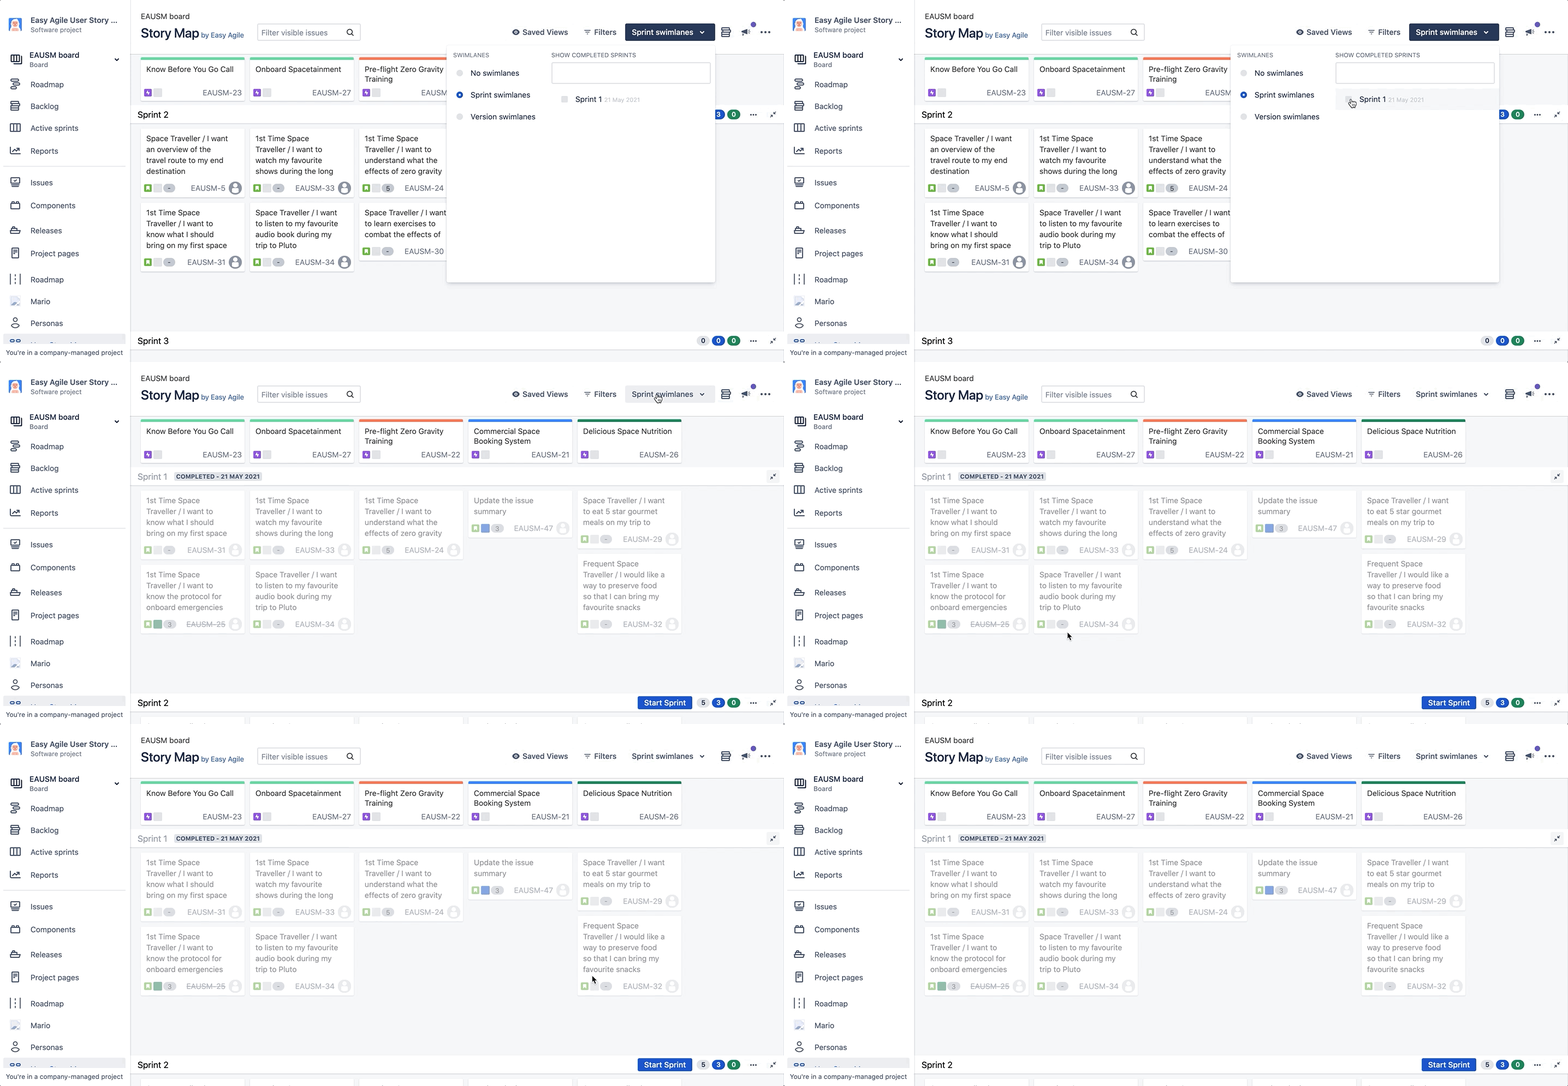
Select the completed Sprint/s that you would like to view on your Story Map to see a read-only snapshot of the Sprint when it was completed:
Hiding Completed Sprints from the Story Map
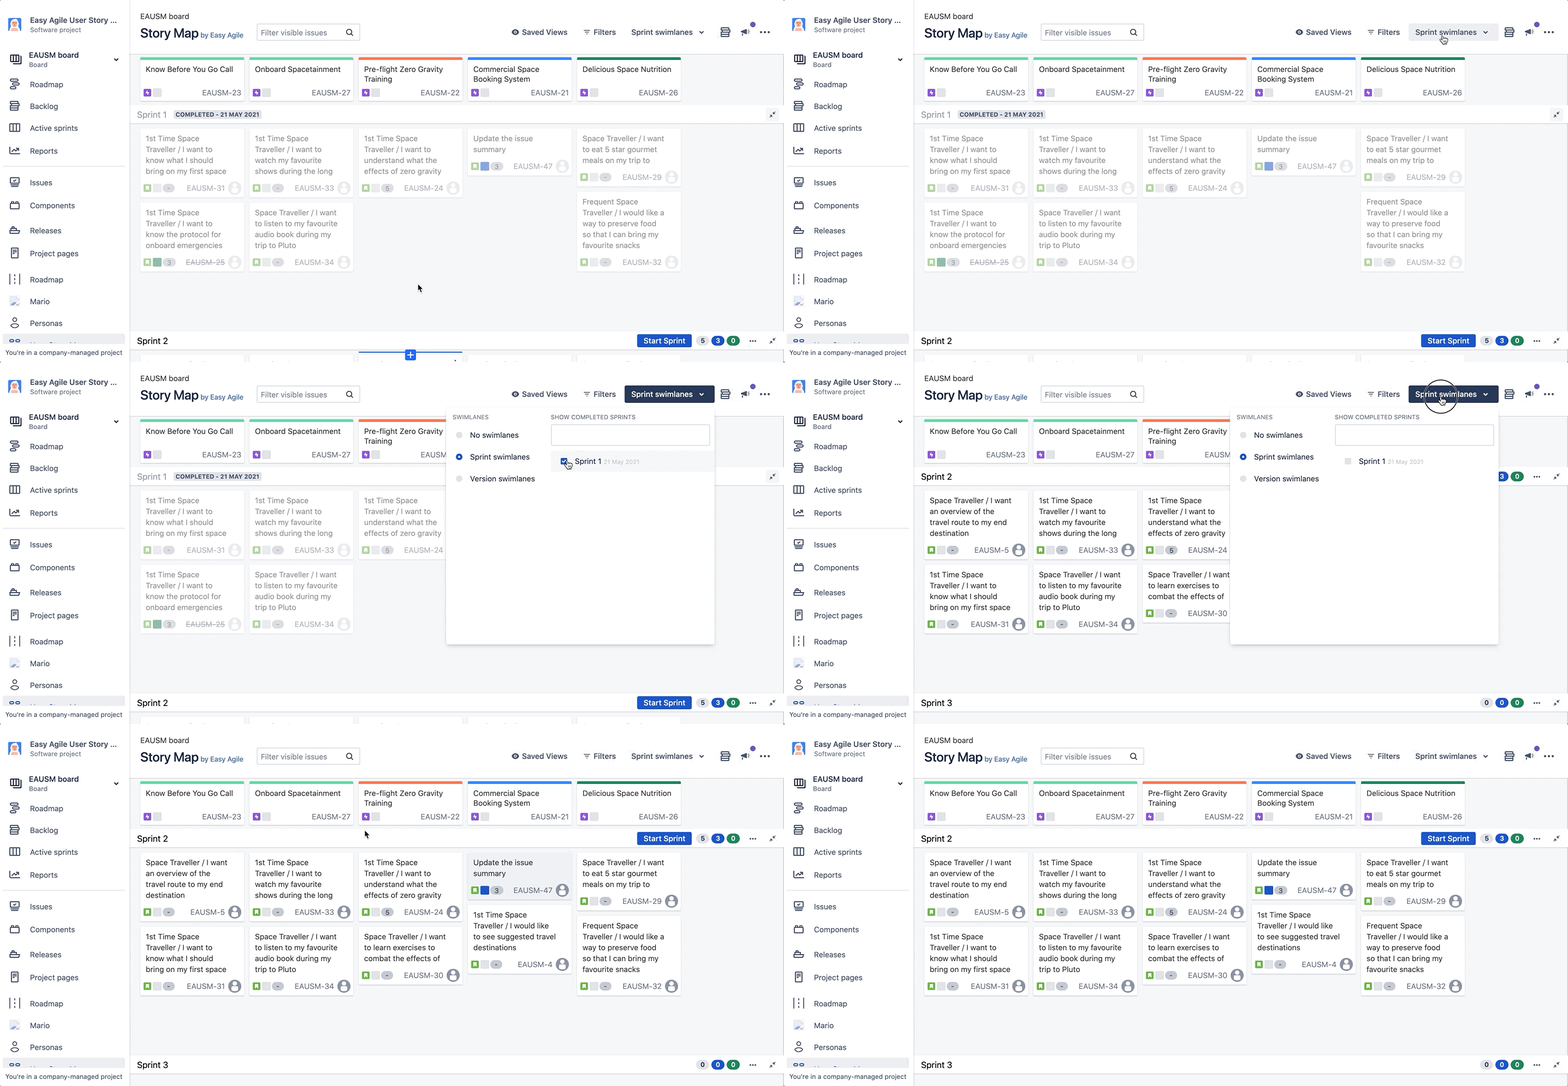
To hide completed Sprint/s from your Story Map, select the Sprint swimlanes radio button from the Swimlanes dropdown and de-select the Completed Sprint under the SHOW COMPLETED SPRINTS section:
Viewing Released Versions on the Story Map
The Story Maps is one of the easiest ways to view your Released Versions in Jira. The ability to visualise the work completed in historic Versions helps teams:
-
run Retrospectives
-
provide visibility into the progress of an entire project/product
-
use the Story Map for reporting
-
create strategic long-term plans which require a firm grasp on previous efforts
-
write release notes
-
adhere to regulatory compliance
-
identify “carry over” from Version to Version
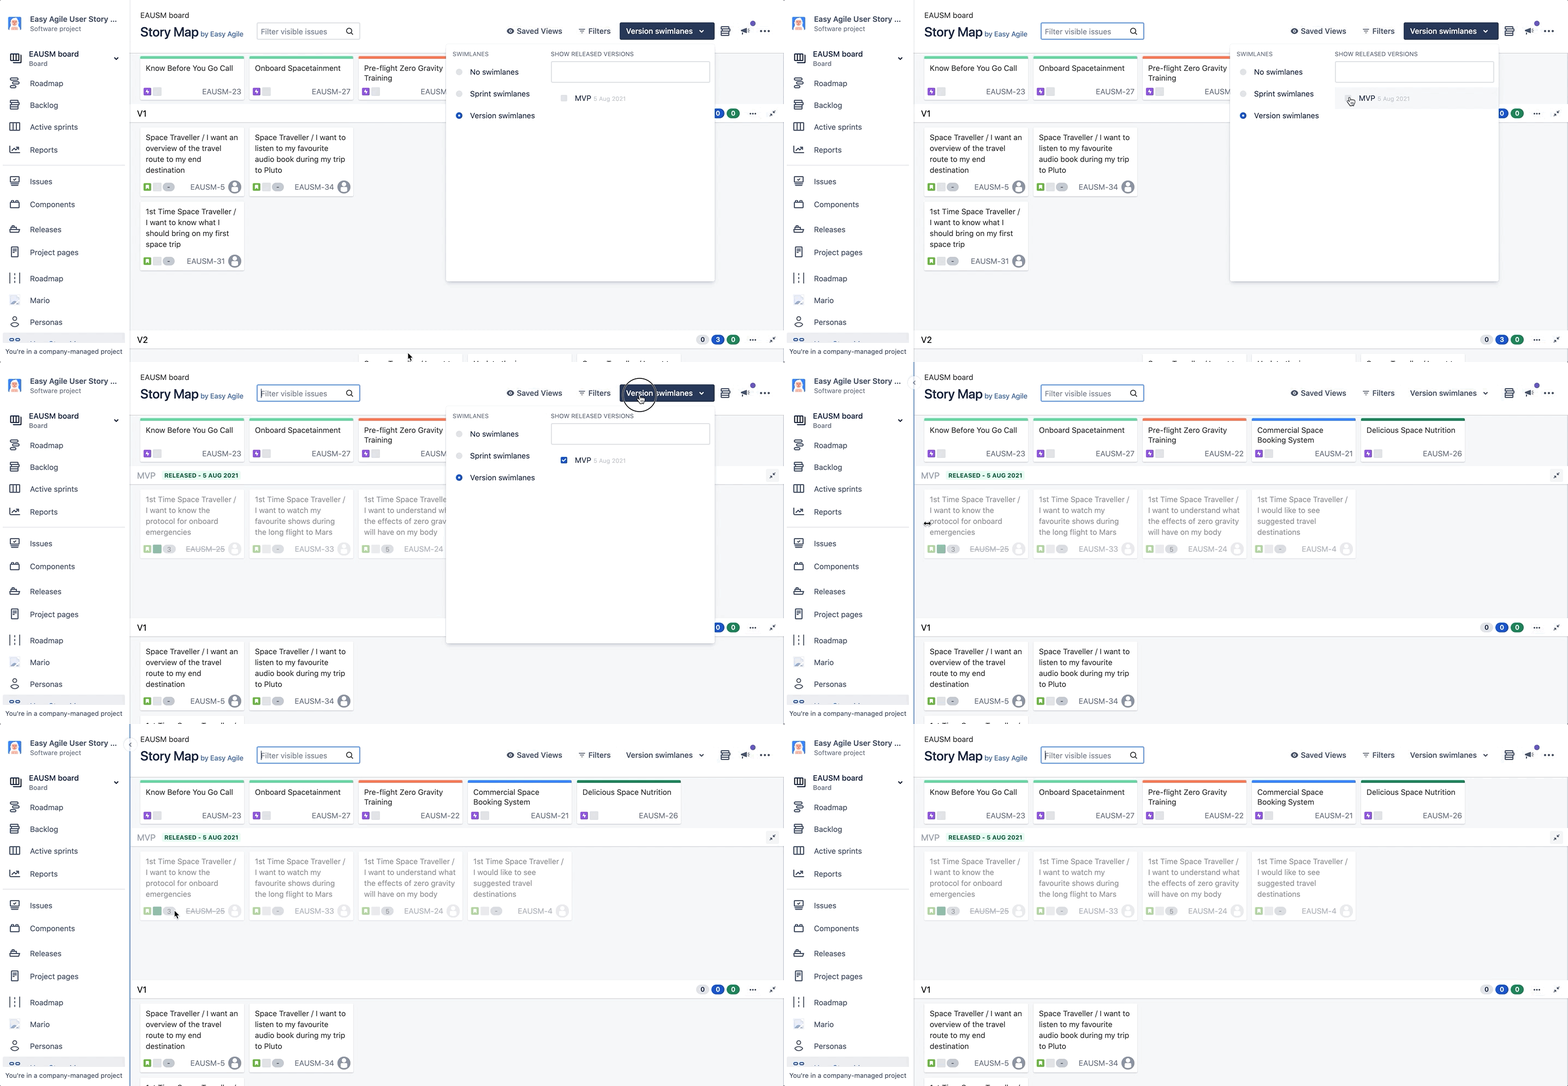
To view Released Versions, select the Version swimlanes radio button from the Swimlanes dropdown. To the right of the panel, you’ll notice a section called SHOW RELEASED VERSIONS:
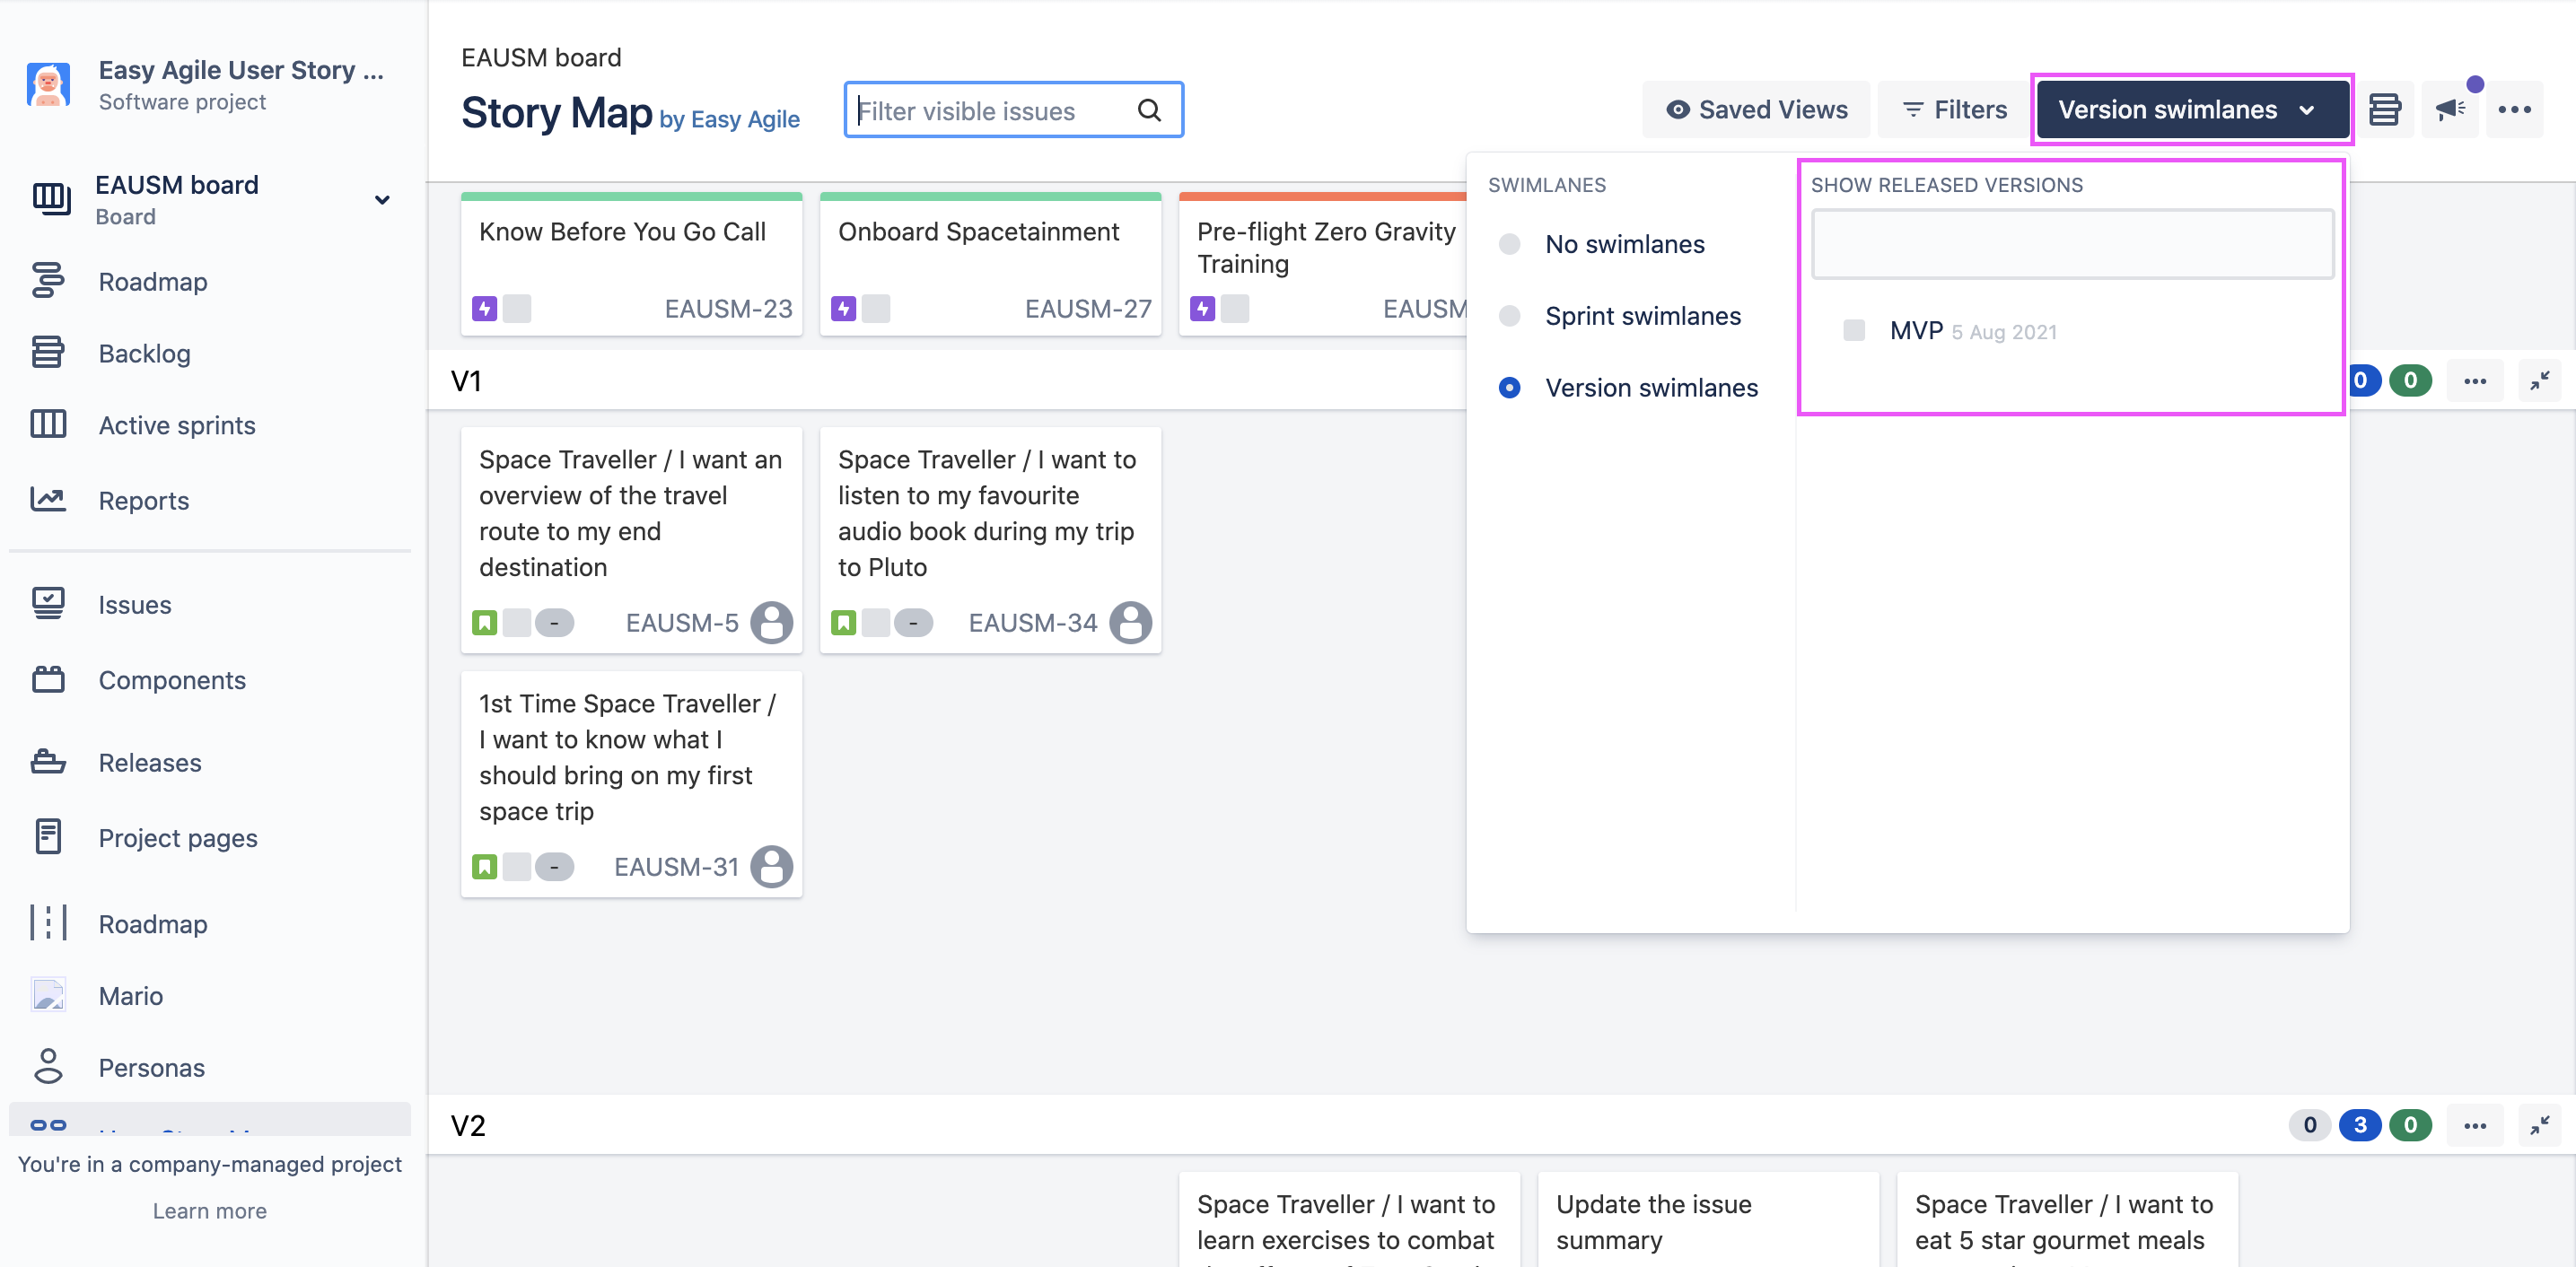
Here you will see a list of all your historic released Versions ordered by release date.
Select the released Version/s that you would like to view on your Story Map to see a read-only snapshot of the Version when it was completed:
Hiding Released Versions from the Story Map
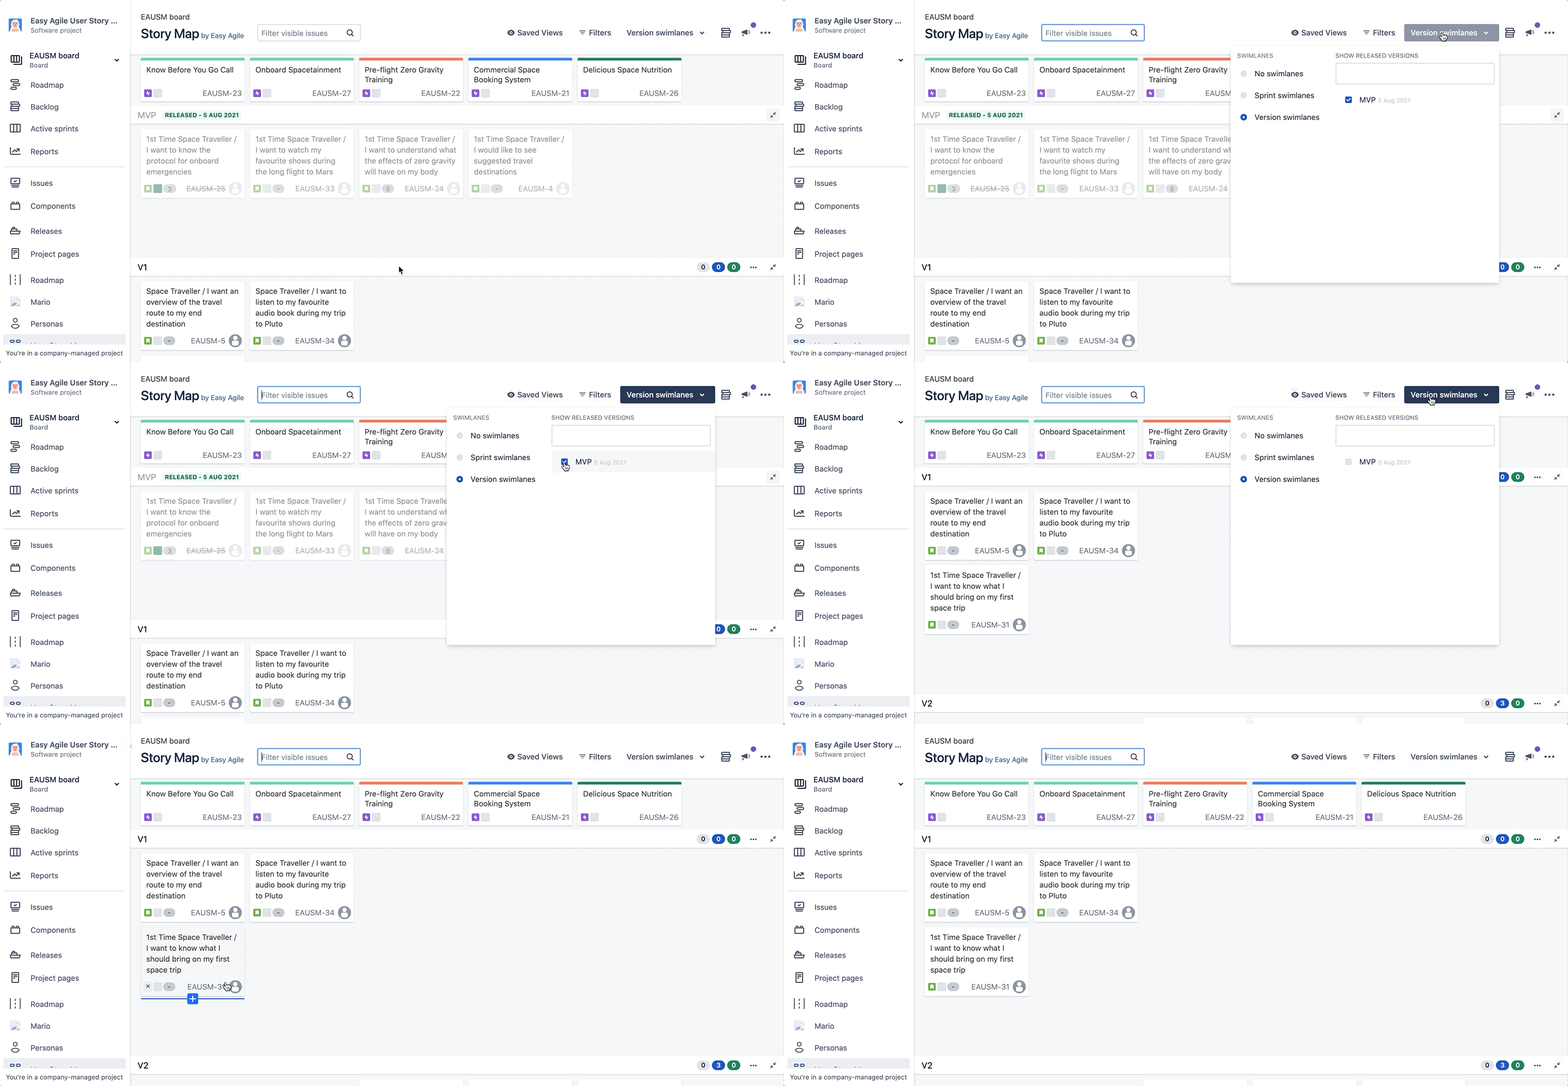
To hide released Version/s from your Story Map, select the Version swimlanes radio button from the Swimlanes dropdown and de-select the released Version/s under the SHOW RELEASED VERSIONS section:
What is the Backlog swimlane on the Story Map?
The Backlog swimlane appears at the bottom of your User Story Map.
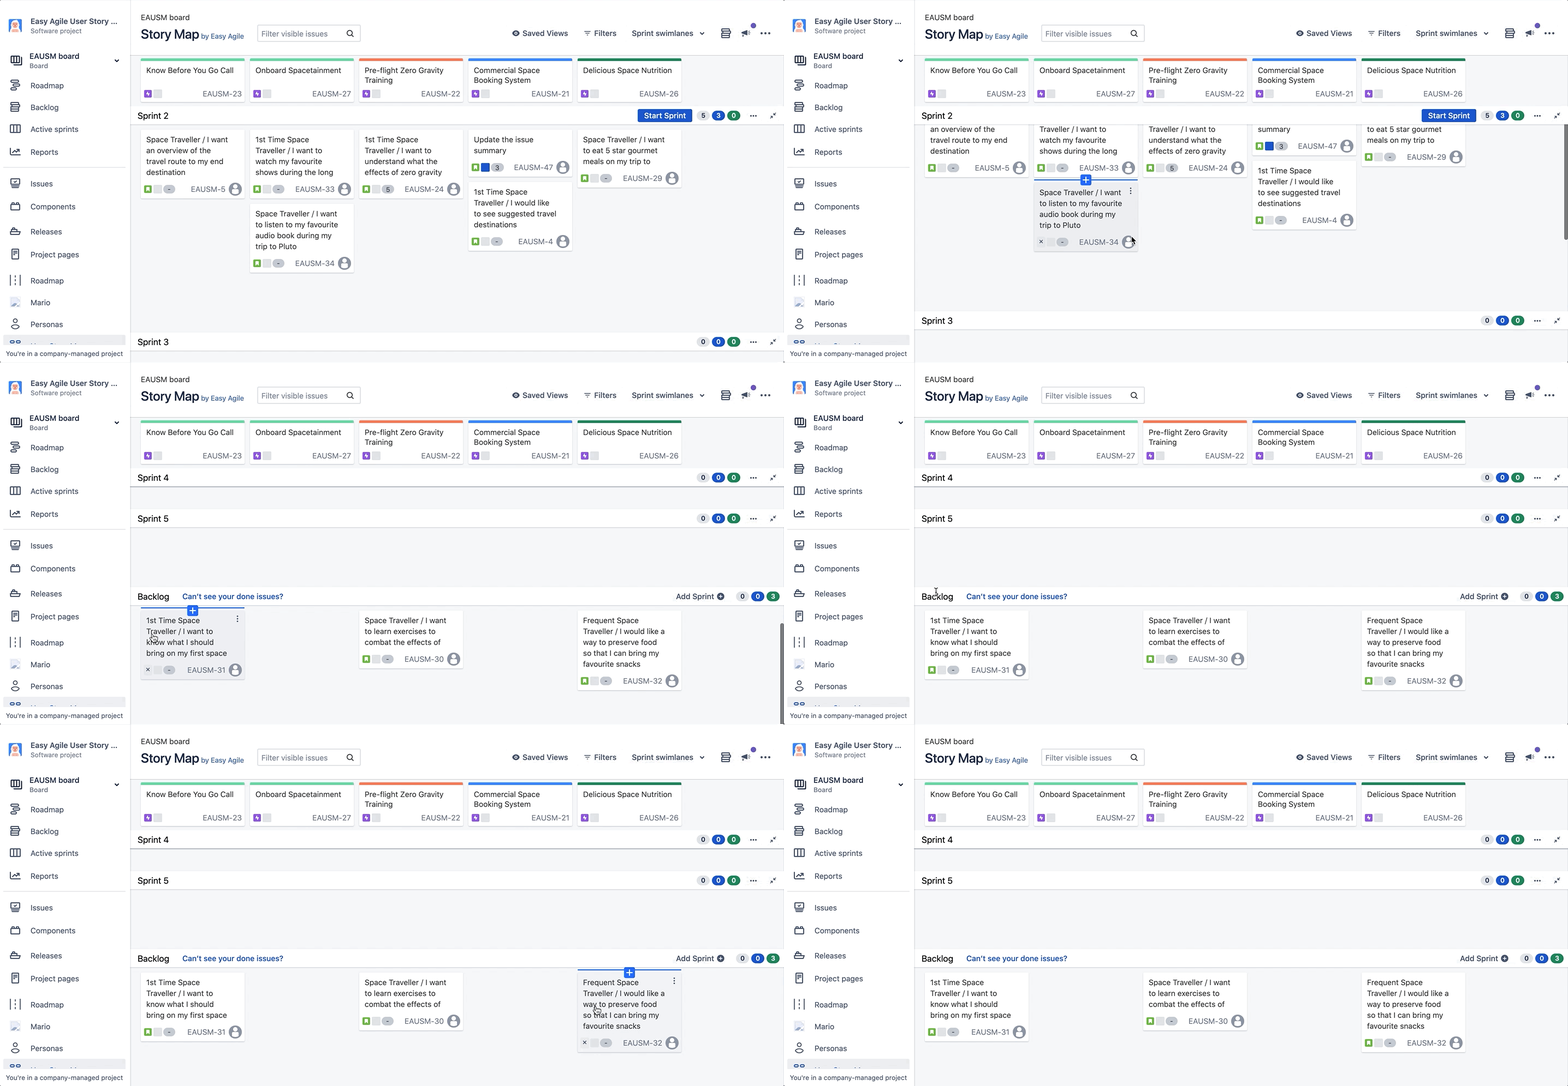
If you have Sprint Swimlanes toggled on, this swimlane holds all of the issues linked to an epic that have yet to be scheduled into a Sprint.
If you have Version Swimlanes toggled on, this swimlane holds all of the issues linked to an epic that have yet to be scheduled into a Version.