Skip table of contents

The user story map: epics and issues

Creating Epics on the Story Map

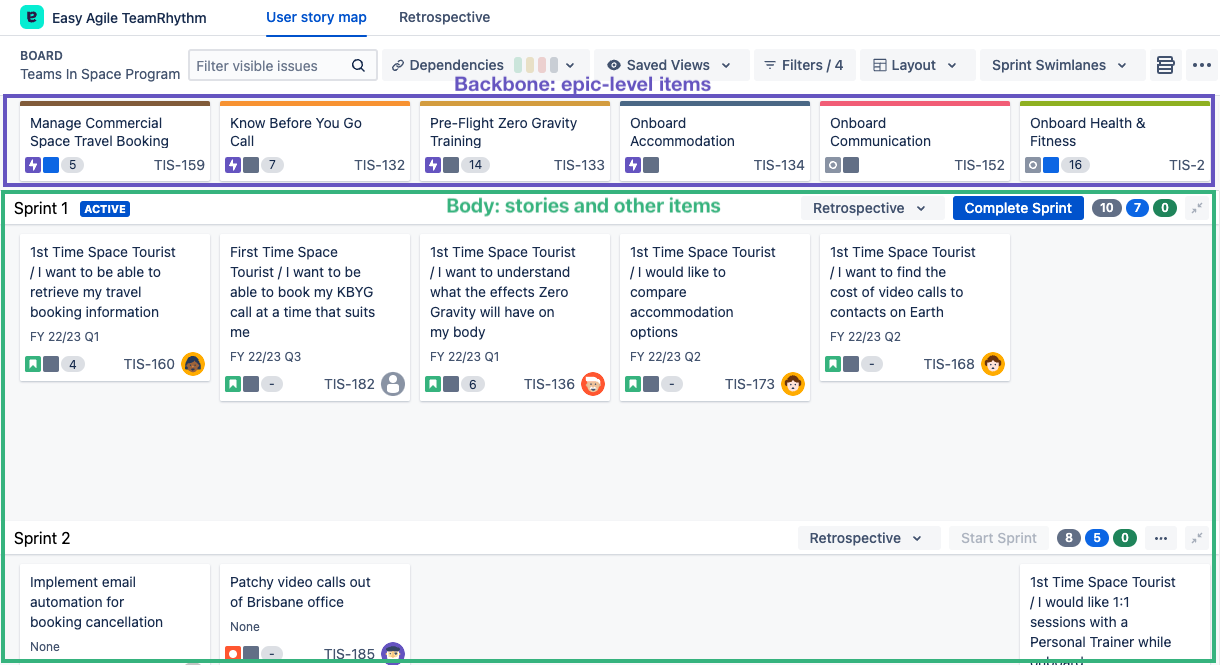
Epics from your Jira board line the top of your Story Map. The order of the epics on your Story Map is pulled directly from your Jira board:

To create an epic on the backbone of your User Story Map, place your cursor where you’d like to create a new epic and a plus sign will appear:

Clicking the plus sign will open a ‘Quick Create’ epic box where you can enter your epic name and then tick to save:

You can create multiple epics along the Story Map backbone by hitting enter:

You can also create Epics on the Story Map when Issue Hierarchy is enabled.


Creating Issues on the Story Map

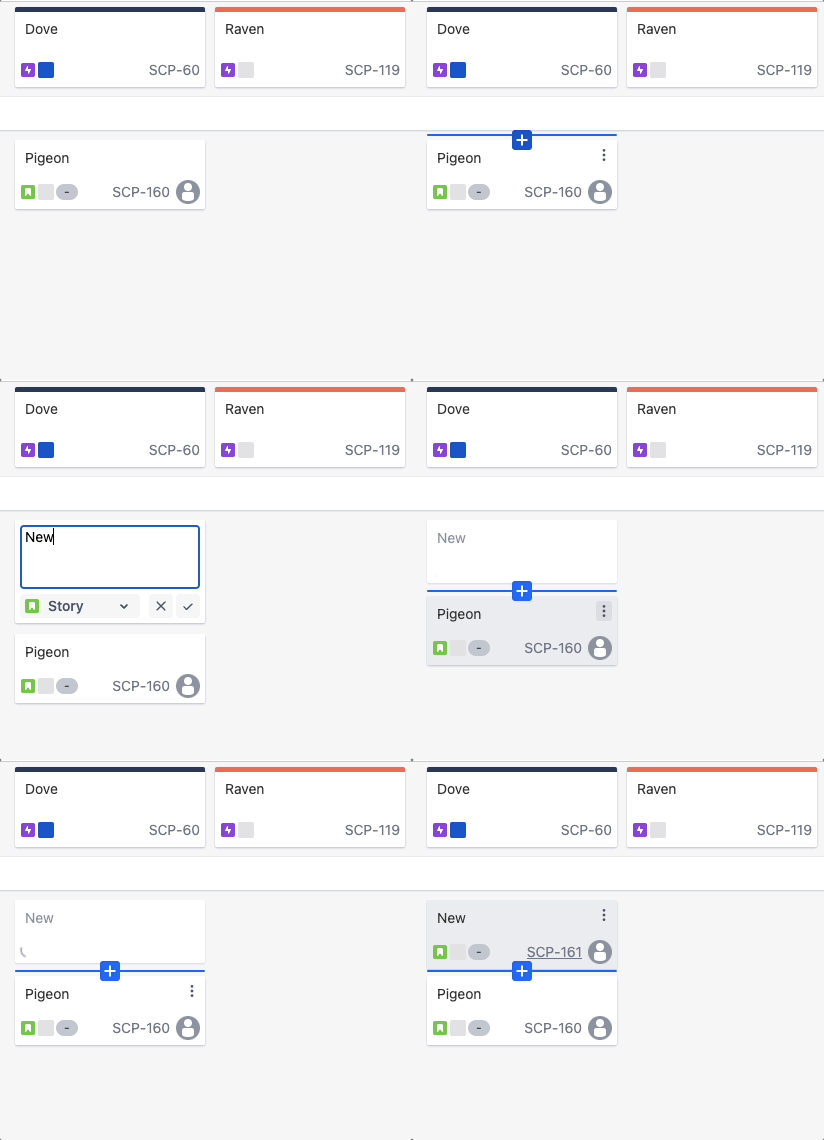
To create a new issue on the User Story Map, hover over any blank space under an epic and click anywhere in the blue box with the [+] sign.

Clicking on the blue box will create a new issue card. Simply type in the story summary and hit enter to continue creating issues beneath your chosen epic.

You can also create and rank new issues between other issues. Hover between 2 issues and click on the blue [+] sign.

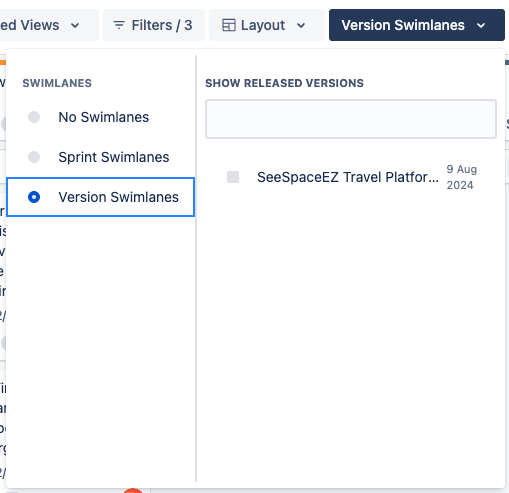
Issues will automatically be linked to the above epic in Jira, and scheduled into the Sprint or Version swimlane that they were created in.

For example, the newly created issue in the video above will inherit the EAUSM-26 - Delicious Space Nutrition epic link, and be scheduled into Sprint 1 on the Jira backlog.

Required fields

If your project has Required Fields the standard "Create Issue" dialog will appear when trying to create new issues.


Creating Sub-tasks on the Story Map

Sub-tasks for an issue will appear underneath that issue on the Story Map. You can expand/collapse the Sub-tasks view for each issue.


Create a sub-task on the Story Map using the Quick Actions menu

You can open the Quick Actions menu in 2 ways: right-click or by hovering over the issue and clicking on the  menu.

  • Open the Quick Actions menu

  • Click on Add a Sub-task

  • Type the Summary and hit enter to continue creating sub-tasks beneath your chosen issue

Subtasks cannot be created on the Story Map if the project has been configured with required fields for sub-task.


Create a sub-task on the Story Map using the + icon

You can create additional sub-tasks on an issue with existing sub-tasks by click on the + icon

  • Click on the + icon in the Sub-tasks expand/collapse bar

  • Type the Summary and hit enter to continue creating sub-tasks beneath your chosen issue


Scheduling Issues without Epics onto the Story Map

Epics from your board line the top of your Story Map and their linked issues sit below them in columns to form the Story Map. This means that only stories linked to an Epic are visible on the Story Map.

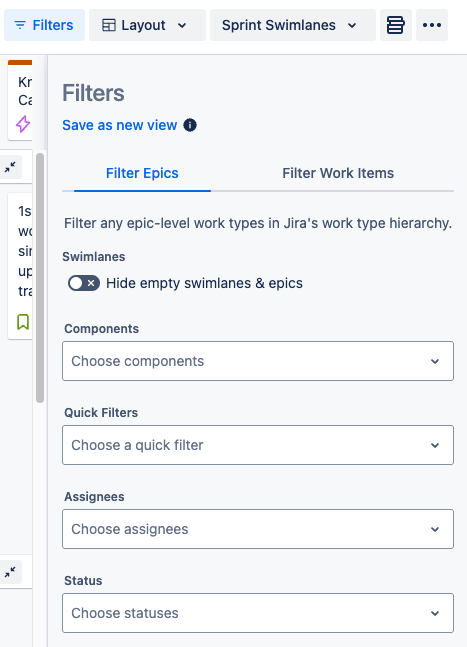
All issues that have not been linked to an Epic live in the Issues without Epics panel. The issues without Epic panel can be found in the top right of the Story Map header (shown below):

You can search for existing issues not linked to an epic in this panel by keyword, issue key or quick filters and multi-select and drag and drop them onto the Story Map.

Dragging an existing issue from your Issues without Epics panel onto the Story Map will link the issue to the epic it is placed under, and schedule the issue into the respective Sprint/Version depending on which swimlane it was dropped into.

In the above video, we dragged TIS-111 - Add Phobos and Deimos Tours as a Preferred Travel Partner from the Issues without Epics panel, onto the Story Map. We placed it below epic TIS-133 Pre-Flight Zero Gravity Training and into the Sprint 1 swimlane. By doing so, we have linked TIS-111 to the TIS-133 epic, and scheduled it into Sprint 1 on the Jira backlog.

You can remove the issues from the epic as well as the sprint at the same time using the quick action menu. Simply right click on the issue or click on the … icon on the issue and select Remove Issue from Epic and Sprint option.

Displaying additional fields on issue cards

You can configure cards on the Story Map to display up to 3 additional fields for all users.

To add fields to cards:

  1. Click the icon in the top right of the Story Map

  2. Under the Card Layout heading, select Card settings

3. Select up to 3 additional fields you want to display on your cards from the dropdowns

4. Click Save

5. Your fields will now display beneath the issue summary for all users:


Showing/Hiding the additional fields configured on issue cards

Users have the ability to toggle on/off the additional fields that have been configured to display on issue cards.

To show/hide the additional fields displayed on issue cards:

  1. Click on the Layout dropdown in the header of the Story Map

2. Under the CARD SETTINGS header, toggle on/off the fields you wish to show/hide on your issue cards:


Editing Epics on the Story Map

Epics can be quickly and easily edited on the Story Map.

Updating the Epic Name

The Epic Name field is what is displayed on the epic cards on the Story Map. To update an epic’s name, simply click on the epic name, and start typing! Hit enter when you want to save your changes.

Please note: editing the Epic Name field does not also update the Epic Summary. These two fields are separate and must be edited separately.

Editing other fields on an Epic (Summary, Description, Assignee Components etc.)

Server/DC

You can update additional fields on an epic via the Easy Agile Issue View. This can be opened by clicking on the issue key of the Epic. The Easy Agile Issue View shows native Jira fields that are configured to appear on your Issue Screen.

The Easy Agile Issue View currently shows the following fields:

  • Summary

  • Description

  • Components

  • Assignee

  • Versions

  • Status

  • Sprint

The following field types are also supported, provided they are on the ‘Edit Issue’ screen being used by your Project:

  • Single & multi-line text fields

  • Single & multi-select list fields

  • Numeric fields

In order to view the above field types in the Easy Agile Issue View, your Jira Administrator will need to add any relevant fields to the screen being used by your Project.

Here is a link to an Atlassian doc which walks you through how to add a field to a screen.

We’d love to hear what other field types you would like supported in the issue view here.

The native Jira Issue View can be opened from the Story Map by ctrl+click on Windows or cmd+click on a Mac on the issue key. Alternatively, clicking the issue key in the issue preview editor will also open the Issue in a new tab.

Cloud

You can update additional fields on an epic via the native Jira edit issue modal. This can be opened by clicking on the issue key of the Epic.


Editing Issues on the Story Map

Issues can be quickly and easily edited on the Story Map.

Updating the issue summary

The issue summary is what is displayed on the issue cards on the Story Map. To update the issue summary, simply click on the issue summary, and start typing! Hit enter when you want to save your changes.

Editing other fields on an Issue (Summary, Description, Assignee Components etc.)

Server/DC

You can update additional fields on an issue via the Easy Agile Issue View. This can be opened by clicking on the issue key. The Easy Agile Issue View shows native Jira fields that are configured to appear on your Issue Screen.

The Easy Agile Issue View currently shows the following fields:

  • Summary

  • Description

  • Components

  • Assignee

  • Versions

  • Status

  • Sprint

The following field types are also supported, provided they are on the ‘Edit Issue’ screen being used by your Project:

  • Single & multi-line text fields

  • Single & multi-select list fields

  • Numeric fields

In order to view the above field types in the Easy Agile Issue View, your Jira Administrator will need to add any relevant fields to the screen being used by your Project.

Here is a link to an Atlassian doc which walks you through how to add a field to a screen.

We’d love to hear what other field types you would like supported in the issue view here.

The native Jira Issue View can be opened from the Story Map by ctrl+click on Windows or cmd+click on a Mac on the issue key. Alternatively, clicking the issue key in the issue preview editor will also open the Issue in a new tab.

Cloud

You can update additional fields on an issue via the native Jira edit issue modal. This can be opened by clicking on the issue key.


Updating the Status Category of an issue on the Story Map

In Jira, there are 3 status categories - To Do, In Progress and Done.

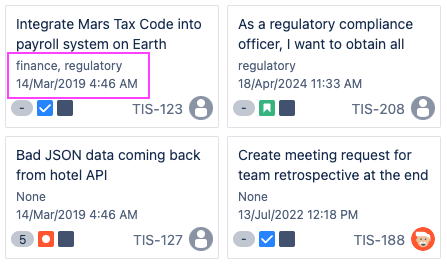
The status category of an issue is shown on every card via corresponding status category color, next to the issue type icon:

Issue on the Story Map in the TO DO status category

Issue on the Story Map in the IN PROGRESS status category

Issue on the Story Map in the DONE status category

Viewing the Status of an Issue

In Jira, you can map status' to one of the 3 pre-defined status categories (To Do, In Progress, Done). An issue's status indicates its current place in the project's workflow.

For example:

Status

Status Category

Thinking About

TO DO

In Review

IN PROGRESS

Won’t Do

DONE

To view the status of an issue on the Story Map, simply hover over the status category color on the card:

Updating the Status of an Issue

You can transition issues and epics between status' without leaving the Story Map. Learn how below:

Server/DC

You can update the status of an issue or epic via the Easy Agile Issue View. This can be opened by clicking on the issue key and using the Status dropdown:

Note: this is not possible for where a transition screen has been defined in the workflow. For more information about creating and editing workflows as a Jira Administrator, see Atlassian’s page Work with issue workflows.

Cloud

You can update the status of an issue or epic via the native Jira edit issue modal. This can be opened by clicking on the issue key and using the Status dropdown:


Estimating Issues on the Story Map

The Story Map uses the same estimation statistic being used by the Jira board. Estimation on the Story Map is compatible with the following Estimation Statistics:

  • Story Points

  • Original Time Estimate

For example, if a board is configured to Story Points, the Story Map will also display Story Points.

Estimates are displayed on the issue cards on the Story Map as below:

Estimated issue card on the Story Map

Unestimated issue card on the Story Map


To estimate an issue on the Story Map, click on the estimation pill on the issue card, enter your estimation value and hit enter:

You can view a roll-up of estimates by status category on the right-hand side of the Sprint or Version swimlane:

This shows an overview of how many Story Points (or Original Time Estimate) are in the To Do, In Progress and Done status categories for that Sprint or Version.

  • Estimation is only available on Scrum Boards. While an estimation field can be added to the Issue screen on a Kanban board, this estimation is not included on the User Story Map.

  • When using a Team-Managed (Next-Gen) project, you must have both the Sprints and Estimation features enabled in your project settings to use estimation.

For more information on how Board Administrators can manage estimation statistics, see Atlassian’s page Configure estimation and tracking.


Deleting Issues on the Story Map

Issues can be deleted from the Story Map using the Quick Actions menu. You can open the Quick Actions menu in 2 ways: right-click or by hovering over the issue and clicking on the  menu.

You can also delete multiple issues from Story Map. Select the issues required to be deleted and right-click to open the Quick Actions menu. Select Delete to delete the issues from Story Map and Jira.

Ranking & Scheduling Issues on the Story Map

Issues can be moved around the User story map in 2 ways: drag-and-drop or via the quick actions menu

Reorder with drag-and-drop to change rank

Drag and drop issues or epics on the User story map to change their order. This also updates the order/rank in Jira.

GIF of a portion of the user story map, dragging an epic one place to the right and an issue one place up

Read more about Order, rank, and drag and drop and Jira board settings.

Note that drag-and-drop is only enabled if your Jira board is ordered by Rank. Learn about resolving drag and drop errors by enabling Ranking.

Issues can be dragged and dropped across epic columns to change the epic link:

In the example above, we moved issue TIS-137 from the Know Before You Go Call epic, to the Pre-flight Zero Gravity Training epic

HOT TIP

You can drag multiple issues from one epic to another, by using the SHIFT key. Press and hold the SHIFT key. With the SHIFT key held, click on the issues you want to move and drag them across to their new epic.


Drag and Drop to schedule an issue into a Sprint/Version

Issues can be dragged and dropped between swimlanes to update the Sprint/Version they are scheduled in:

In the example above, we moved issue TIS-137 from Sprint 1 to Sprint 2.

HOT TIP

You can drag multiple issues from one Sprint/Version to another, by using the SHIFT key. Press and hold the SHIFT key. With the SHIFT key held, click on the issues you want to move and drag them across to their new swimlane.

Quick Actions menu to schedule an issue into a Sprint

Issues can also be scheduled into a Sprint using the Quick Actions menu. You can open the Quick Actions menu in 2 ways: right-click or by hovering over the issue and clicking on the menu

You can schedule multiple issues to be scheduled into a Sprint using the Quick Actions menu. Select the required issues and right click to open the Quick Actions menu.

Quick Actions menu to reorder epics

You can move the epics far left or far right via the quick actions menu. Right-click on the epic or click on the … icon on the epic to display the quick action menu and then select the required option.


Epic Statistics on the Story Map

In Jira Data Center, a progress bar will show at the top of epic cards on Scrum boards.

Epic statistics shown as the blue progress line under the Epic color

This progress bar is pulled in from the Jira backlog and hovering over the blue line on the Story Map reveals the epic statistics.

  • For example, if the stories linked to an Epic have a total of 12 story points, and an issue worth 3 story points is marked as Done, the progress bar will be at 25%.

Epic statistics in the Jira backlog

Epic statistics found on the Story Map

This progress is calculated based on the Estimation Statistic configured in Board settings (i.e. Story Points or Original Time Estimate).

  • Estimation is only available on Scrum boards as Kanban boards do not have an Estimation statistic setting.

Epic progress is not yet available on Jira Cloud due to a limitation of Atlassian’s API: progress on this feature can be tracked on Atlassian’s Jira Cloud backlog here: JSWCLOUD-14710: Expose Epic Statistics in JIRA Software API.

JavaScript errors detected

Please note, these errors can depend on your browser setup.

If this problem persists, please contact our support.